.png&blockId=78c9ff9a-717f-4cfb-9b99-87bbb83a5b89)


Smartship's new SKU management page will be available starting in October 2023. Starting in September, existing users will be able to preview the new SKU management page feature, and starting in October, you will be using the new version of the SKU management feature.
What has changed
•
You can view and manage products & options in one grid.
•
Powerful batch editing: The ability to select multiple skus at once to change their properties or delete them in bulk is provided.
•
Convenient stock management: By selecting multiple SKUs, you can quickly check availability of only the selected SKUs, and easily add the selected SKUs to the warehousing list.
List
1.
What is a SKU?
2.
Bulk registration through Excel
3.
Register product through page
4.
How to Register Combination Options
5.
Search grid and bulk editing
6.
How to register seller defined code
7.
Warehouse stock information and warehousing request list
8.
Shipping warehouse settings
9.
Sales site product information
10.
Customs and Tax Information
11.
SKU sharing
12.
Appendix
a.
SET SKU
b.
Automatically registered products
c.
Import sales site products
1. What is a SKU?
SKU is a unit that manages stock in the Qxpress fulfillment center and can be understood as a concept corresponding to product options on sales sites. Smartship provides a function to manage SKUs in a similar concept to product management on sales sites.
Classification of Products According to Option Type
Products registered through the SKU management page are divided into single products (single option) and option products (multi-option) depending on the availability of options. A single product is a single SKU without any other options within the product, and an option product has multiple options depending on choices such as color and size.
When you create a product, a ‘representative product’ that can be commonly applied to all options is created, and an option SKU representing actual stock is created below it. (Even in the case of a single product, the actual SKU corresponds to the option, so one default option is created.) The representative product is a place to store common information and is not itself subject to stock management.
2. Bulk Registration through Excel

path: Inventory > SKU management
If you want to register a large number of products at once, you can enter product information in a predefined Excel template and upload it to register products in bulk.
The Excel upload function can be executed by selecting “Inventory > SKU Management” from the Smartship menu, entering the SKU management page, and then clicking the [Upload Excel] button at the top right of the screen.

Click the [Upload Excel] button to display the SKU registration pop-up window.
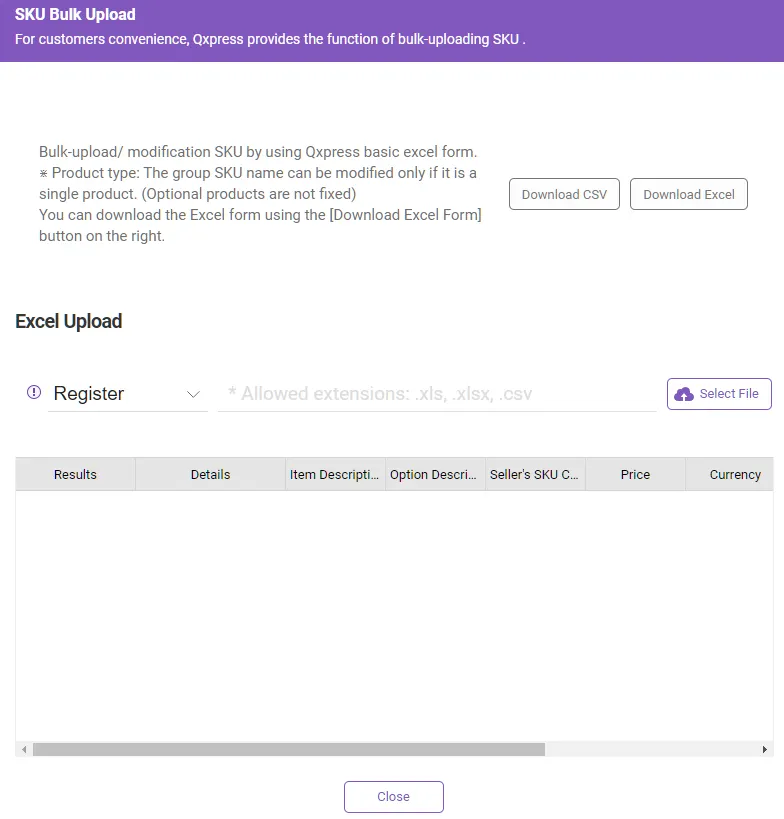
SKU registration through Excel upload proceeds in the following order.
1.
Download Excel Template
2.
Edit Excel File
3.
Upload and register files
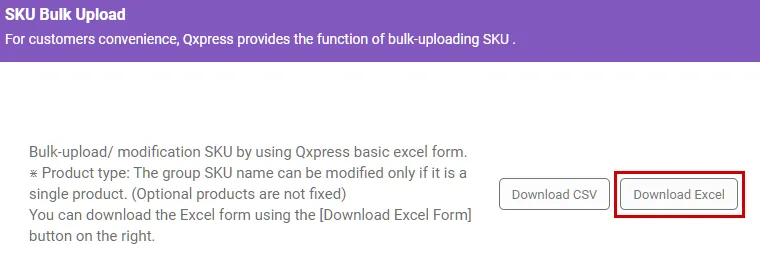
Download Excel Template
The template for entering product information can be downloaded from the upper right corner of the upload pop-up window. There is a [CVS format download] button and a [XLSX format download] button. Normally we use XLSX files.
Some Excel versions cannot recognize more than 60,000 rows in one file, so if the data size is very large, please register using the CSV file format.
Fill out the template
Enter the information below in the downloaded template.

1.
Item Description [Required]: Enter the product name.2.
Option Description: Enter the option name. For single products without options, you do not need to enter them.
3.
Seller’s SKU Code: If there is a management code for each option managed by itself, enter it.
4.
Price [required]: Enter the price of the product/option. Please enter only numbers greater than 0.5.
Currency [required]: Enter the currency code using three digit alphabetic characters. (e.g. Korean Won = KRW, US Dollar = USD, Japanese Yen = JPY, etc.)The order of each field in the template is important when uploading Excel. If you arbitrarily change the order of each column in Excel, it will not be registered correctly after uploading, so please keep the order of the fields as they are in the original form.
File Upload and Registration
Once you have completed creating your product data file, upload it to the system and start registering.
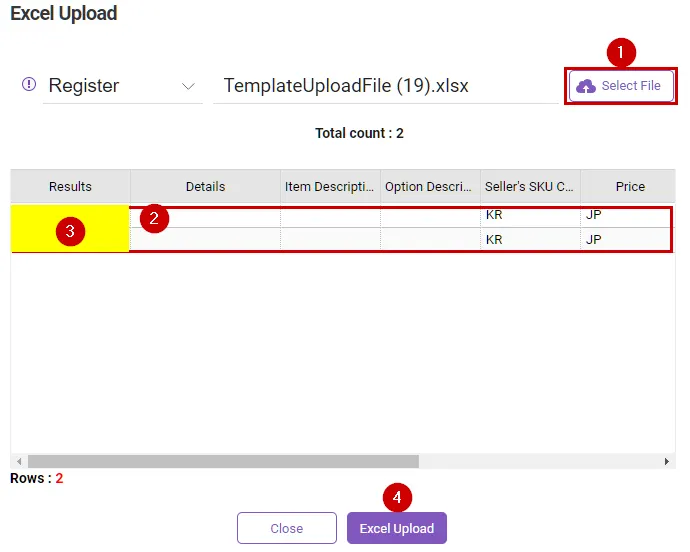
1.
Click the [Select File] button on the right side of the pop-up. When the Find File dialog box is displayed, select the file you want to upload and click [OK].
2.
When a file is selected, the result of analyzing the contents of the file is displayed at the bottom.
3.
If required date is missing, they will be displayed in the ‘processing result’ area (yellow). If there are products missing required data, please edit the Excel file and click the [Select File] button again.
4.
Please click the [Excel Upload] button. Click the Register button to complete information registration.
Products that cannot be registered due to duplicates : Attempting to register a product with an empty option name field as a single product. At this time, if there is a product registered with the same product name, the product with that name cannot be registered. If the data contains an option name, the option is added to the existing product. Additionally, “SKU Seller Management Code” cannot be duplicated in two or more SKUs.
3. Register Product through Page
path: Inventory > SKU management
You can register products by entering them one by one through the SKU management page. The SKU management page provides an option creation tool that allows you to quickly and easily register list-type and combination-type options, so if the number of products you want to register is not large, product registration through the page may be easier and faster.
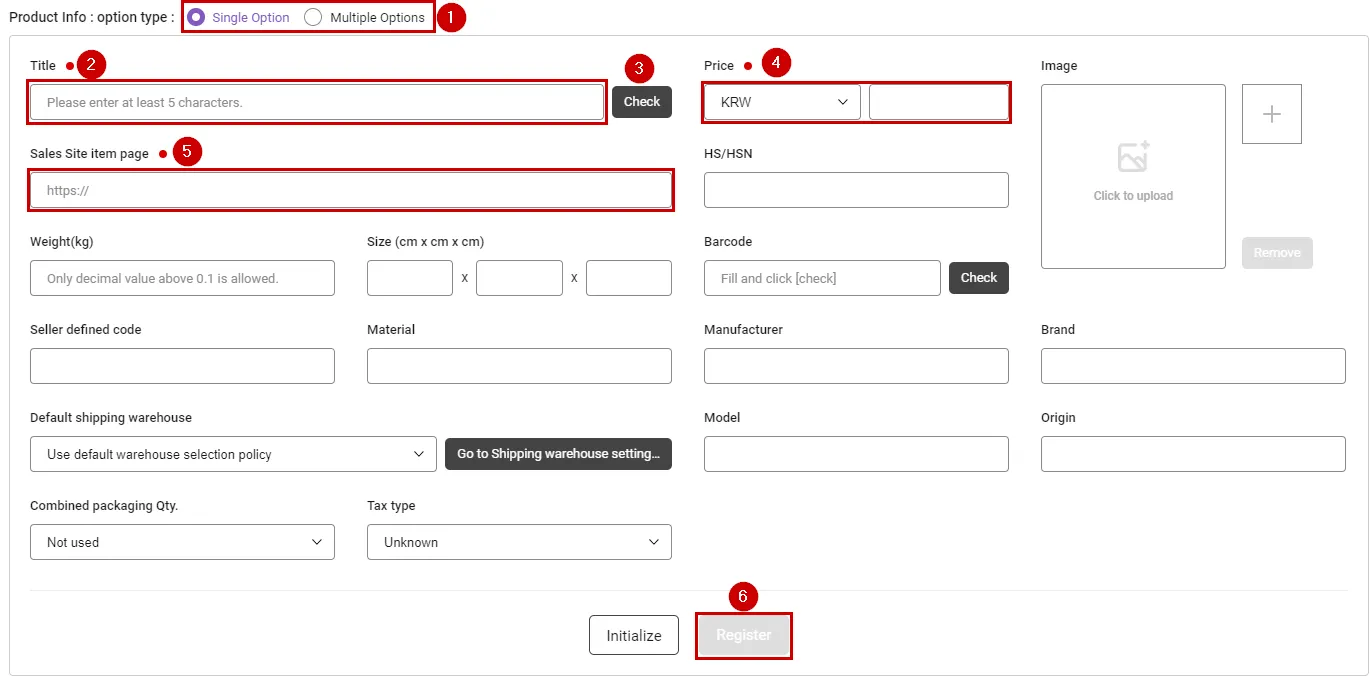
1.
Select the product type according to the option between ‘Single Product’ and ‘Multi-option’.
2.
Enter the product name of the main product. Enter at least 3 characters for the product name.
3.
Click the [Check] button to check if the product name is a duplicate.
4.
Enter the product price. Product price can only be entered as a number greater than 0.
5.
Enter the URL of the product detail page that sells the product.
6.
After entering all required information, the [Register] button will be activated. Click the [Register] button to register the product. If you register a multi-option product, the option generator screen will appear.
If all required fields are entered correctly, the [Register] button will be activated. If the [Register] button is not activated, please check if the required fields are entered correctly.

The following information is an item that can be entered additionally.
The following information is an item that can be entered additionally.
•
Seller Defined Code : You can enter the seller code for matching with an external sales site. This can only be entered for single products, and for multi-option products, the seller defined code must be entered only for each option.
•
Product Barcode: By entering the product barcode, you can quickly enter the standard specification information of the matching product.
•
Origin
•
Weight(kg)
•
Size
•
Material
•
Manufacturer
•
Brand
•
Model
•
Image : You can register up to 2 images.
•
Default Shipping Warehouse : If you have more than one fulfillment warehouse in use, you can manually designate a preferred shipping warehouse for that SKU.
•
Maximum combined packaging quantity : For bulky products such as diapers, you can specify the maximum quantity that can be packed together. The default value is ‘Disabled’, and you can specify the quantity that can be packaged from 1 to 5. Orders containing SKUs with specified quantities that can be combined are automatically packed separately according to the order quantity.
•
Tax type : You can set tax types for products defined by SKU. (‘Not set’, ‘Taxation’, ‘Non-taxation’)
4. How to Register Combination Options (Option Generator)
When you register a multi-option product, the option generator is called where you can add options for the registered product.
Combining Options
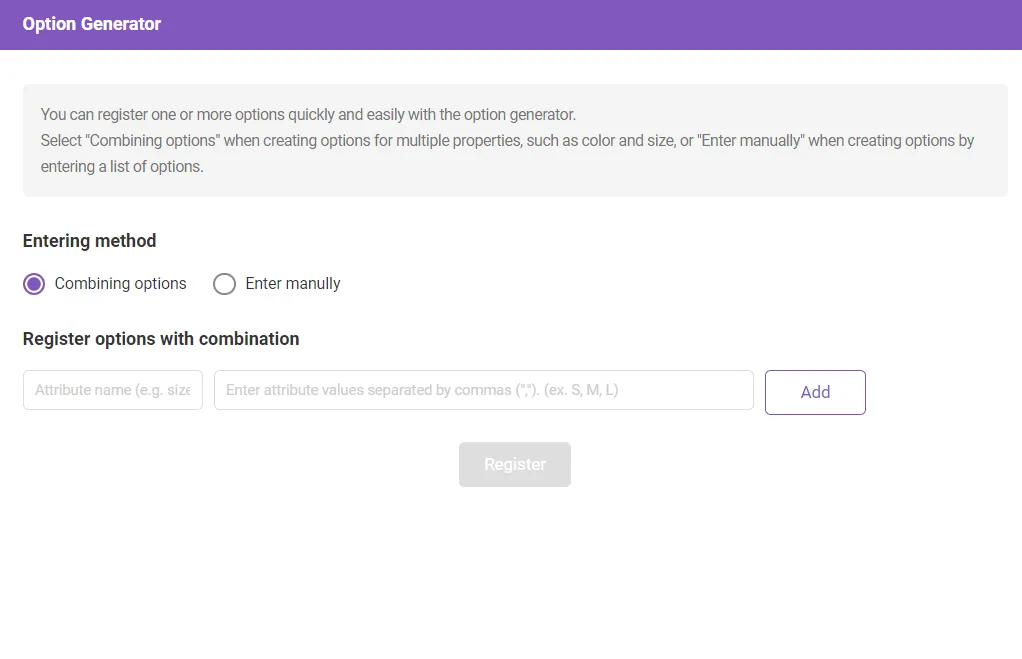
In "Option Combination" mode, you can register options by entering attributes and attribute values. In the screenshot above, 2-5 attribute values were entered for each of the three attributes: color, size, and material. Clicking the [Register] button will automatically register all 40 combined options.
Enter manually
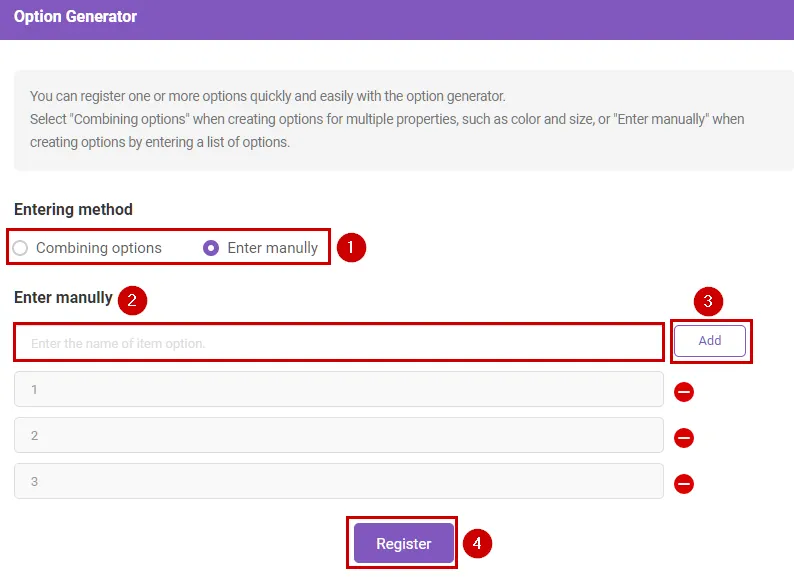
1.
Option input method : You can choose between “Combining options” and “Enter manully”. “Combining options” automatically creates options with a combination of each attribute by entering attributes such as color/size/material, while the “Enter manully” method registers by entering each product list rather than a combination of attributes.
2.
Enter option name (Enter manully) : In “Enter manully” mode, you can enter the name of each option directly. In the case of “Combining options”, you can register the properties to be combined.
3.
When you press the [Add] button, the entered information is added. If you press the ‘Enter’ key while entering the option name in 2), the entered information can be immediately added to the list and the next option can be entered.
4.
After adding one or more options, click the [Register] button to register product options in bulk with the entered options.
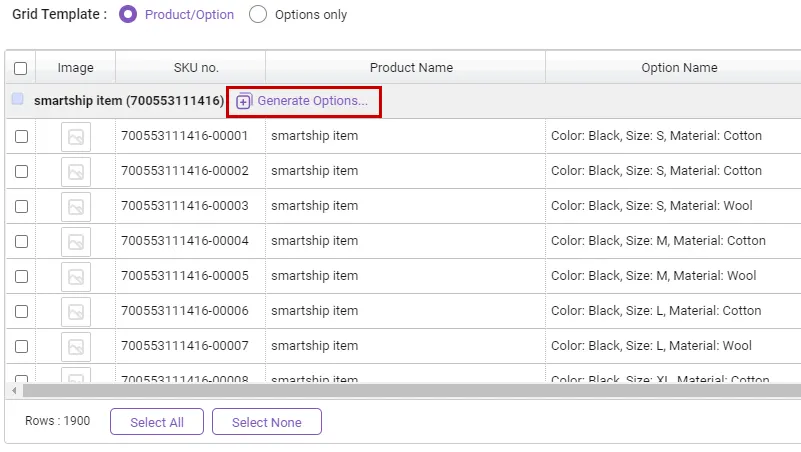
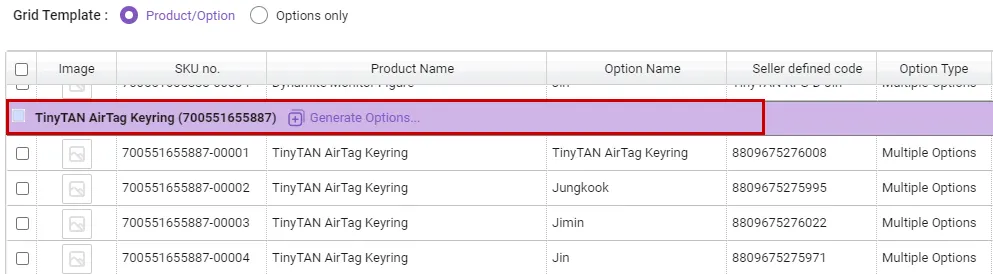
Registering Options for Existing Products
When you click the [Generate Options] link for the product you want to add an option to in the top search grid, the option generator pop-up will open and you can add the entered option to the product.
Options can be added to a single product, and once options are added, it will automatically be converted to a “multi-option” product. (However, even if you delete an option from a multi-option product and only leave one, it will not be converted to a “single option” product.)
5. Search Grid and Bulk Editing
The new SKU management feature allows you to search and manage product and option information in one grid.
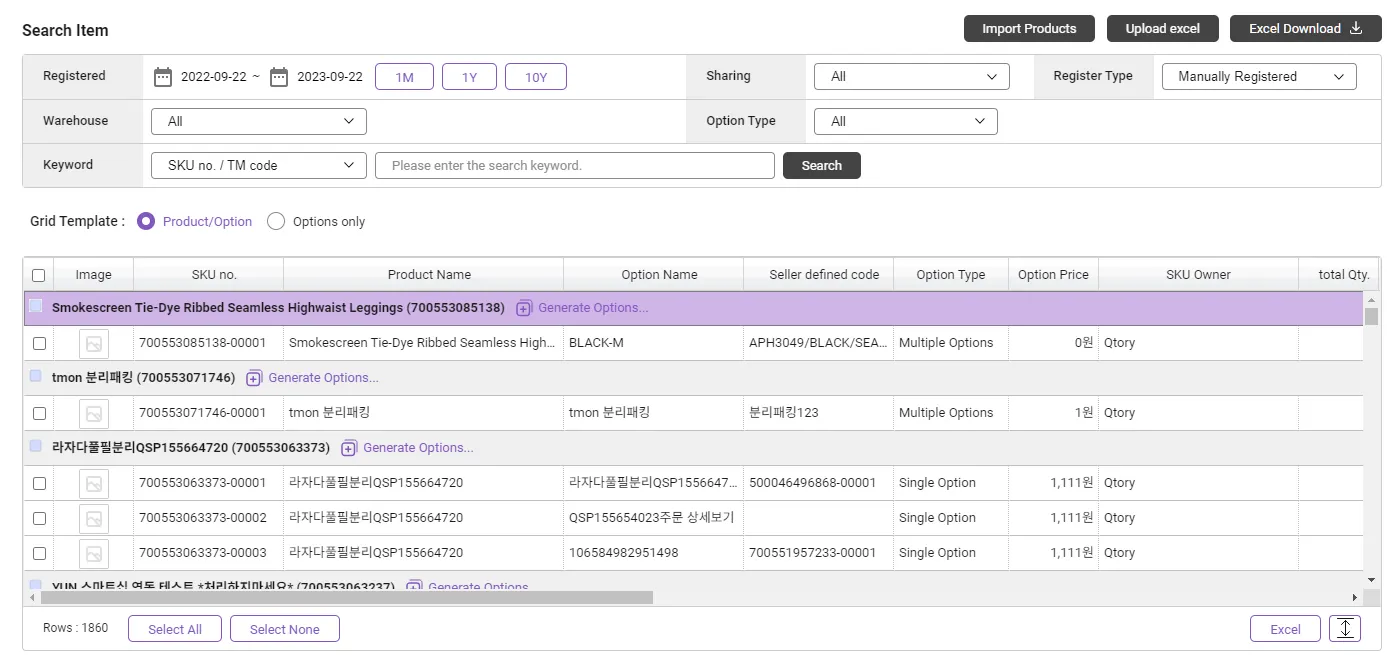
Search Filter
•
Basically, it searches for SKUs registered within 1 year. However, if you search for a specific SKU by SKU number, you can search regardless of the period.
•
When searching by SKU number, you can search multiple search terms at once by entering the SKU values separated by a space.
•
“Sharing” : You can search the SKUs by sharing, shared or not shared SKUs.
•
“Option Type” : You can inquire by type whether the option configuration method is single option or multiple option.
•
“Wharehouse” : You can filter by the QFC where the SKU is defined.
Grid Display Formats
The new management feature integrates the Product Lookup Grid and Option Lookup Grid. Search results are grouped by product, with individual option SKUs listed under each group.

1.
Rows with a gray background represent representative products. You can check and modify representative product information by clicking to select it.
2.
If you check the box in a representative product row, all options for that product will be selected.
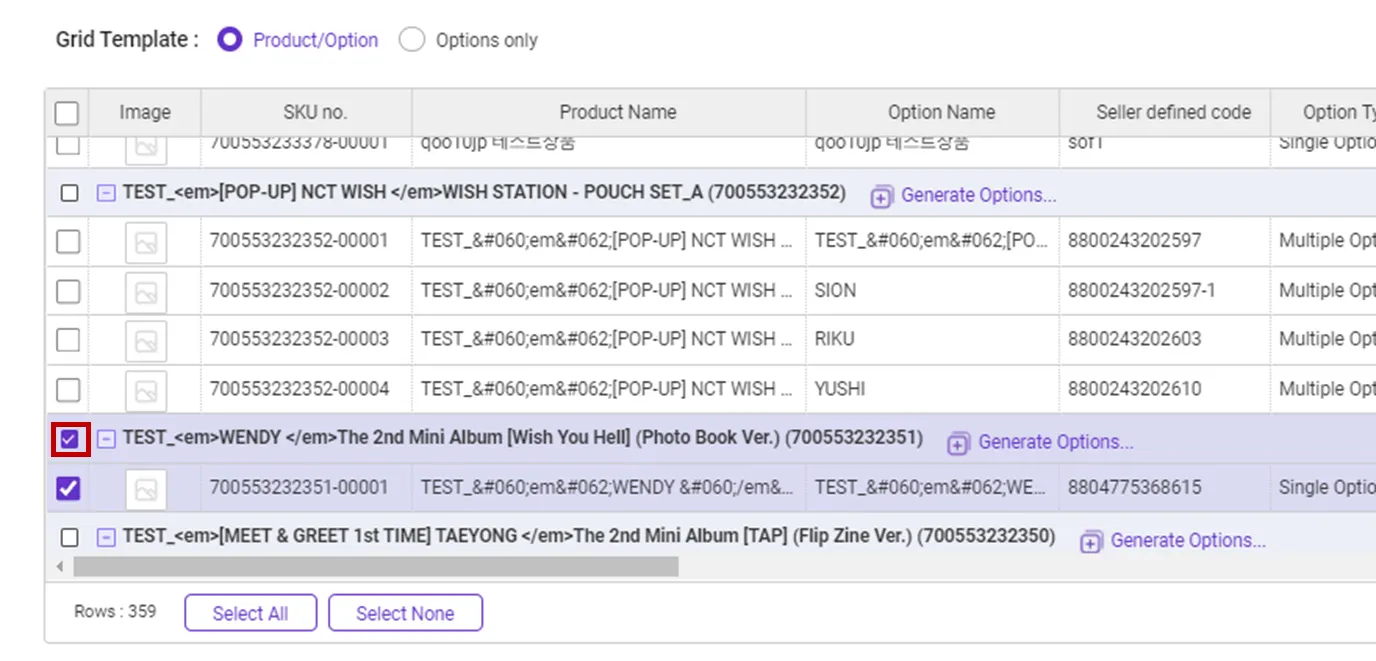
3.
Rows with a white background represent individual option products. You can edit optional product information by clicking to select it.
4.
You can select multiple option SKUs, regardless of which product the option belongs to. By checking and selecting multiple rows at once, you can change the information of the selected options in batches, providing a more powerful batch editing function.
Options that are not the same product can be selected at once.
Switch Grid Display Format
The lookup grid supports two view types: “Product/Options” and “Options Only”. The “Product Options” view displays option SKUs grouped under the product unit, and the “Options Only” displays only the SKUs of the option unit like a regular grid.
•
Product/Options : Groups and displays option SKUs by product
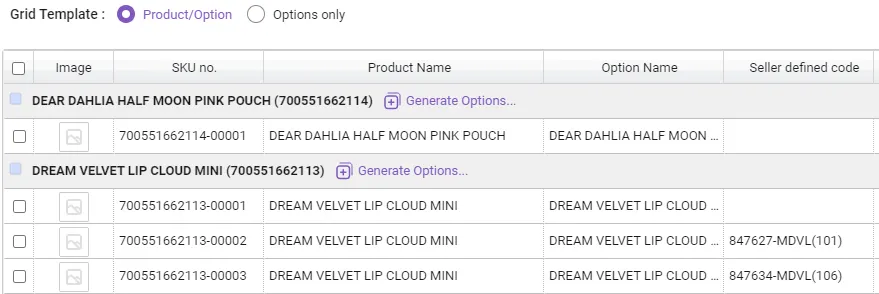
•
Options only : Show detailed SKU information only
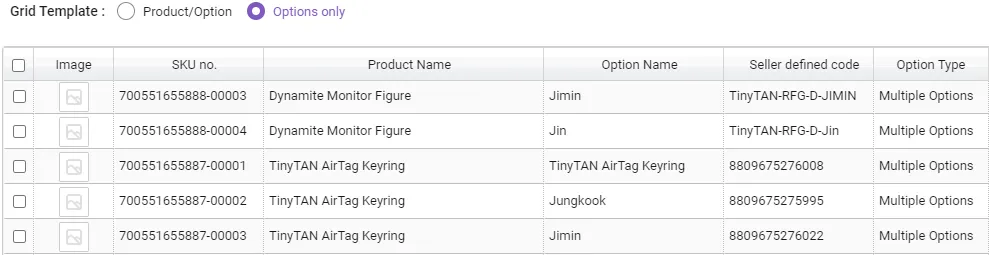
Any changes you make to grid display options will be saved in your browser, so your settings will be remembered when you reconnect to the same browser.
Representative Product vs. Option Product
If you select a ‘product row’ with a background color, you can edit the attribute information of the representative product, including the product name. And when you select each option SKU, you can edit the properties of that option product only.
In the case of a single option product, the same UI is displayed regardless of whether you select the product row or the option row.
In particular, when a representative product is selected, a new “Warehouse / Stock” tab is provided, allowing you to check the warehouse stock status of all option SKUs for that product at a glance.
1.
Edit representative product information.
2.
You can check the stock information of all options for the product.
Select All Product Options
To the left of the product row, there is a small square button. Clicking this button selects all options for that product at once. When two or more rows are checked and multi-selected at a time, batch editing mode is activated.
Bulk Edit Mode
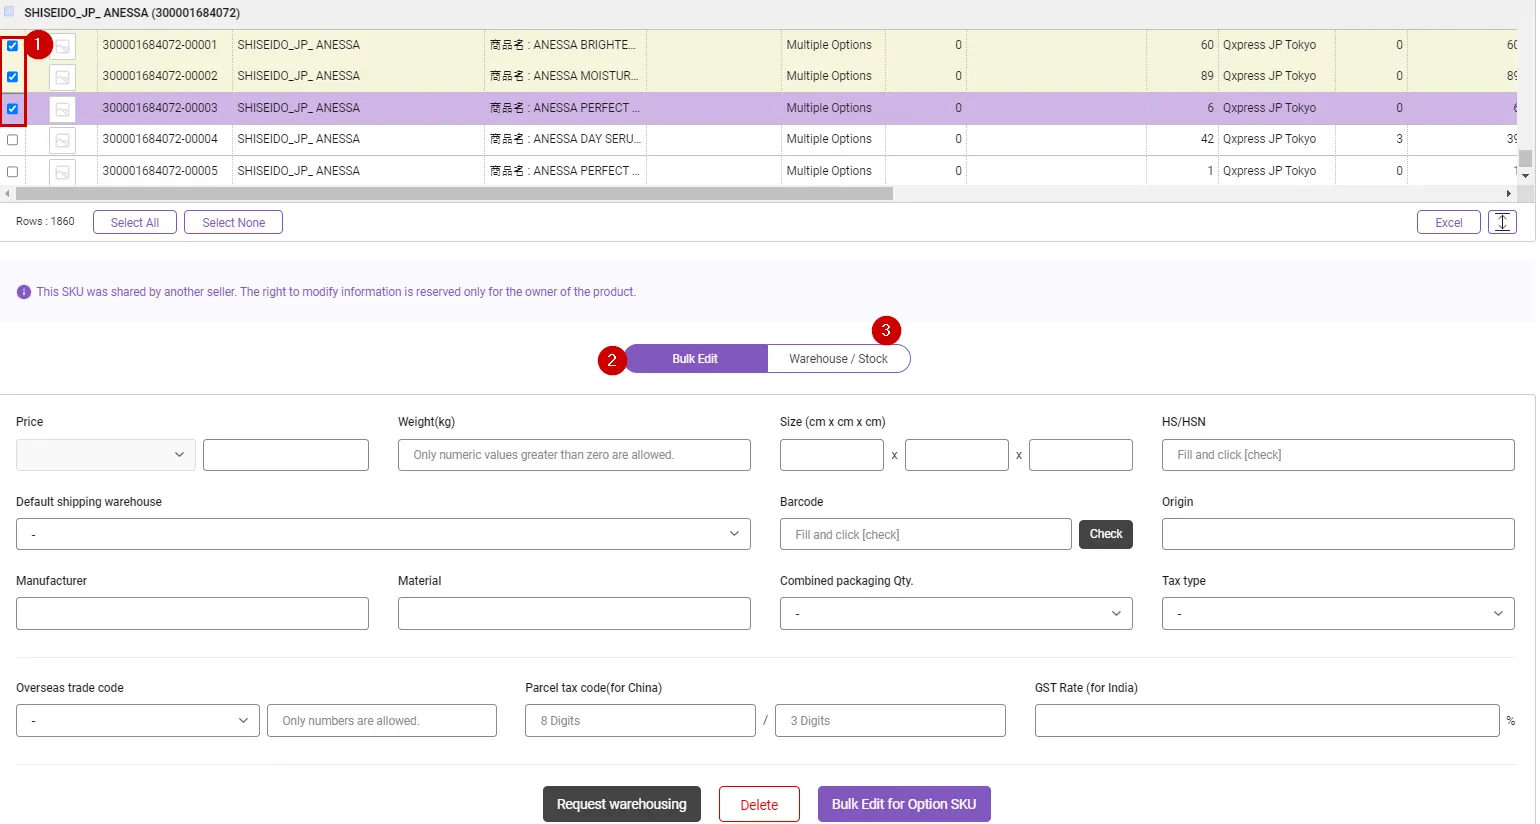
1.
Select one or more SKUs.
2.
If you enter the value of the desired attribute in the “Bulk Edit Information” tab and click the [Bulk Edit for Option SKU] button, the corresponding attribute for all selected SKUs will be changed in batches. (The values of fields not entered will not be changed.)
3.
The ”Warehouse / Stock” tab gives you a glance at warehouse stock for all selected SKUs.
6. How to Register Seller Defined Code
In order to recognize an order from an sales sites as a fulfillment shipment, the system must know which SKU in the QFCs is matched with the sold product. Typically, this matching is done using the “Seller Code” field on the product on the seller’s site.
Most sales sites have a field to enter a separate code such as “SKU”, “Seller Product Code”, or “Seller Management Code” when registering a product/option. The value registered here can be the SKU number (of Smartship), or there is a way to register your own seller management code and then register the same code value to the corresponding Smartship SKU.
•
Using Smartship SKU number in management code of product on sales site
•
Using seller management code to a Smartship SKU
You must choose one of these two methods to register your information.
This seller management code is entered into the product in the case of a single product, but is entered into each option in the case of an optional product.
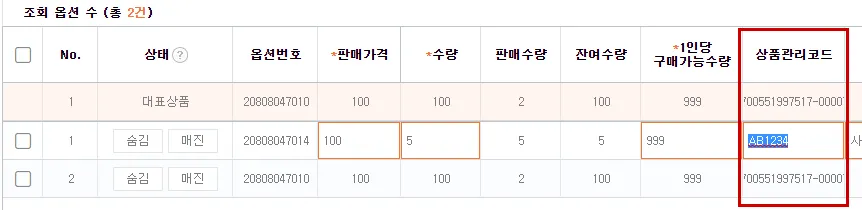
Ex)1: Tmon option management – “Product Management Code”

Ex)2: “Seller product number” in Interpark’s product management
Enter the SKU Number in the Seller Defined Code of the Sales Site’s Product
If you do not define and use a separate seller defined code for the product you are selling, you can just use the SKU number as the defined code. The SKU number can be checked directly in the SKU number column in the inquiry grid of the SKU management page.
Even in the case of a single product, a SKU number is created for actual stock management, so you can use this information as is. Usually, the SKU number of a single product is ‘-00001’ followed by the product number (12 digits starting with 7 or 9).
Register this SKU number as the management code for each product/option on the product management screen of the sales site.
How to Register a Seller Management Code to a Smartship SKU
If you use a separate management code, a unique management code is usually registered in the product information on the sales site. This means that there is no space left for the SKU number on the product on your sales site. In this case, just register the seller defined code in the Smartship SKU.
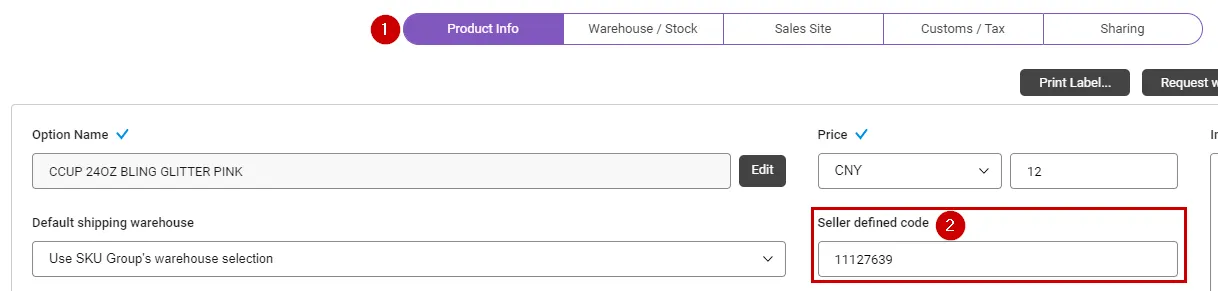
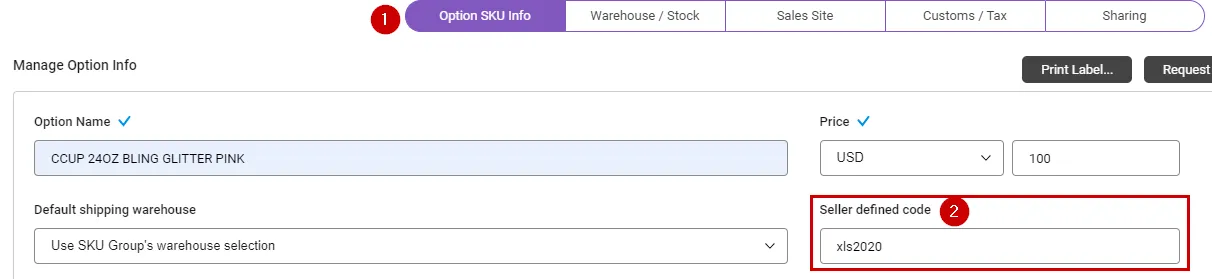
On Smartship, in the case of a single product, there is an item called “Seller Defined Code” in the representative product information. In case of a multi-option product, the field is present in each option information tab. Register your seller management code here.
When registering in bulk using Excel file upload, you can register by entering the seller management code for each SKU in the “Seller’s SKU Code” column.
[Single product]
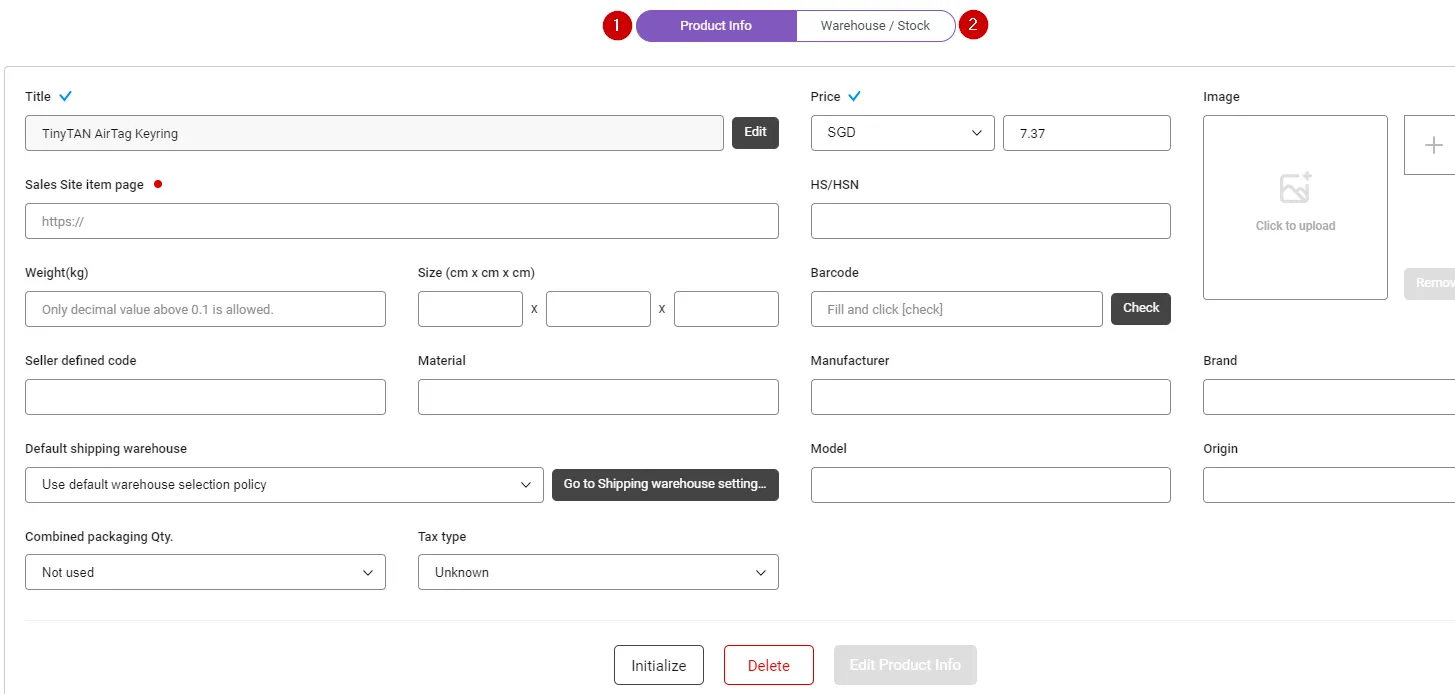
For a single product, you can edit product information by selecting the product row and representative option row. In the “Product Info” tab, enter the seller management code in the “Seller defined code” field.
[Optional product]
For optional products, select each option and enter the seller management code in the “Seller defined code” field in the “Option SKU Info” tab.
7. Warehouse Stock Information and Warehousing
The SKU management page allows you to easily check the warehouse stock status of individual SKUs. If you select multiple SKUs at the same time, you can change the properties in bulk. At this time, you can filter and check only the stock of the selected SKUs through the “Warehouse / Stock” tab.
SKU Filter by QFCs
A new “Warehouse” filter item has been added to the SKU search filter. Warehouse filters allow you to view only the SKUs defined in a specified QFC.

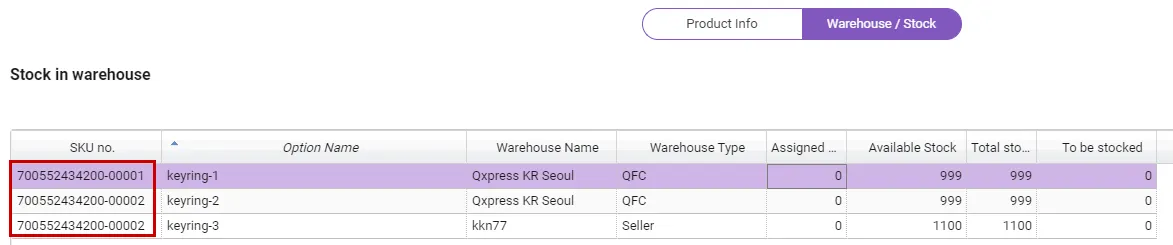
Warehouse and Stock information for a SKU
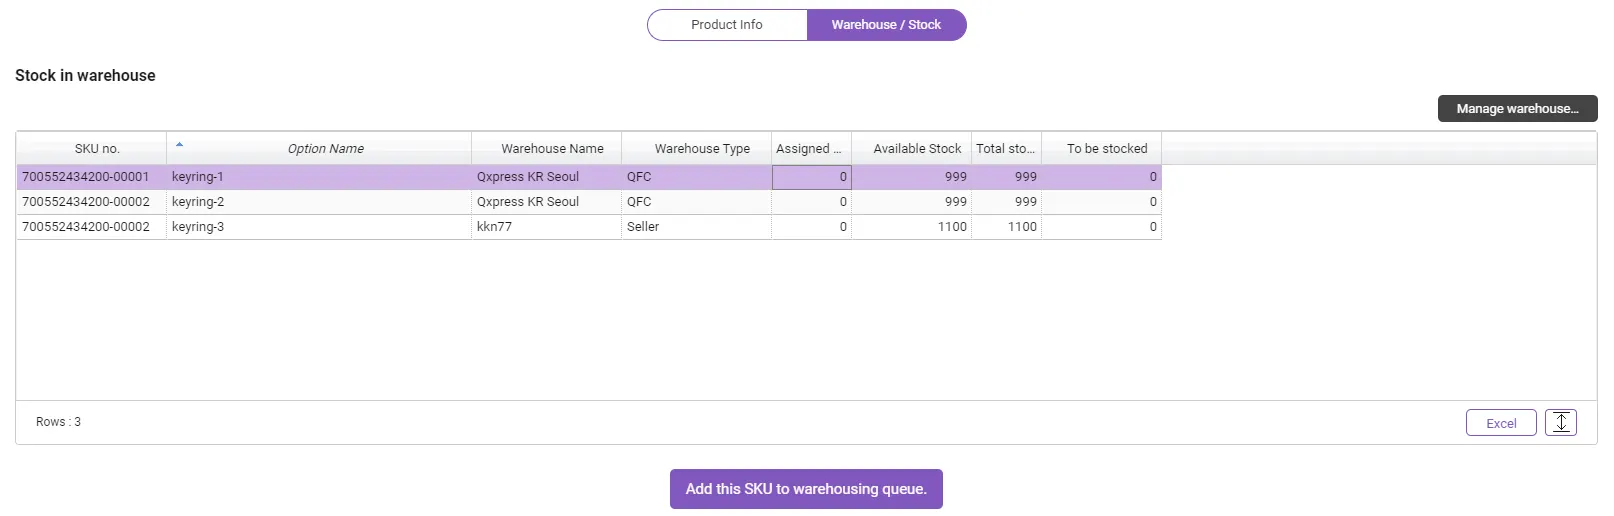
After selecting a SKU in the inquiry grid, select the “Warehouse / Stock” tab at the bottom to view stock and receipt/delivery history by warehouse for that SKU.
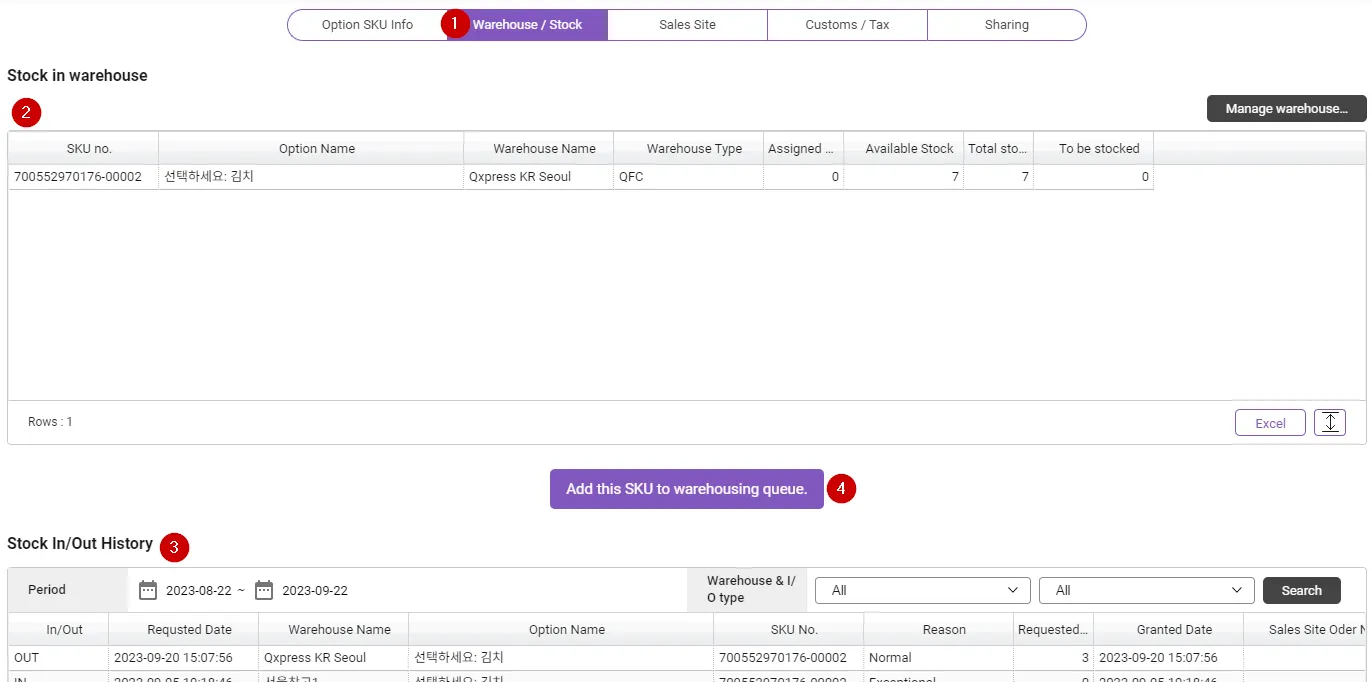
1.
After selecting the SKU, select the “Warehouse / Stock” tab
2.
The “Warehouse / Stock” grid displays the status of SKUs in stock at each warehouse.
3.
The “Stock In/Out History” grid displays the incoming/outgoing history of the SKU within a specific period.
4.
Clicking the [Add this SKU to warehousing queue] button will add the currently viewed SKU to the stock request list. From the warehousing application list, you can apply for warehousing by selecting the warehousing quantity and warehouse of the added SKU.
Warehouse Status for Multi-Selected SKUs
If you select two or more SKUs by checking them in the viewed grid, the UI at the bottom goes into bulk edit mode. At this time, if you select the “Warehouse / Stock” tab, the warehouse specific stock of the selected stock will be displayed. This feature allows you to easily determine warehouse stock for specific SKUs.
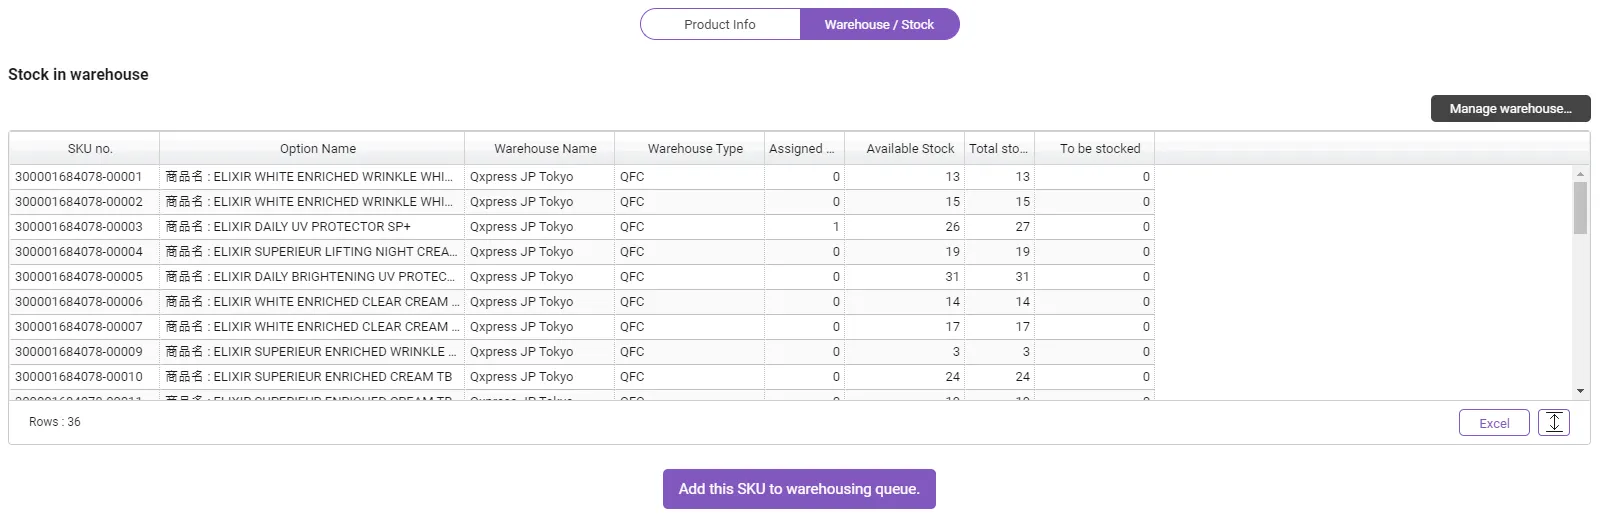
Bulk Addition to Stock Warehousing Request List
In previous versions of SKU management, you had to select SKUs one by one and then add them to the stock in warehouse request list. Starting from version v2, you can check and select multiple SKUs and click the [Add this SKU to warehousing queue] button at the bottom to add the selected SKUs to the stock request list at once.
If there are SKUs added to the stock warehousing request list, an icon as shown on the right will be displayed at the bottom of the screen.
The number displayed on the icon indicates how many SKUs are added to the stock warehousing request list. (Not a total count, this only shows the count of SKU no.s)
By clicking on the banner, you can quickly edit the stock warehousing request list and send it to the stock request page.
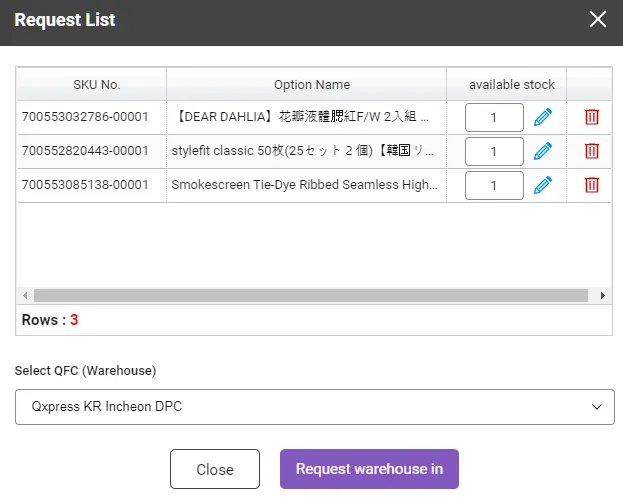

Modify the stocking quantity in the stocking request list, select a warehouse, and click the [Request warehouse in] button to go to the stocking application creation screen and fill out the stocking application.
8. Shipping warehouse settings
The shipping warehouse for products shipped from QFC can be applied to all SKUs at once, or a specific shipping warehouse can be set for each SKU. If a specific shipping warehouse is not set when registering a SKU, the allocation type set on the “Warehouse Assign Policy” page is applied. If a specific shipping warehouse is set for an individual SKU, that SKU will ignore the QFC allocation policy.
There are two ways to set up a shipping warehouse, and the specific shipping warehouse set for each SKU is given priority.
1.
Default shipping warehouse settings (apply to all SKU products in bulk)
Path : Setting > Fulfillment Rule Setting
For SKU products using fulfillment, you can set the shipping warehouse type on the “Warehouse Assign Policy” page.
Default shipping warehouse settings for each SKU
2-1. Default shipping warehouse settings for each SKU (single product)
Path : Inventory > SKU Management > Product Info
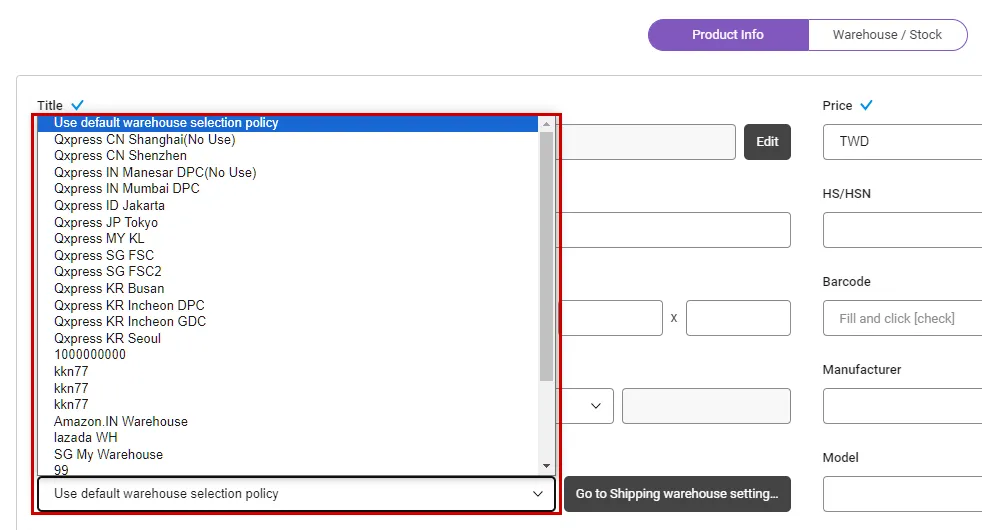
If you want to ship from a specific warehouse for an individual SKU, click [Default Shipping Warehouse] and select a shipping warehouse to proceed with shipping from that warehouse.
2-2. Default shipping warehouse settings for each SKU (option product)
Path : Inventory > SKU Management > Option SKU Info
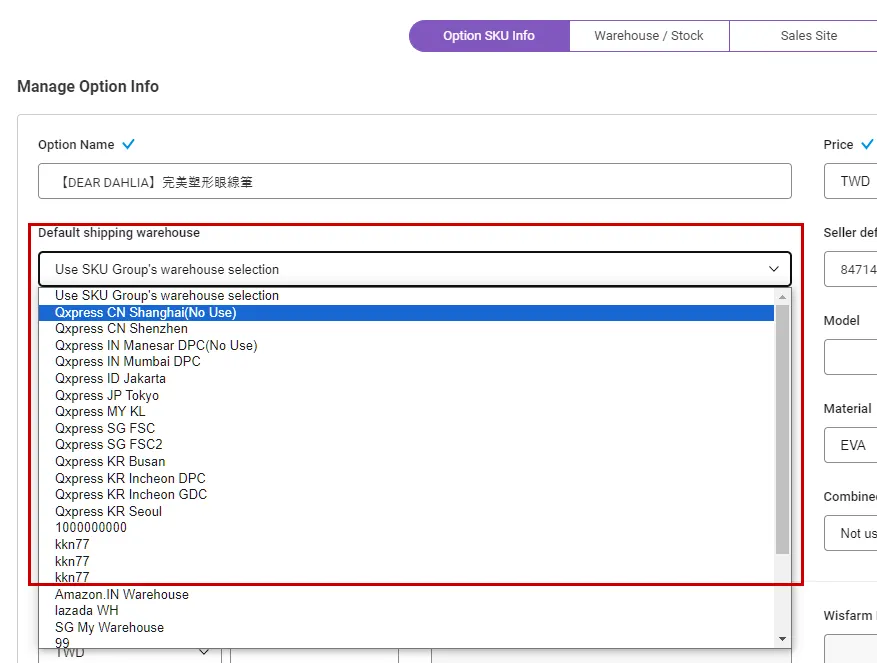
If you specify a shipping warehouse for a specific option among option products, only the option SKU product will be shipped from the designated warehouse.
9. Sales Site Product Information
After linking an order from a sales site, the first time the order product and SKU are matched, information about which product the SKU is associated with on the sales site is recorded in the Smartship.
This information can also be registered manually prior to order creation. In the “Sales Site” tab, you can check and manage information linking the sales site product/option and SKU.
You can also manually register the related information between the sales site product and the SKU, but we do not recommend doing so because there is a possibility of linking incorrect information.
Registration of Sales Site Product Information
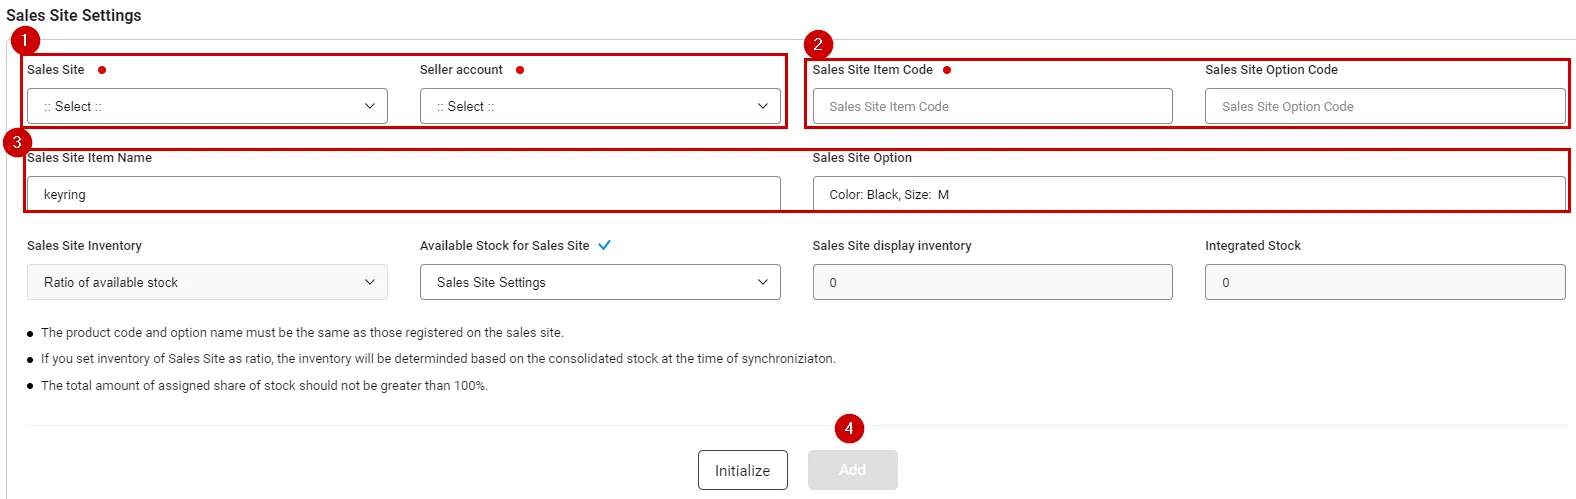
1.
Select an external Sals Site and seller account that have API integration enabled.
2.
Select the option (SKU) to which you want to associate your product.
3.
Enter the product name, product code, option name, and option code of the sales site. (If it is registered as a single product in an sales site, the option code and option name can be omitted.)
4.
Click the [Add] button to save the external shopping mall product linkage information.
Orders collected after this information is registered include this information when mapping the SKU, allowing SKU matching without a separate SKU number or seller management code.
Even if you set connection information, if there is a seller management code for the product in the sales site order information, the SKU matching the seller management code will be matched first.
Available Stock for Sales Site
For some sales site, stock synchronization is available in Smartship.
The stock synchronization function does not operate in real time. This function displays only a portion (e.g. 80%, 50%) of the actual available stock as product stock on the sales site, reducing the rate of overselling on sales sites when products of the same SKU are sold across multiple sales sites.
The stock synchronization function works for products that are initially linked when an order is placed, and there must be a history of stock changes.
Connected to some supported sales sites, and the ratio to be used for stock synchronization for each sales site can be specified in “Sales site API Settings”. Therefore, the stock ratio of all products on a sales site is applied to the same stock ratio. However, if you register linkage information for individual products, you can set a separate ratio only for specific products.

•
“Sales Site Settings” means ‘values specified in the Sales Site API settings’.
•
You can select a synchronization percentage from 100% to 10% in 10% increments.
•
“Stock displayed in sales site” is the value when the ratio selected is applied to “Stock in integrated use.”
10. Customs and Tax Information
The “Customs/Tax” tab is where you can enter information required for customs clearance and Customs rate information. You can register the necessary information depending on the country the product is being shipped to.
Customs/tax information is product specific information, not optional. Editing information in a specific option will affect all other options for the same product. Separate information cannot be registered for specific options.
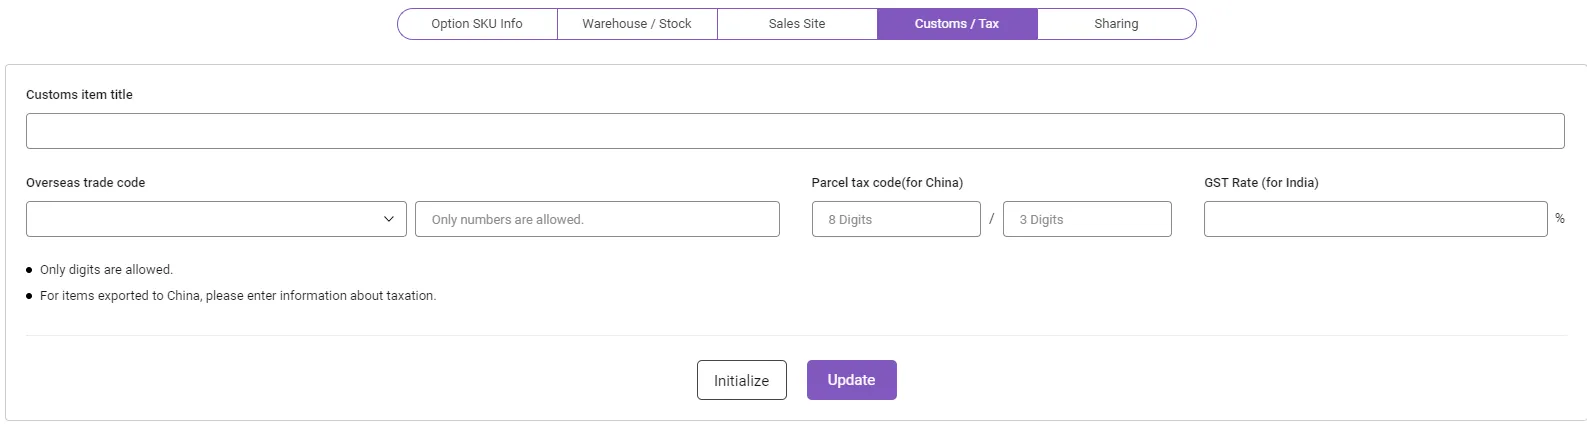
•
Customs item title : Basically, the product name is the same as the customs clearance item name, but some countries only allow English characters, so you can enter the English name if necessary.
•
Overseas trade code : You can enter transaction item codes such as NS/HSN/ JAN.
•
Parcel tax code(for China) : Enter your China tax registration code.
•
GST Rate(for India) : Enter the GST rate for goods shipped to India.
11. SKU Sharing
The “Sharing” tab is a function that allows you to share your SKU with other Smartship sellers and entrust them with sales. If you share a SKU, the partner can sell the shared SKU by registering it as a product on an external sales site like their own SKU.
Shared SKUs can be a good strategy to sell your products to sales sites or countries you haven't yet entered without any additional entry costs.
Before sharing your SKU with others, you must consult with your QFC representative and your QX sales manager in advance.
SKU Sharing Interface
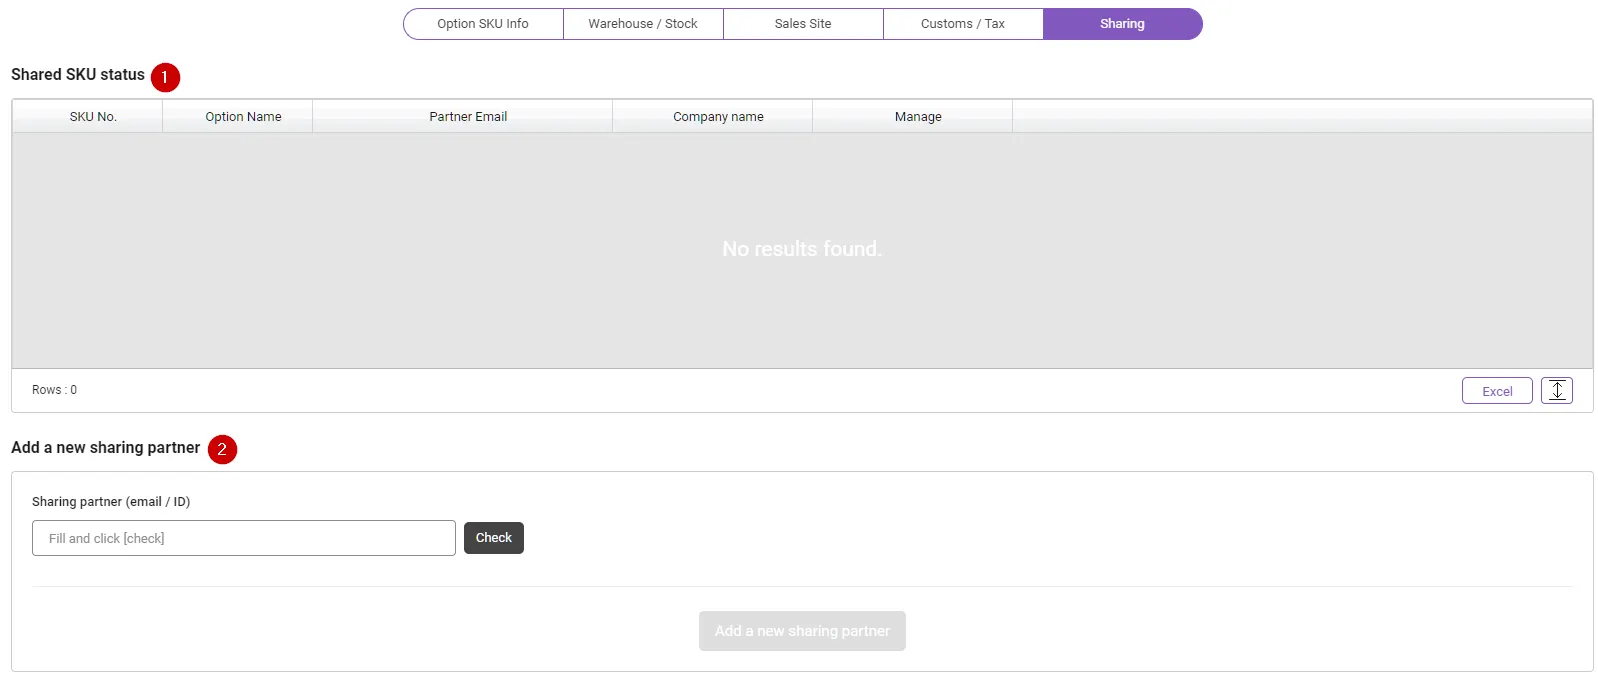
1.
You can view previously shared SKUs and shared partner information.
2.
You can choose a new sharing partner.
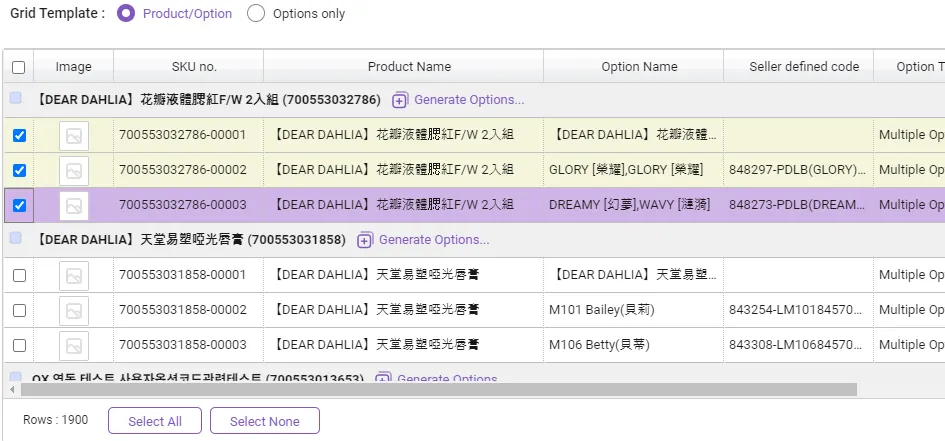
Share Single Products with Other Partners

1.
Select all options for the selected product or just one option you want to share.
2.
After entering the Smartship ID of the sharing partner, click the [Check] button to check if the information is correct.
3.
Click the [Add a new sharing partner] button to share the selected SKU with the relevant partner.
Share Multiple Products with Other Partners
You can share multiple products at once with different partners. If you share multiple products in bulk, all the options that belong to them will be shared.
1.
Search products and check the products you want to share.
2.
Enter partner information in the “Bulk Sharing of Products” area under the Bulk Edit Information area, and add a sharing partner. Partner registration is the same as adding a partner on an individual SKU.

3.
Please enter partner's Smartship ID
4.
Please click [Check]
5.
Please click [Add a new sharing partner]
When shipping with a shared SKU, fulfillment costs are charged based on the Smartship account that actually made the shipment, not the SKU owner.
12. Appendix
12-a. SET SKU
You can form a SET SKU by bundling multiple registered SKUs as one product. You can create a set product by linking the Set SKU and the product on the sales site. The method of linking a Set SKU to a sales site product is to use a seller management code in the same way as linking a single SKU to a sales site product.
Path : Inventory > Set SKU
Register Set SKU
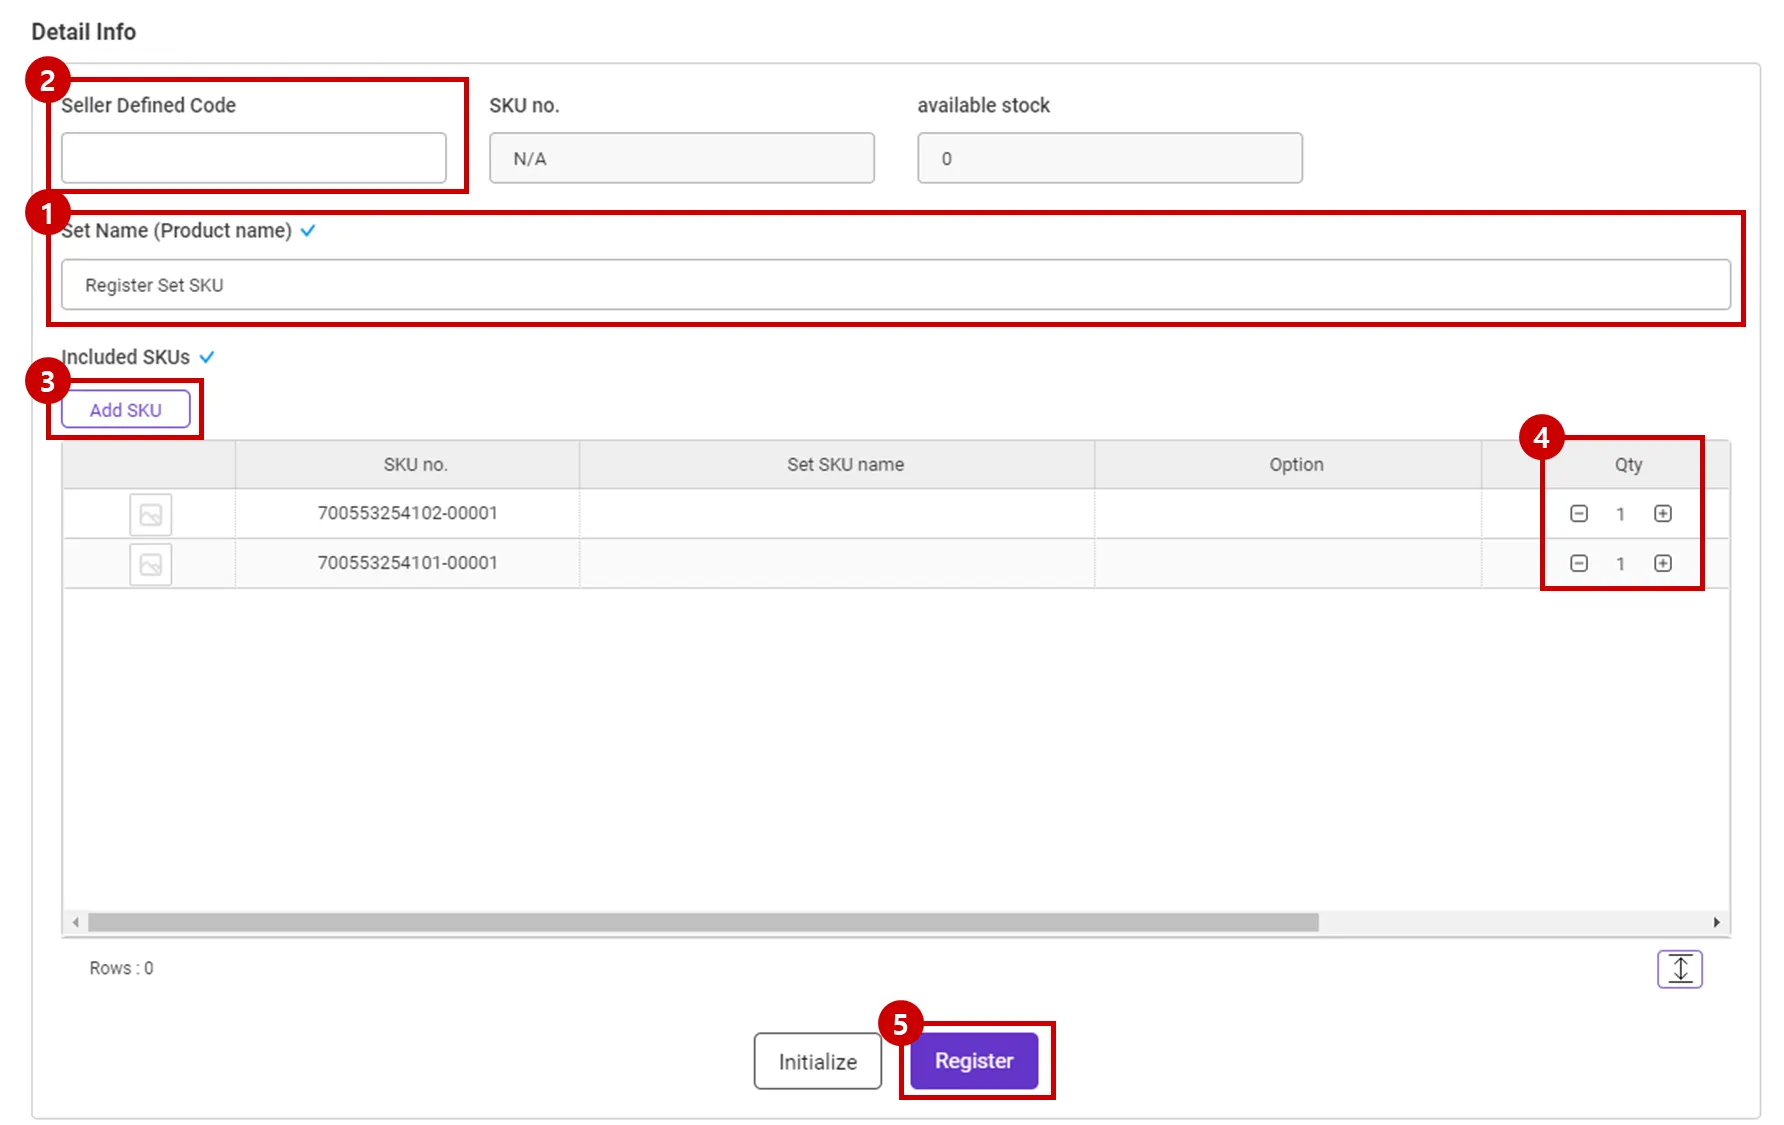
1.
Enter the name of the SET SKU product.
2.
Enter the seller’s SKU code. For the seller management code, enter the same value as the management code for the set product on the sales site. If you are not using a separate seller’s code, leave it blank and create a set product. After the set is created, simply enter the SKU number into the product on the sales site.
3.
Click the [Add SKU] button to view and select the SKU of the product to be included in the set to add it.
4.
To change the quantity of an added SKU, click on the “Qty” field and edit the quantity. (Click to change to editable.)
5.
Click the [Register] button to create a set product.
Register SET SKU(Excel)

1.
Please click the [Upload Excel] button at the top right of the SET SKU management page.
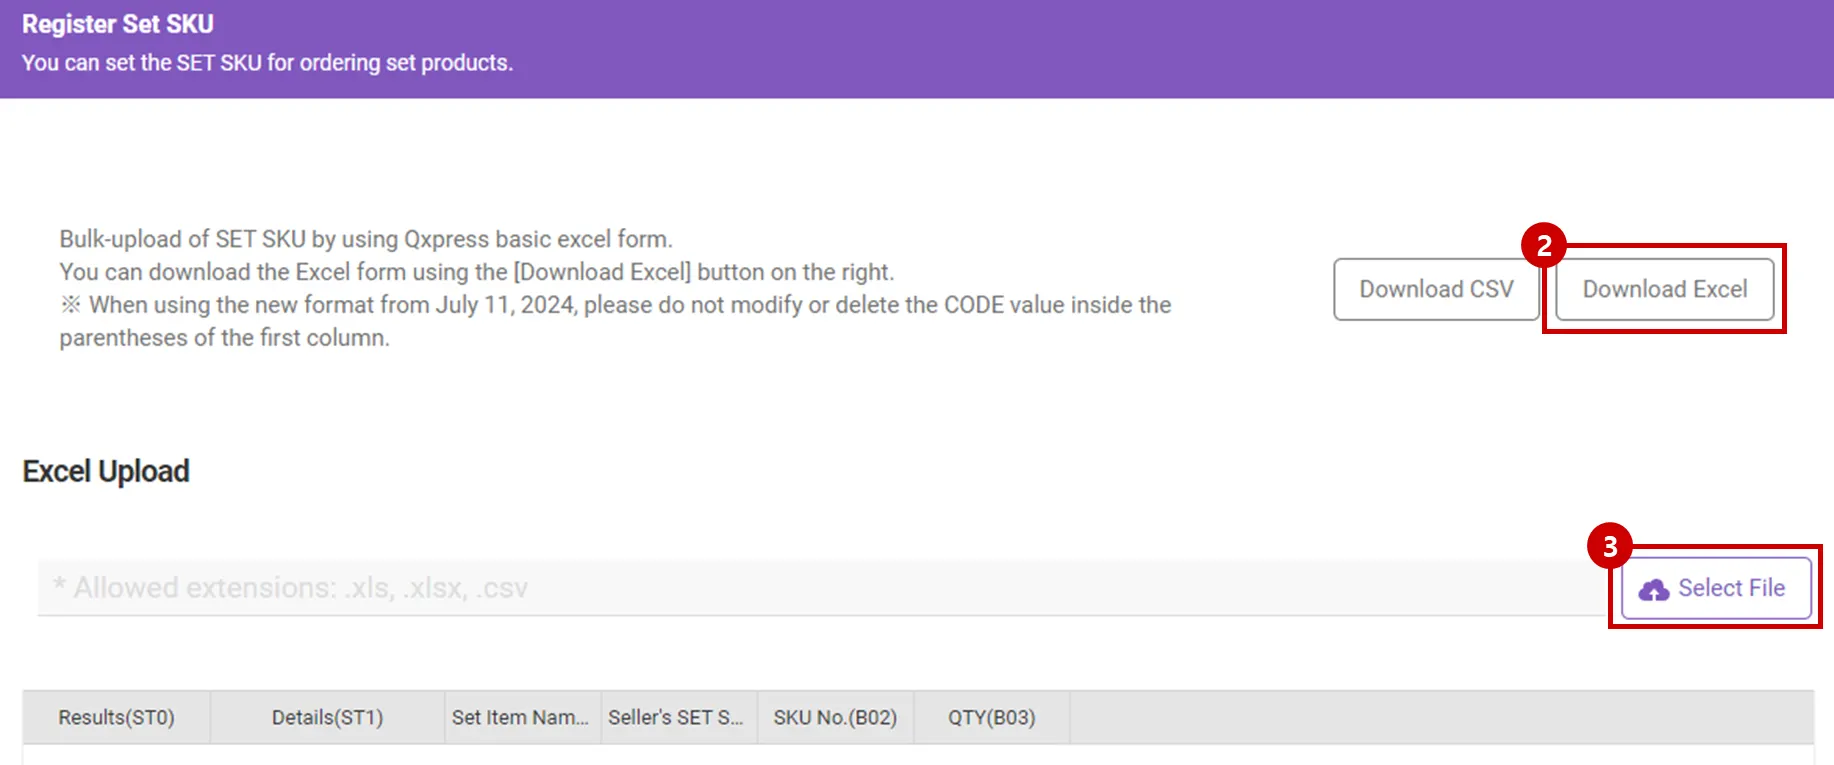
2.
In the pop-up window that appears, download the Excel format.
3.
Click the [Select File] button to choose the Excel file from your PC.
4.
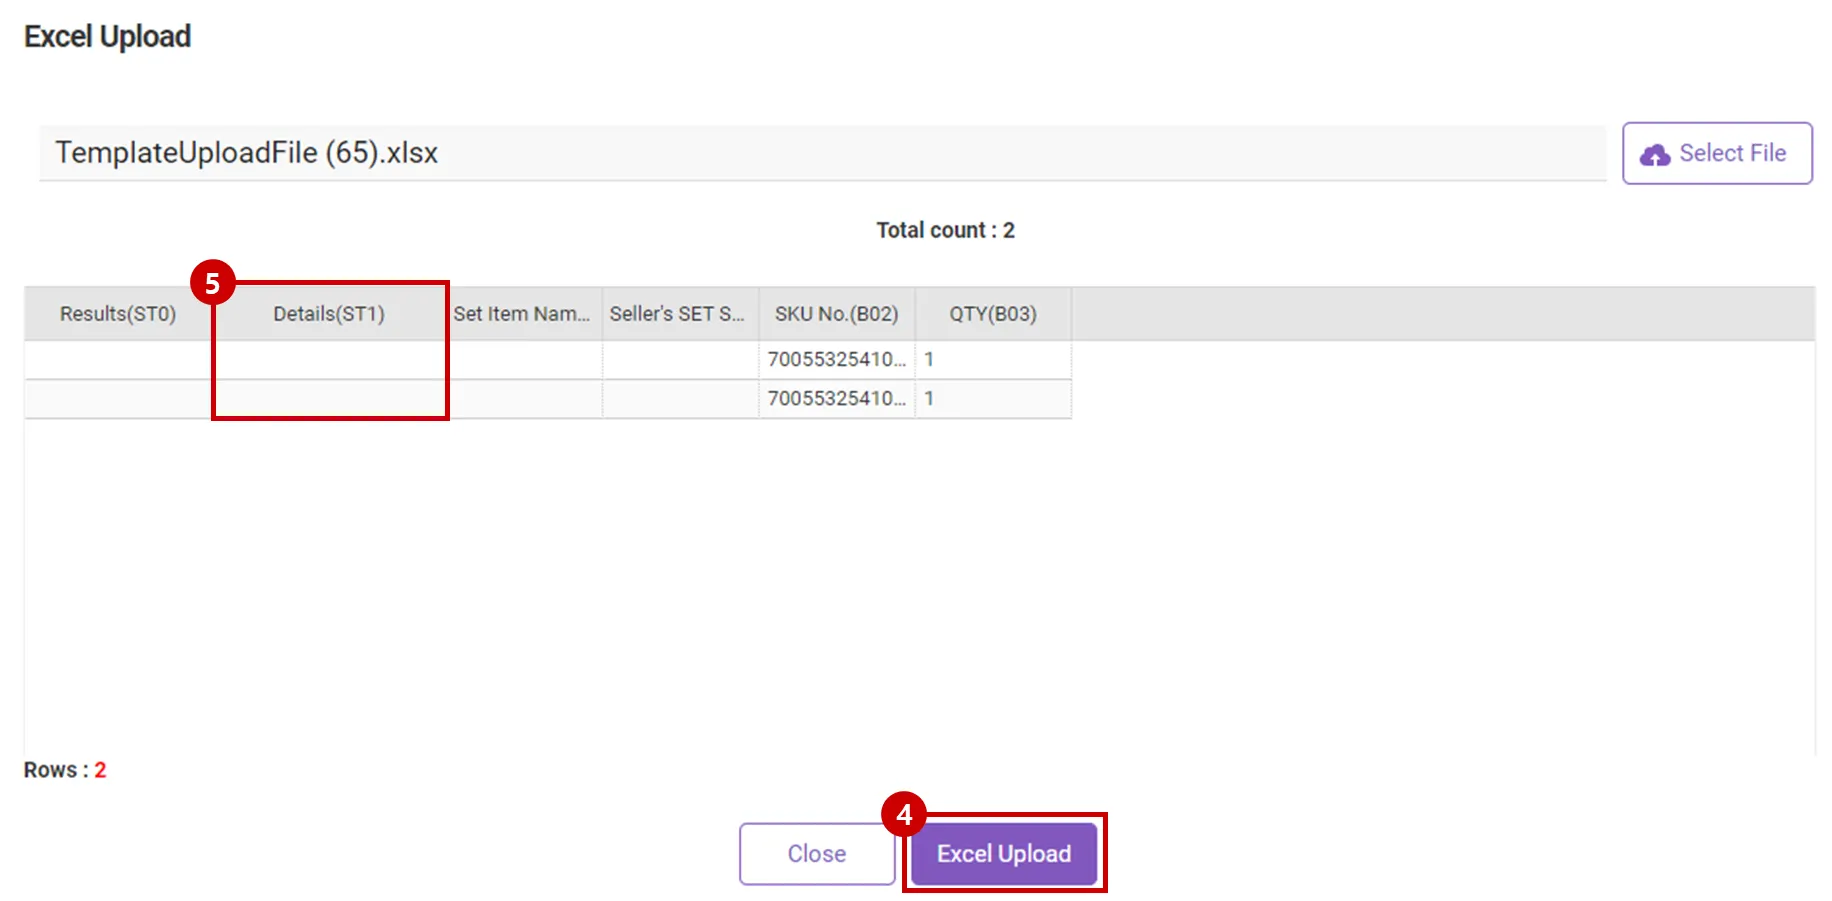
After the file has been successfully uploaded and you have confirmed that the data has been loaded, click the [excel Uploadl] button. If you are uploading a large amount of SET SKU data, please wait for a moment as there might be a delay.
5.
Once the registration is complete, check the results. If there are any failed entries, you will need to correct them and upload again. For the reason of failure, please refer to the "Details(ST1)" column.
How to Check SET SKU
Path : Inventory > Set SKU
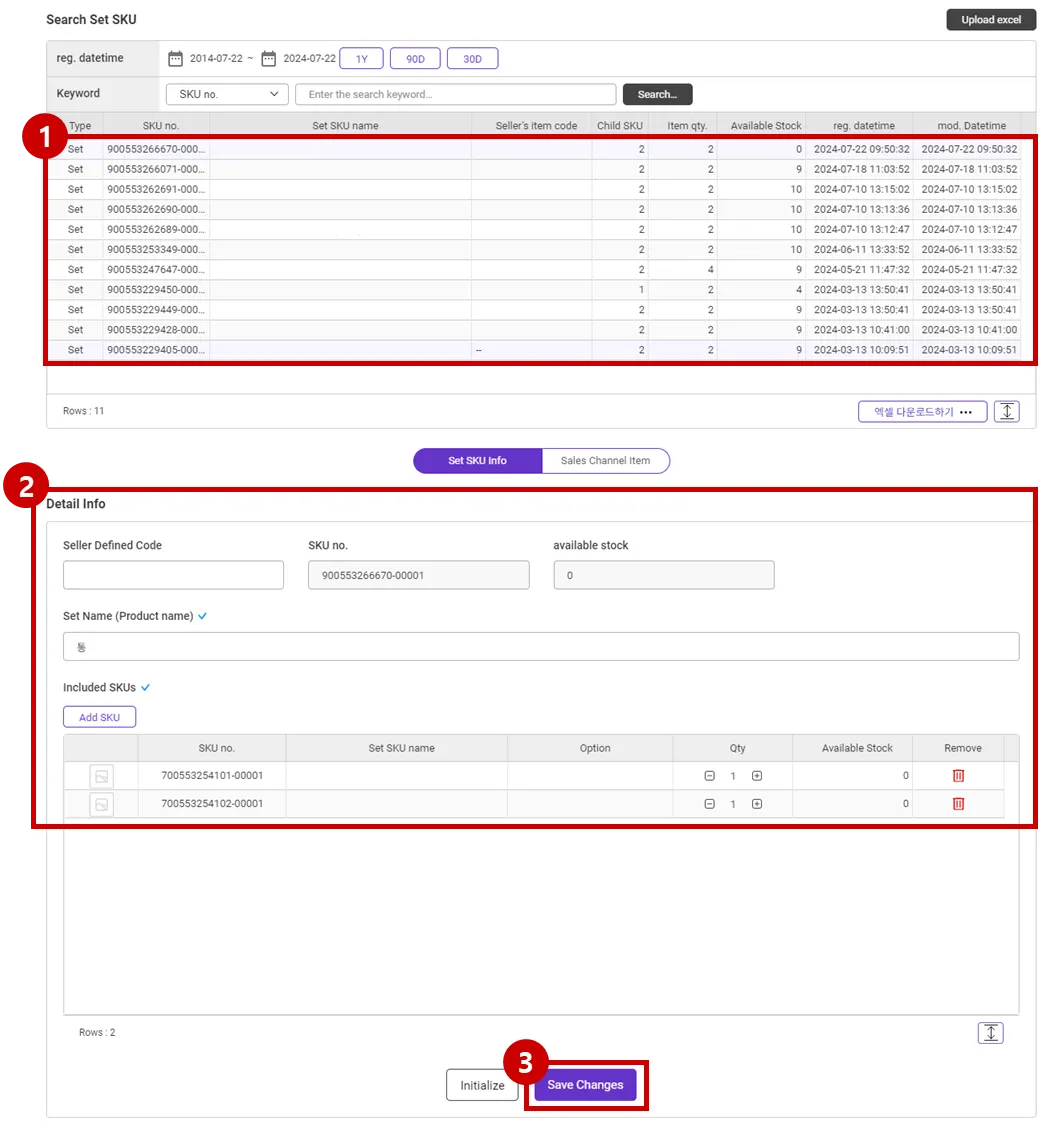
1.
Click on the list of registered SET SKUs to display detailed information at the bottom.
2.
You can check the information of the selected SET SKU.
3.
You can modify the information of the selected SET SKU.
12-b. Automatically Generated Products
When an order is registered from a sales site, and when a product has not been matched with the exisitng SKUs, the basic information of the SKU will be generated automatically. Auto Generated SKUs can be understood as SKUs that have not yet been activated; in fact, they are not yet managed for stock, but have basic information stored in advance.
When you manually register a product with the same name, if the product name is duplicated, the message “An automatically generated product is found” will be displayed. At this time, if you select [Convert to a normal product], product information including price, URL, etc. will be automatically registered.
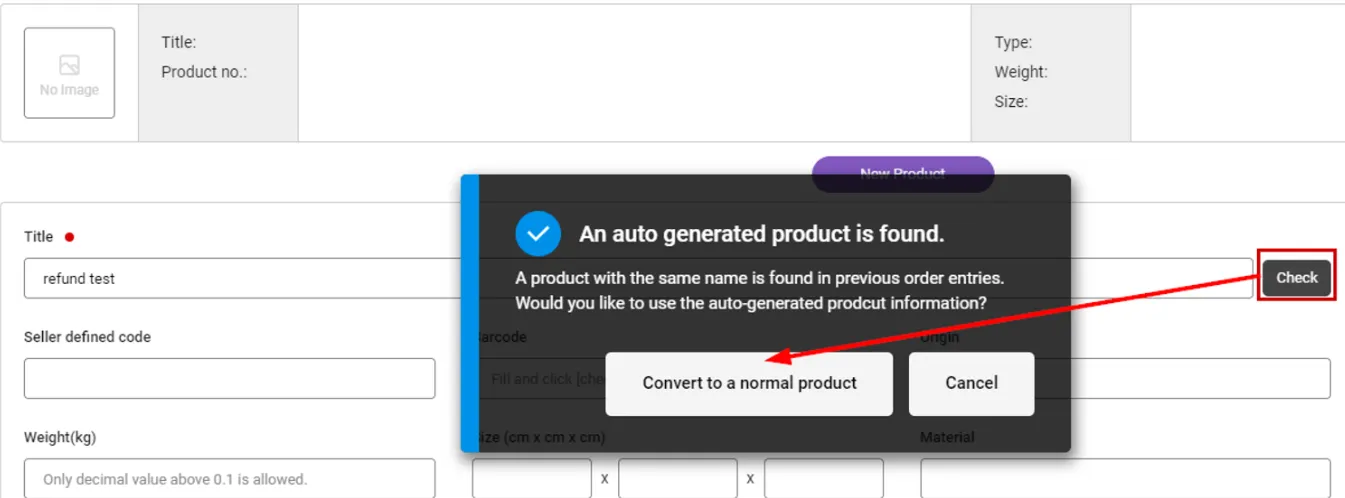
After automatically generated products and options are converted to regular products, the SKU is automatically matched in orders for the product on the sales site even if you do not enter a seller defined code.