.png&blockId=78c9ff9a-717f-4cfb-9b99-87bbb83a5b89)

Is this your first time using Smartship? For those of you who don't know where to start or what to do, please look at the beginner's integrated guide and follow it slowly, so even first time users can easily use it from order registration to shipping processing.
List
1. Smartship Process
•
Smart Shipping
Register/confirm order > Generate/print shipping label > Request pick up
•
Tracx Logis Fulfillment Center (TXFX)
Register/confirm order > Assign to Tracx Logis Fulfillment

Preparing to use the fulfillment center :
After registering the SKU, please stock the product at TXFX.
2. Shipping Type
There are two shipping types provided by Smartship.
Please read the description of each shipping type below and then use the type you want.
•
Smart Shipping
•
Tracx Logis Fulfillment Center (TXFX)
3. Smart Shipping
What is smart shipping?
Smart shipping is a shipping method in which the seller directly packages the product and sends it to a courier or TX fulfillment center. We recommend this method for sellers who sell products that have low sales volume or are difficult to keep in stock.
When registering an order in Smartship, there are two ways to link it using the API or register it manually. Please check the guide below for more details.


3-1. How to register API integration order
API integration order registeration steps
Create API KEY for each sales site > Register sales site API > API order integration > Print shipping label > Request pick up
This is a method of automatically importing orders for each sales site by registering the API KEY provided by each sales site to the smart ship. If you register an API for each sales site, you can set it so that orders from the sales site where sales occurred are automatically registered in Smart Ship. If you do not want the order to be automatically registered, you can set it up individually by referring to the API integration setup page guide.
You can check how to link each sales site API through the link below.
Please check the guide below for details.


Setting up API with Sales Site
When issuing a sales site API KEY to connect to Smartship, please refer to the information below and set the processing method for API integration orders.
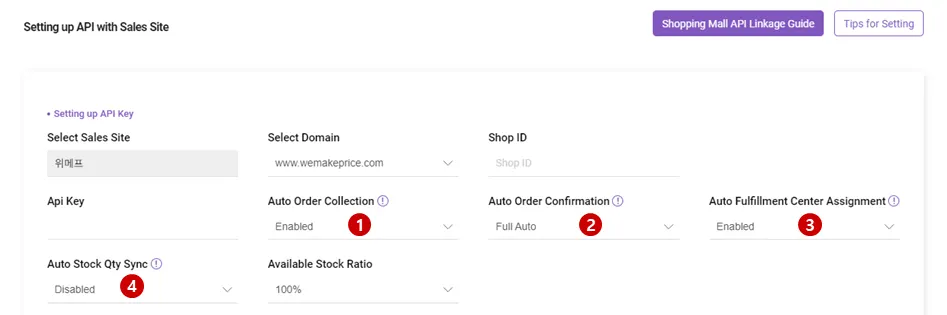
Common Option Details
How to manually handle API order integration
After completing API KEY registration, please register your order by referring to the guide below.
If you have set “Auto Order Collection” and “Auto Order Confirmation” to automatic on the sales site link settings page, the process below will be skipped and you can proceed from printing the shipping label.
Path : Sales Site API > Import Orders via API
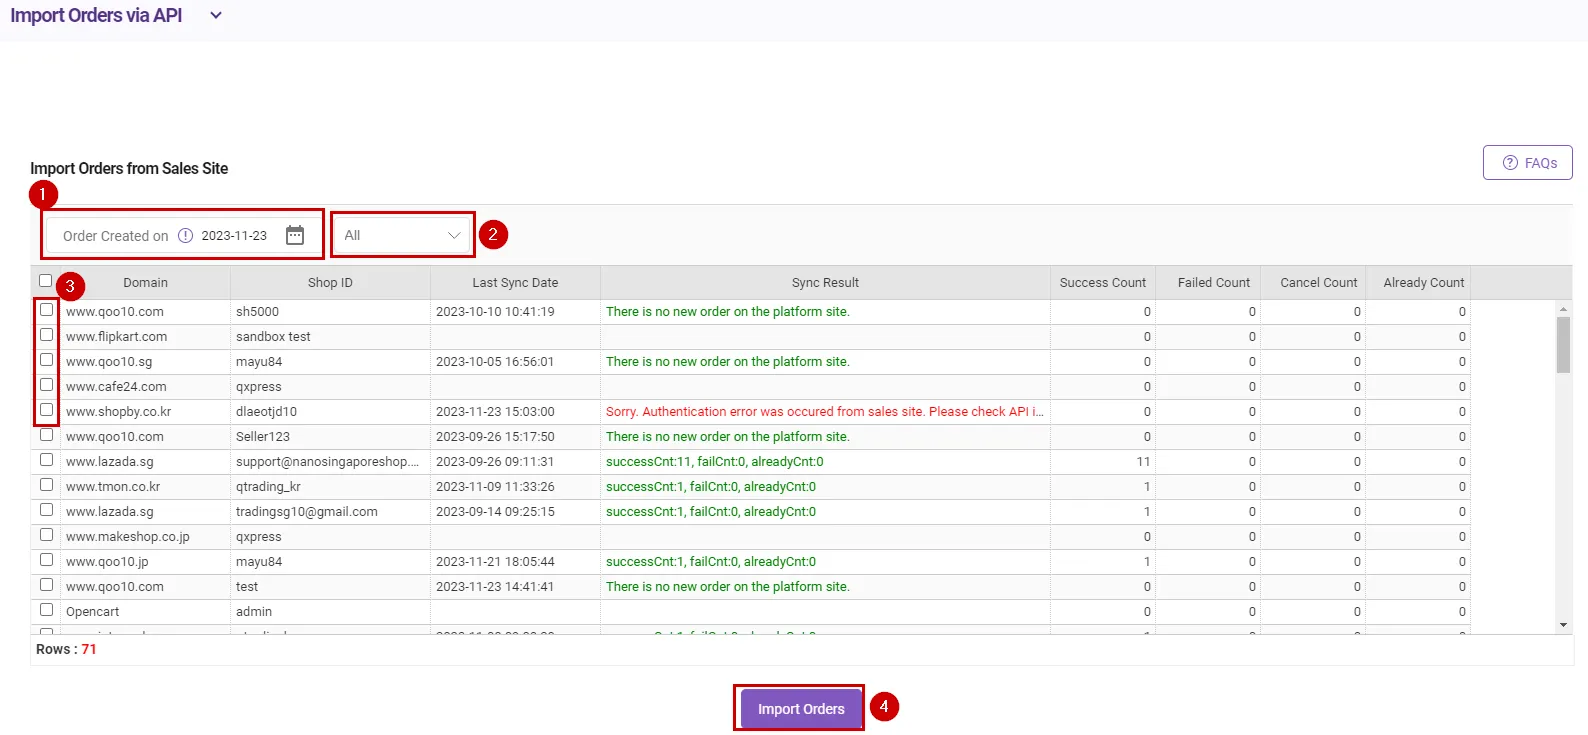
1.
Please set the date on which the order occurred in the sales site.
2.
Select the sales site where you would like to register your order.
3.
Click the checkbox.
4.
Click the [Import Orders] button to register your sales site order.
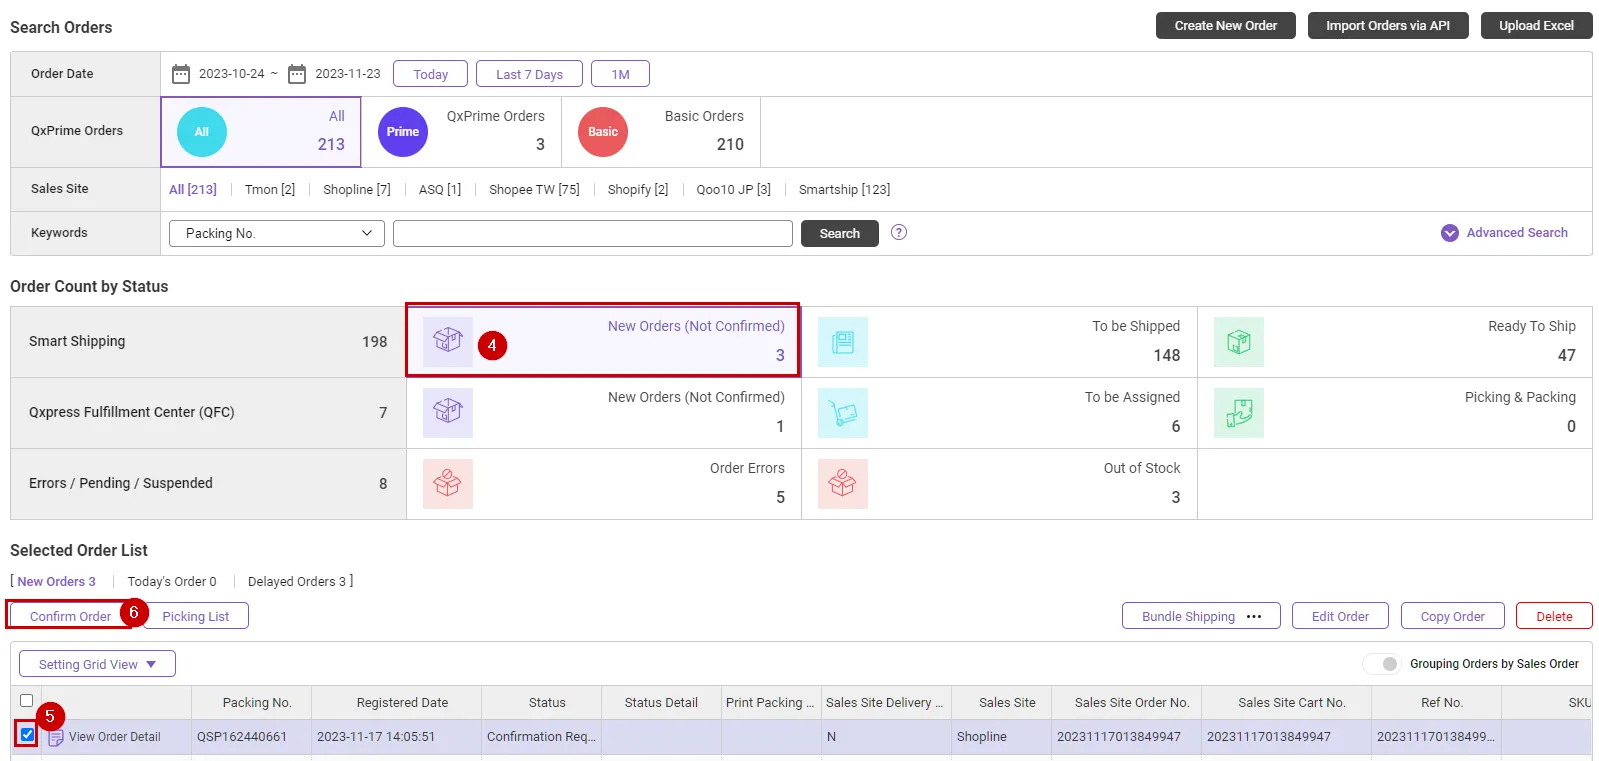
Path : Order > Order Management
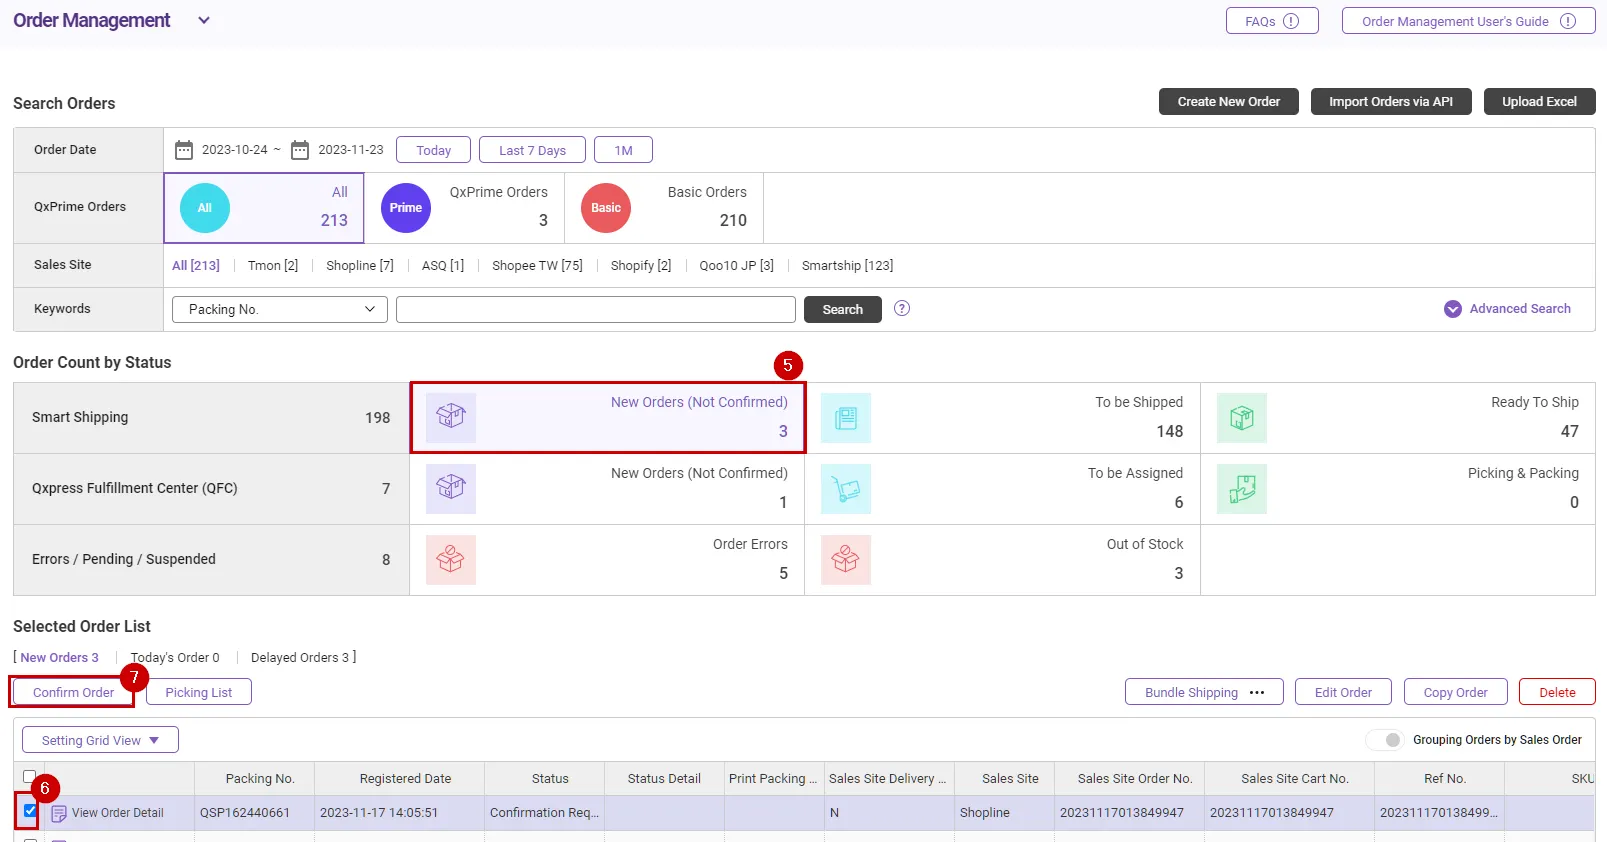
5.
Click New Orders (Not Confirmed).
6.
Select the orders.
7.
When you press the [Confirm Order] button, the status changes to shipping label printing.
3-2. How to register a manual order (Create order)
When registering a single order, please use create order.
Manual order registration steps
Sales site order occurs > Individual registration in Smartship (single item & Excel bulk registration) > Confirm order > Shipping label printing > Pick up request > Package and shipped > Delivered
Path : Order > Order Management
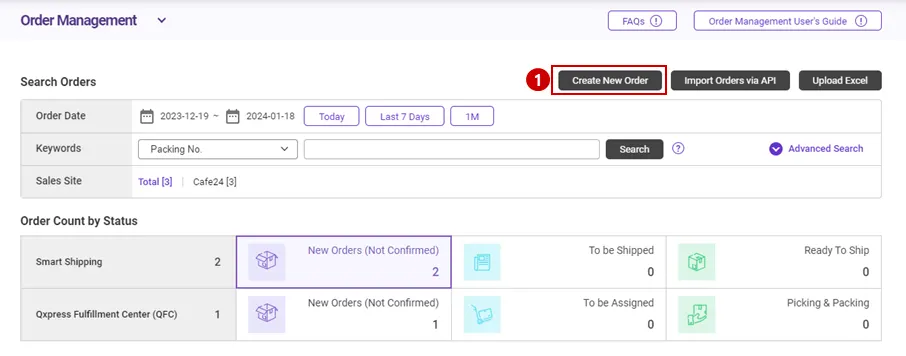
1.
Click the [Create New Order] button.

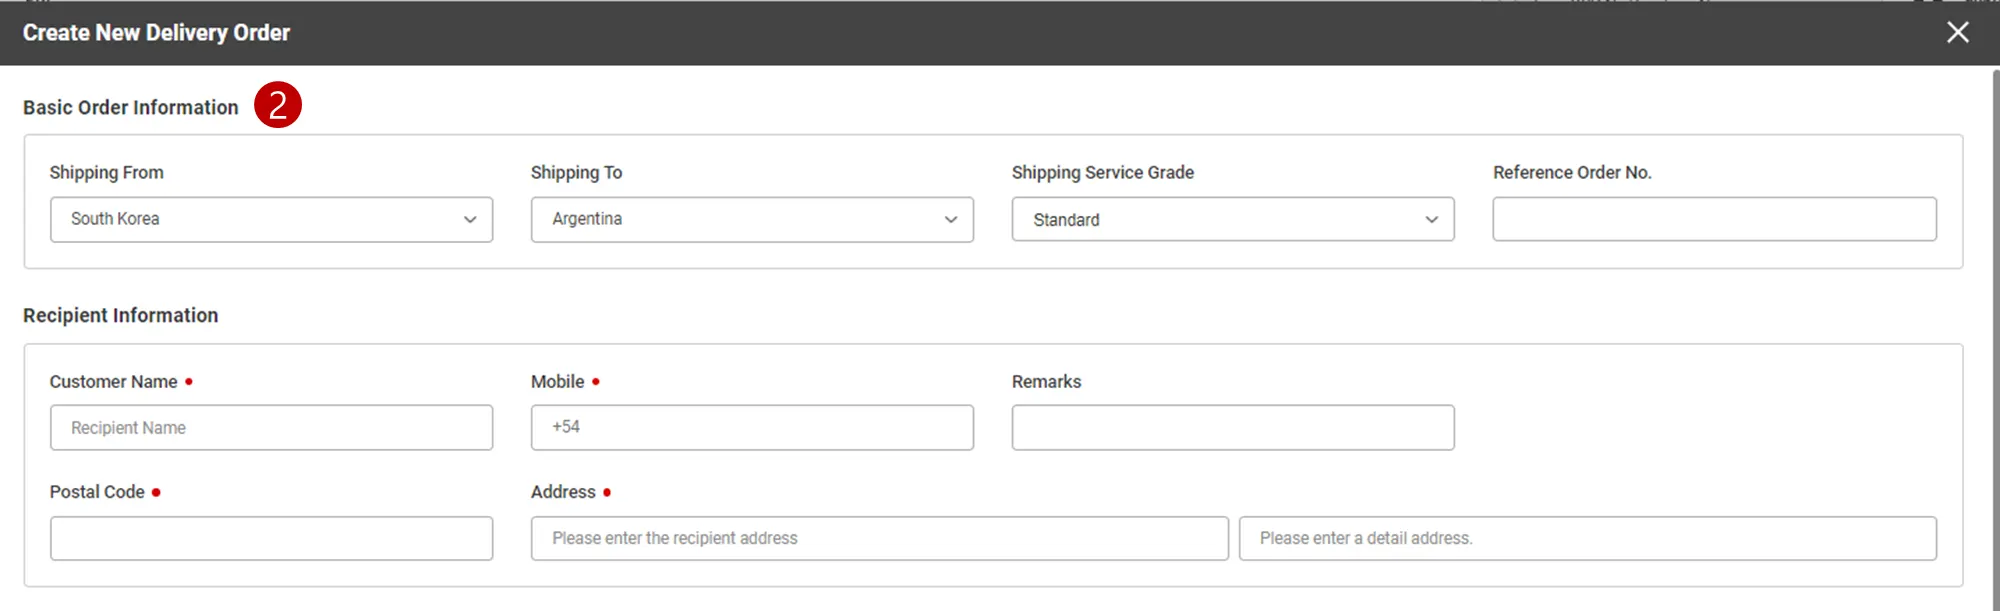
2.
Please enter basic information. (Required fields marked with a red *)
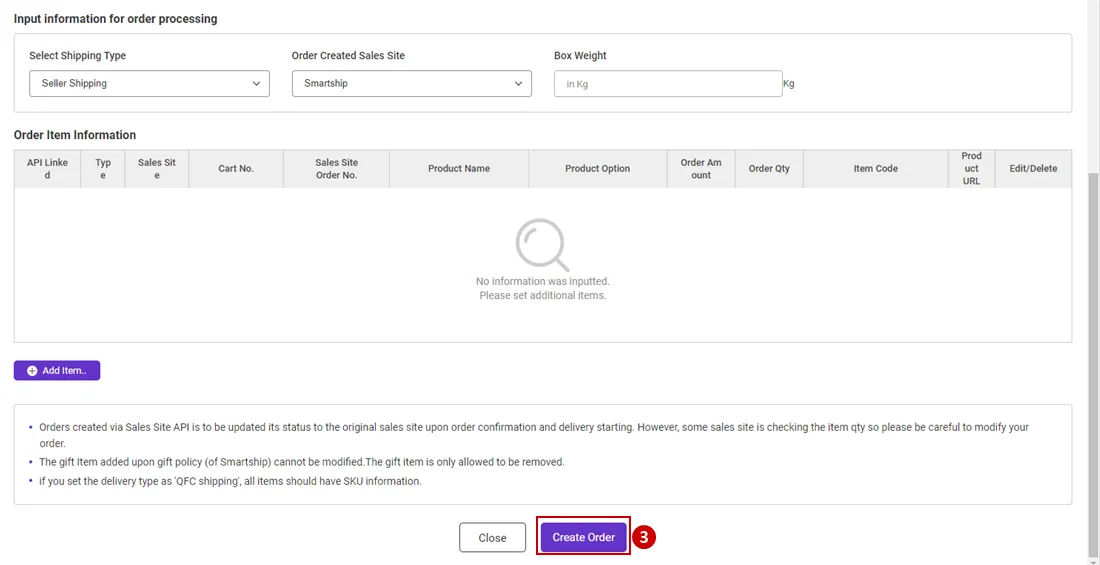
3.
After entering the information, click the [Create Order] button to register your order.
4.
Click New Orders (Not Confirmed).
5.
Select the orders.
6.
When you press the [Confirm Order] button, the status changes to shipping label printing.
3-3. How to register manual order (Upload Excel)
When registering bulk orders, please register using Excel.
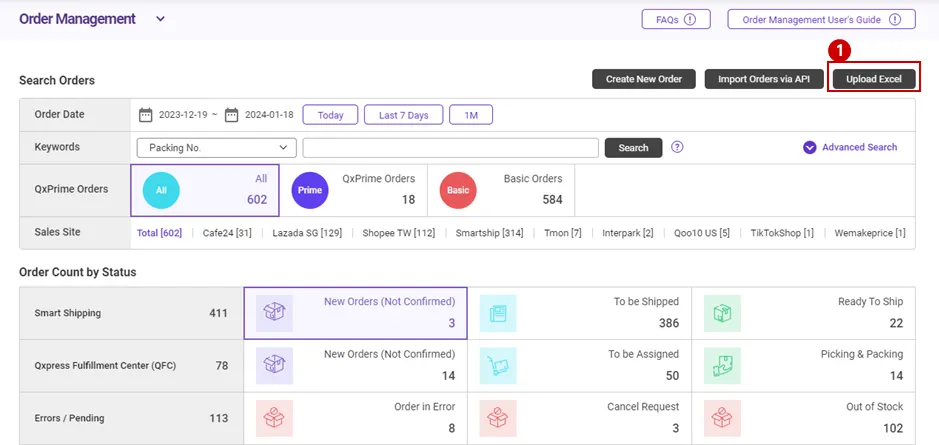
1.
Click the [Upload Excel] button.
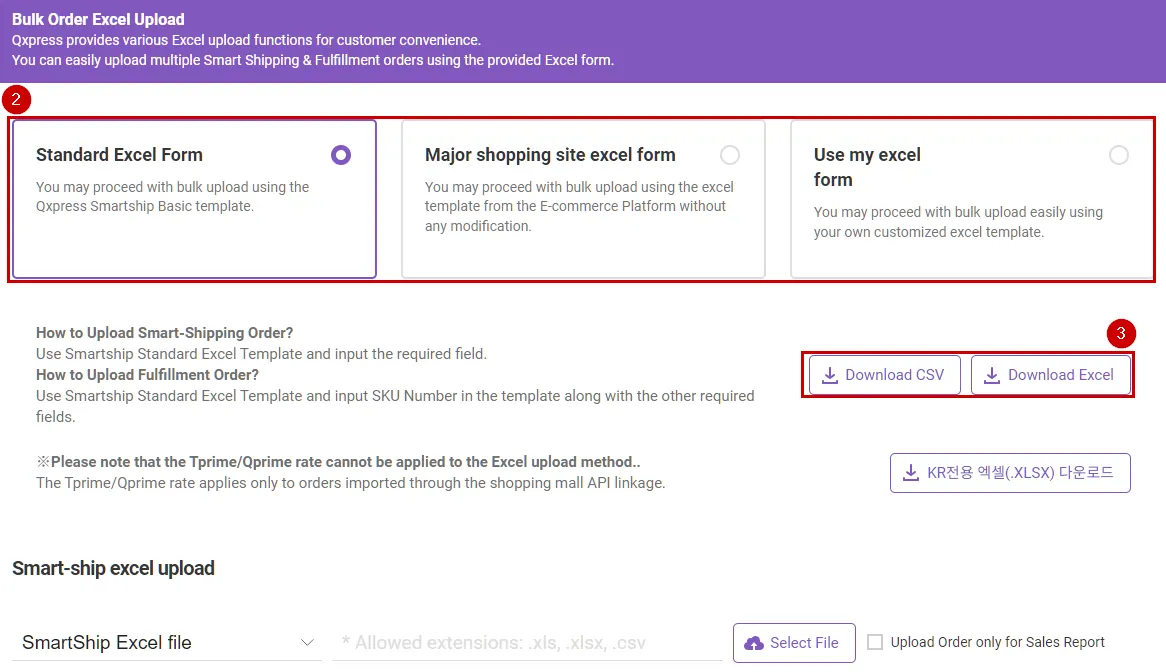
2.
Select the type of Excel form you want to use.
•
Standard Excel Form : You may proceed with bulk upload using the Tracx Logis Smartship Basic template.
•
Major shopping site excel form : You may proceed with bulk upload using the excel template from the E-commerce Platform without any modification.
•
Use my excel form : You may proceed with bulk upload easily using your own customized excel template.
3.
Please select the form and download Excel.
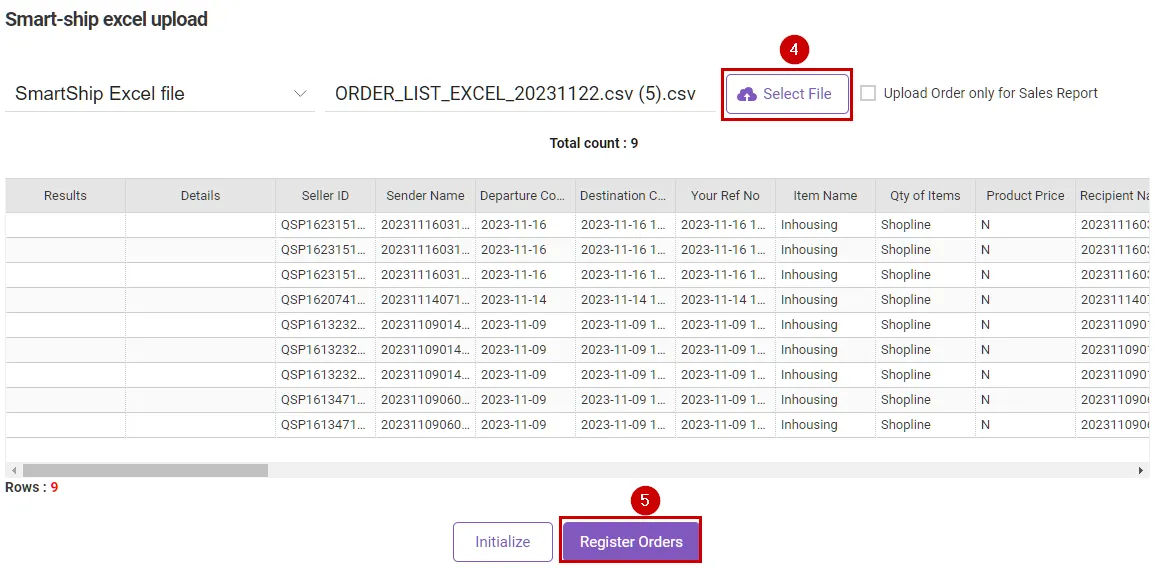
4.
Click the [Select file] button to register Excel.
5.
Click the [Register Orders] button to register your order. The order confirmation process is as above.
3-4. How to create and print shipping label
Once you register your order and complete “Confirm Order”, you can create and print an shipping label and request pickup. After requesting pickup, attach the printed shipping label to the packaging box and deliver it to the pickup driver.
Please refer to the guide below on how to print an shipping label.
Path : Waybill > Shipping Label
How to print shipping label for unassigned orders
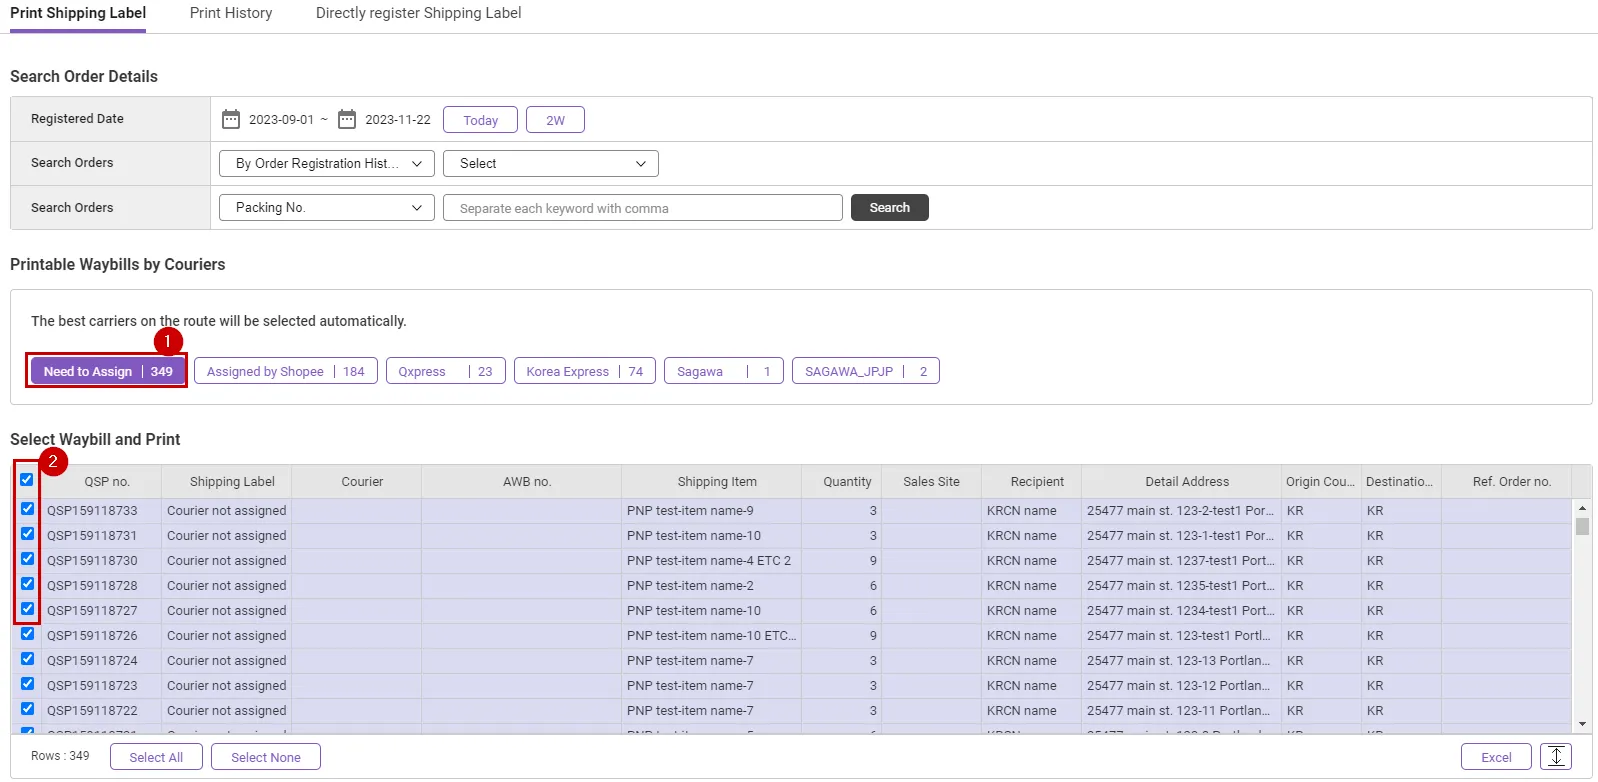
1.
Click the [Need to Assing] button.
2.
Please select the order that requires carrier assignment.
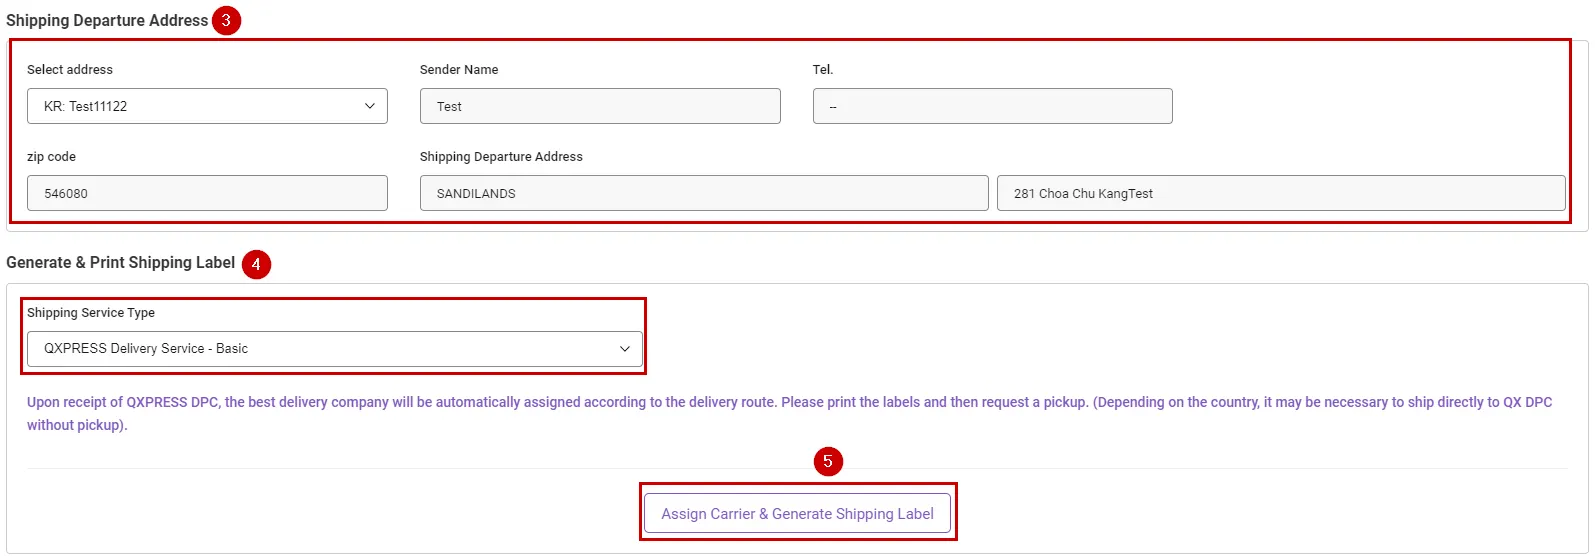
3.
Please enter Shipping Departure Address information.
4.
Please select a Shipping Service Type. (If you are not a API-integrated seller, it will be fixed to Basic service.)
5.
When you press the [Assign Carrier & Generate Shipping Label] button, a shipping company is assigned.
(Tracx Logis is assigned as the default shipping company, and the existing QSP number is assigned as the shipping label number.)

6.
Please press the [Tracx Logis] button.
7.
Please select the order for which you want to print a shipping label.
8.
Please press the [Print Shipping Label] button.
9.
After printing the shipping label, attach it to the packaging box.
How to print an shipping label for an order with a pre-shipped carrier assigned
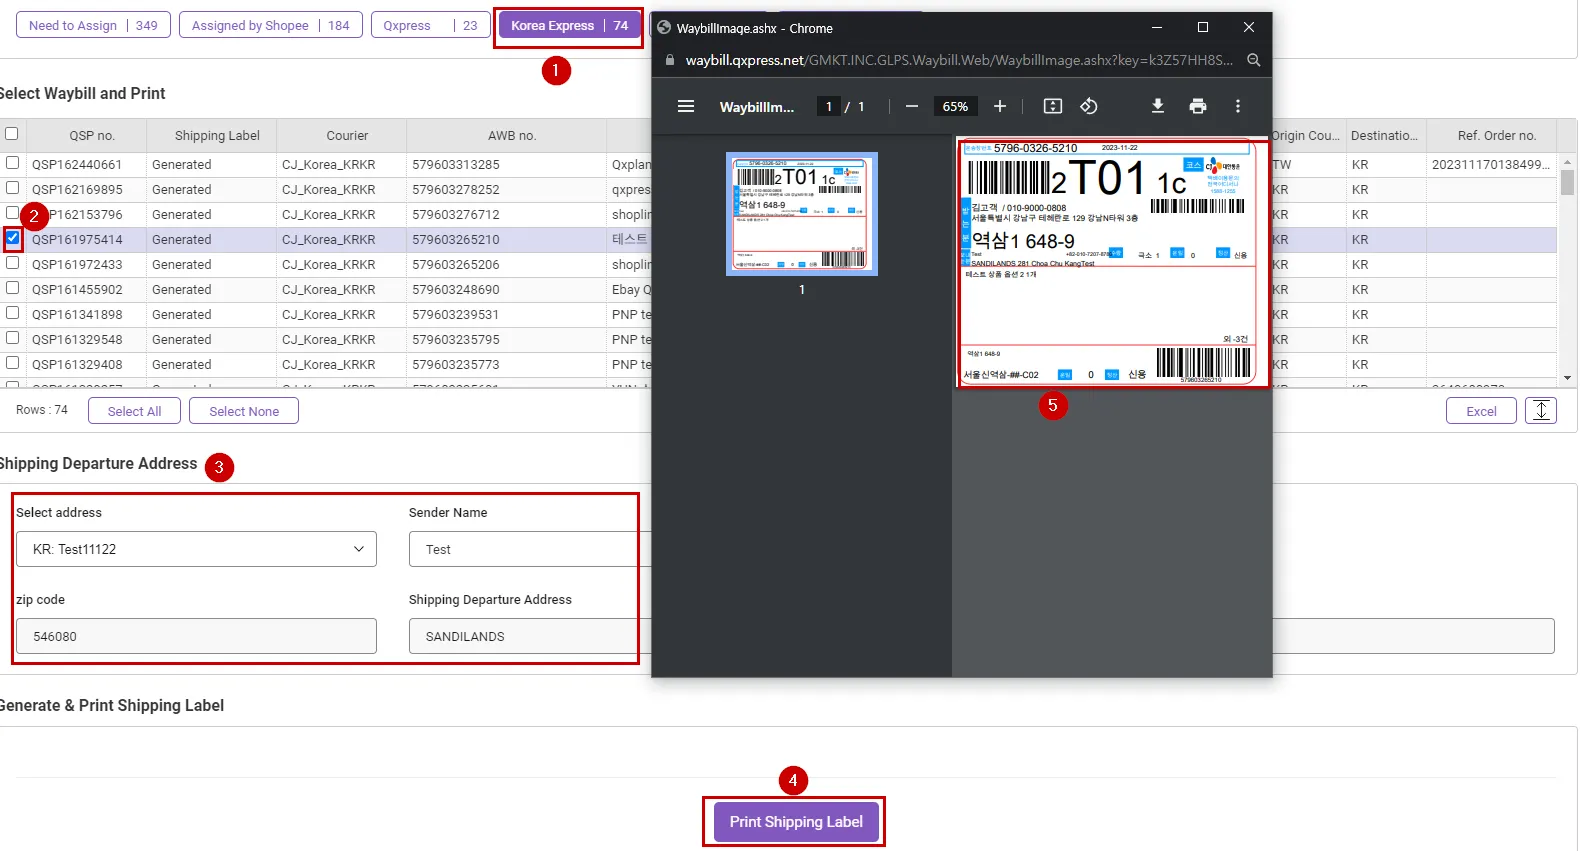
1.
If a pre-shipping carrier is set up, it will be displayed at the top.
(Press the [Korea Express] button when printing invoices for orders assigned to CJ.)
2.
Please select the order for which you want to print an shipping label.
3.
Please enter Shipping Departure Address information.
4.
Click the [Print Shipping Label] button.
The [Print Shipping Label] button appears after printing the shipping label.
5.
After printing the shipping label, attach it to the packaging box.


3-5. How to request pick up
Once you have completed printing the shipping label, you can request pick up and have it shipped. (Not a required process.)
After requesting pick up, please prepare the product in advance by packaging it and attaching the printed shipping label.
Shipping is not possible if an shipping label is not attached.
Please refer to the guide below on how to request pick up.
Path : Pick Up
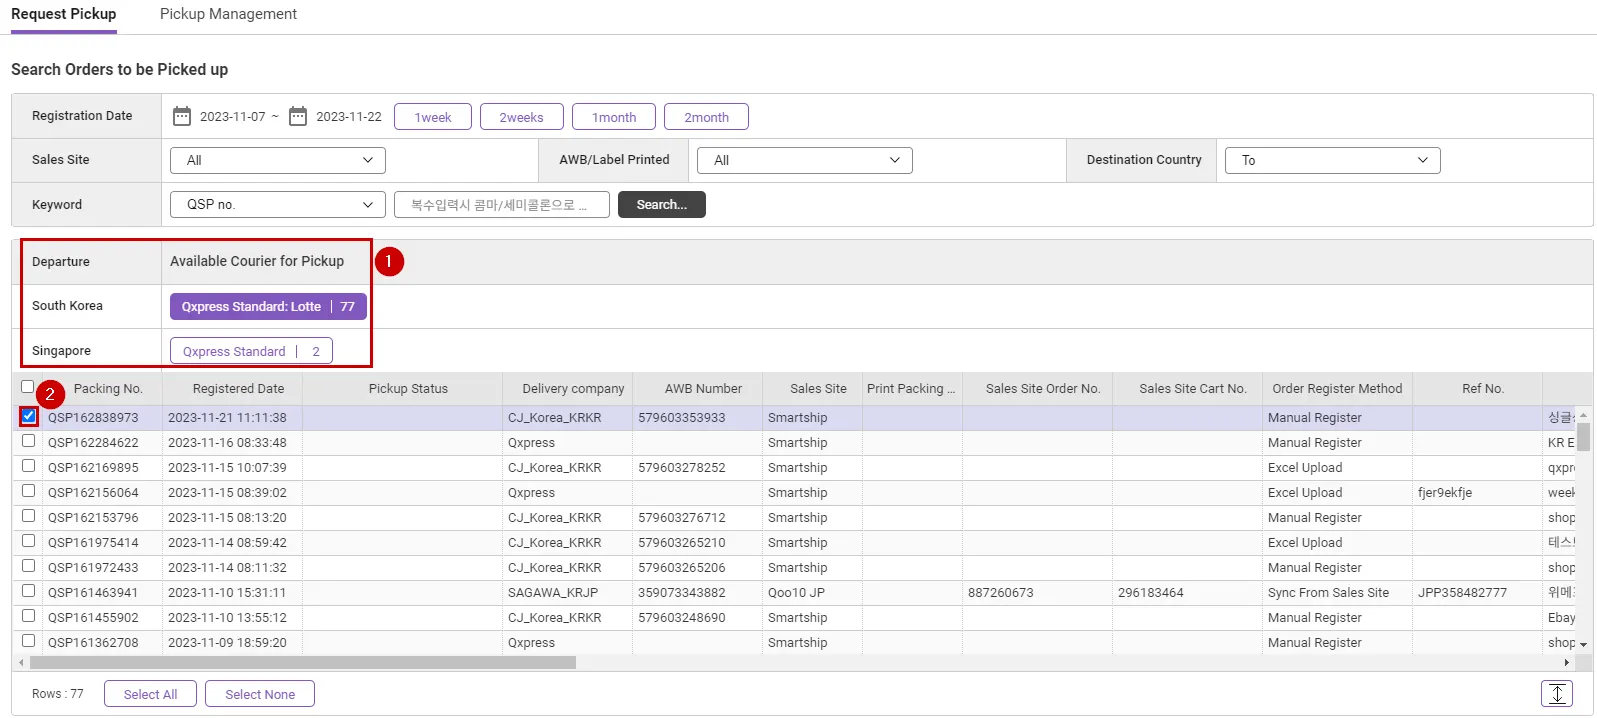
1.
Select the departure country and applicable courier company.
(Depending on your Departure, Available Courier for Pickup will change.)
2.
Select the order you would like to request pick up.
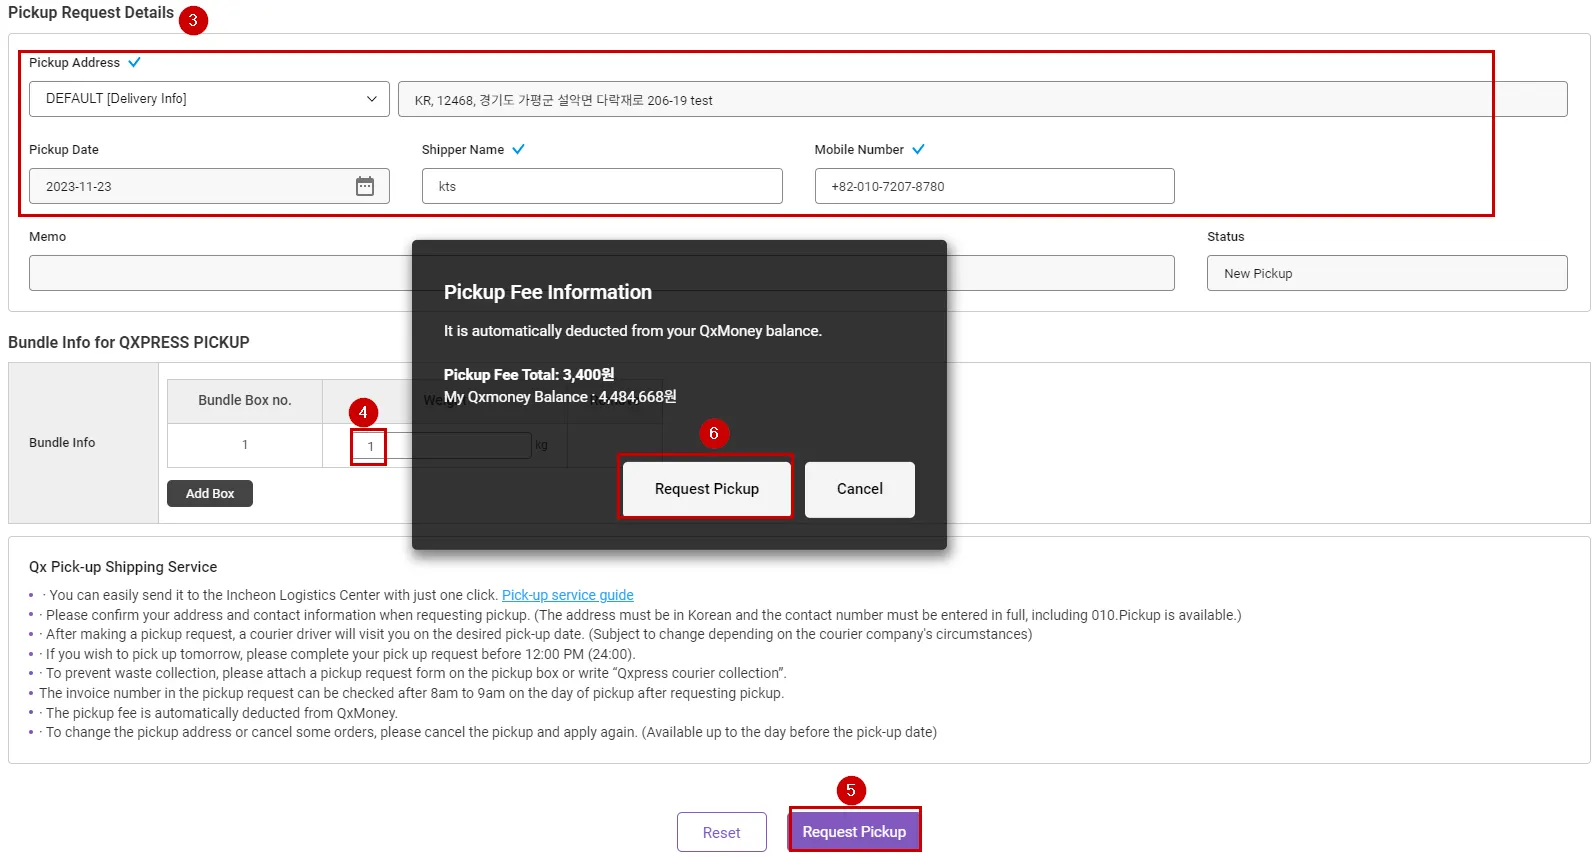
3.
Please enter Pickup Address information.
4.
Please enter the weight of the packaging box.
5.
Click the [Request Pickup] button.
6.
After checking the pickup fee, click the [Request Pickup] button to complete the pickup request.
Please check the guide below for details.


4. Tracx Logis Fulfillment Center (TXFX)
What is Tracx Logis fulfillment Center?
This is a shipping method in which Tracx Logis ships a product with a registered SKU once it is in stock at the TX warehouse and the product is sold.
Before using fulfillment shipping, you must register the product you are selling in the sales site as an SKU. After completing SKU registration, you must ship it to the TX warehouse. Incoming products are stored in the TX warehouse, and the fulfillment order registered by the seller is confirmed by TX before being shipping to the buyer. There is no need for the seller to print a shipping label and request pickup.
Fulfillment order processing sequence
Register/confirm fulfillment order > Assign to Tracx Logis Fulfillment
(Preparation: SKU registration > TXFX warehousing)
Sellers only need to register orders, and those who register orders through API integration only need to register items when set to automatic. Please note that in order to be able to ship normally, you must restock in advance to avoid running out of stock in the future.
4-1. How to register a SKU
Please check the guide below for details.


There are two ways to register a SKU.
•
Bulk registration through Excel
•
Register a single item on the page
Bulk registration through Excel
Path : Inventory > SKU Management
If you want to register a large number of products at once, you can enter product information in a predefined Excel template and upload it to register products in bulk.
The Excel upload function can be executed by selecting “Inventory > SKU Management” from the Smartship menu, entering the SKU management page, and then clicking the [Upload Excel] button at the top right of the screen.
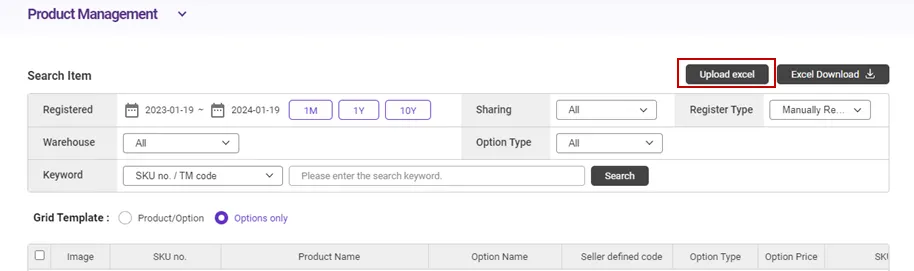
Click the [Upload Excel] button to display the SKU registration pop-up window.
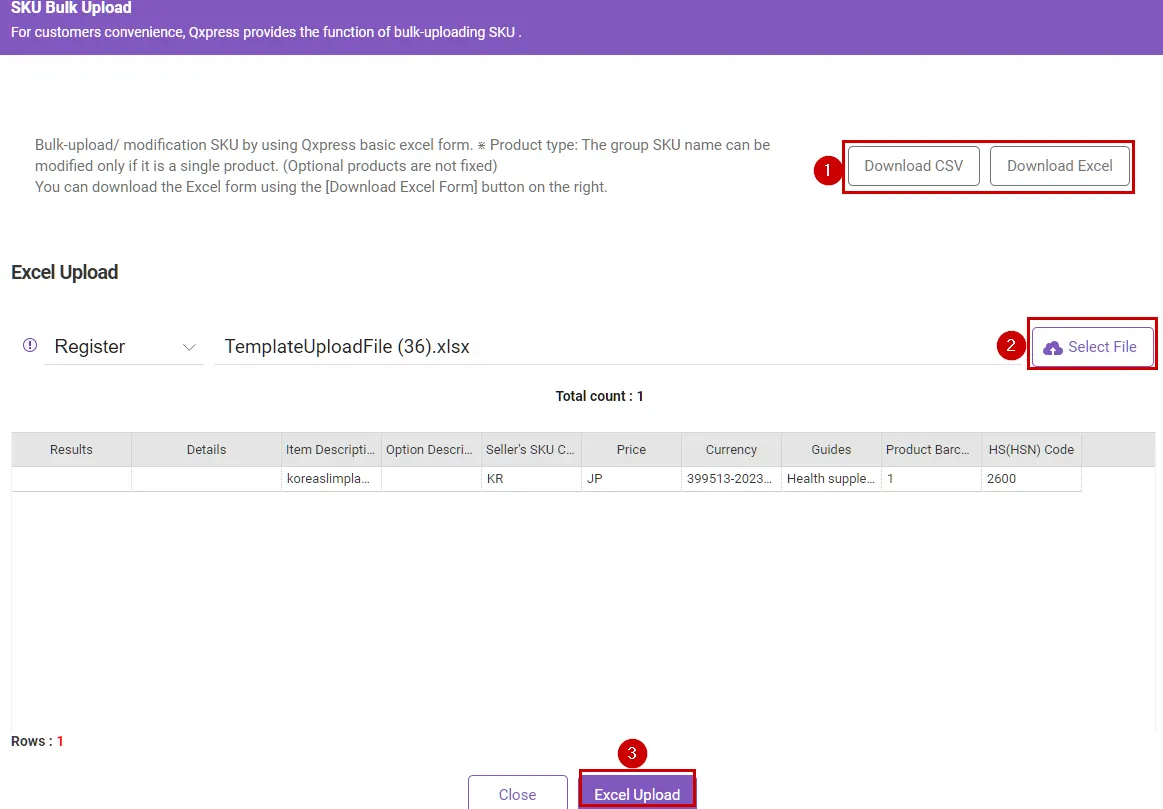
1.
Please download Excel format.
2.
After editing Excel, click the [Select File] button to upload.
3.
Click the [Excel Upload] button to complete SKU registration.
What is the difference between CSV and XLSX?
The template for entering product information can be downloaded from the upper right corner of the upload pop-up window. There is a [CVS format download] button and a [XLSX format download] button. Generally, people use XLSX files.
Some Excel versions cannot recognize more than 60,000 rows in one file, so if the data size is very large, please register using the CSV file format.
Fill out the template
Enter the information below in the downloaded template.

1.
Item Description [Required]: Enter the product name.2.
Option Description: Enter the option name. For single products without options, you do not need to enter them.
3.
Seller’s SKU Code: If there is a management code for each option managed by itself, enter it.
4.
Price [Required]: Enter the price of the product/option. Please enter only numbers greater than 0.5.
Currency [Required]: Enter the currency code using three digit alphabetic characters. (e.g. Korean Won = KRW, US Dollar = USD, Japanese Yen = JPY, etc.)The order of each field in the template is important when uploading Excel. If you arbitrarily change the order of each column in Excel, it will not be registered correctly after uploading, so please keep the order of the fields as they are in the original form.
Register Product through Page
Path : Inventory > SKU Management
You can register products by entering them one by one through the SKU management page. The SKU management page provides an option creation tool that allows you to quickly and easily register list-type and combination-type options, so if the number of products you want to register is not large, product registration through the page may be easier and faster.
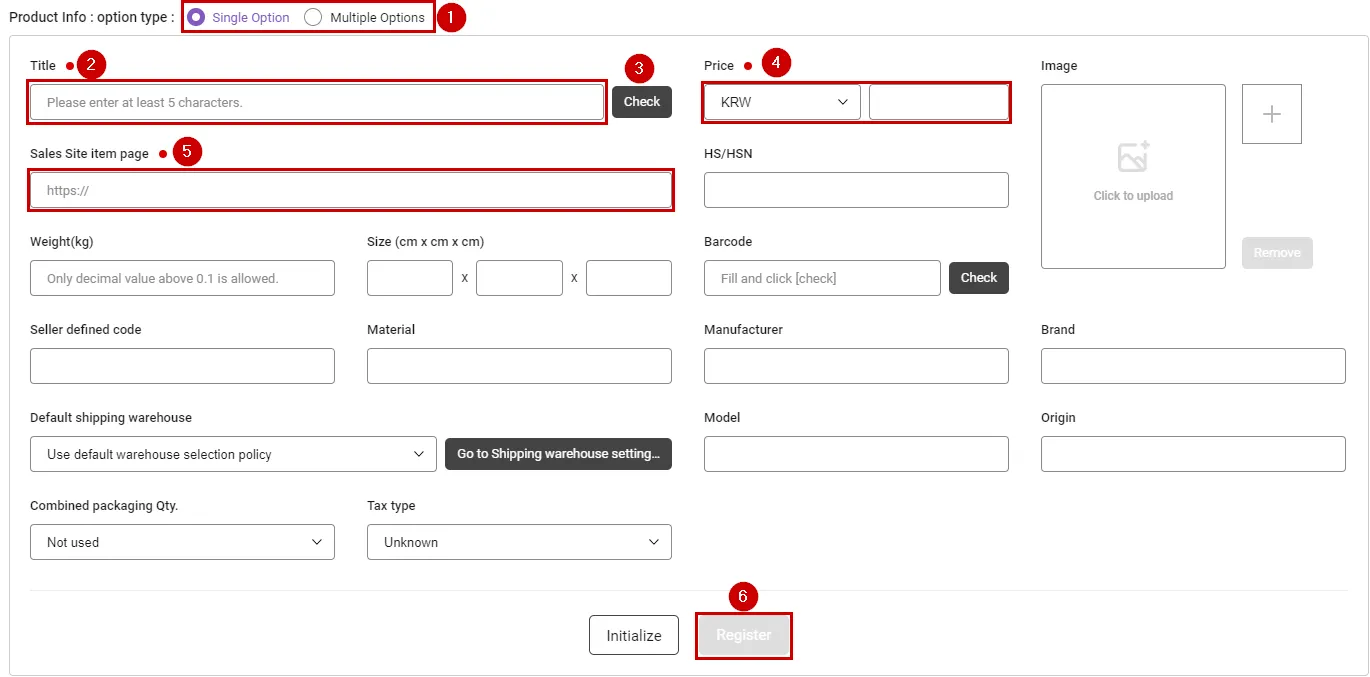
1.
Select the product type according to the option between ‘Single Option’ and ‘Multiple Options’.
2.
Enter the product name of the main product. Enter at least 3 characters for the product name.
3.
Click the [Check] button to check if the product name is a duplicate.
4.
Enter the product price. Product price can only be entered as a number greater than 0.
5.
Enter the URL of the product detail page that sells the product.
6.
After entering all required information, the [Register] button will be activated. Click the [Register] button to register the product. If you register a multi-option product, the option generator screen will appear.
If all required fields are entered correctly, the [Register] button will be activated. If the [Register] button is not activated, please check if the required fields are entered correctly.

If you enter an incorrect information such as price or URL, it will be treated as not entered.
The following information is an item that can be entered additionally.
•
Seller Defined Code : You can enter the seller code for matching with an external sales site. This can only be entered for single products, and for multi-option products, the seller defined code must be entered only for each option.
•
Product Barcode: By entering the product barcode, you can quickly enter the standard specification information of the matching product.
•
Origin
•
Weight(kg)
•
Size(cm X cm X cm)
•
Material
•
Manufacturer : : It applies to each option in common.
•
Brand : It applies to each option in common.
•
Model
•
Image : You can register up to 2 images.
•
Default Shipping Warehouse : If you have more than one fulfillment warehouse in use, you can manually designate a preferred shipping warehouse for that SKU.
•
Maximum combined packaging quantity : For bulky products such as diapers, you can specify the maximum quantity that can be packed together. The default value is ‘Disabled’, and you can specify the quantity that can be packaged from 1 to 5. Orders containing SKUs with specified quantities that can be combined are automatically packed separately according to the order quantity.
•
Tax type : You can set tax types for products defined by SKU. (‘Unknown’, ‘Taxable’, ‘Non-taxable’)
How to Register Seller Defined Code
Why register a seller defined code?
In order to recognize an order from an sales sites as a fulfillment shipment, the system must know which SKU in the TXFXs is matched with the sold product. Typically, this matching is done using the “Seller Code” field on the product on the sales site.
Most sales sites have a field to enter a separate code such as “SKU”, “Seller Product Code”, or “Seller Management Code” when registering a product/option. The value registered here can be the SKU number (of Smartship), or you can register your own seller management code and then register the same code value to the corresponding Smartship SKU.
•
Using Smartship SKU number in management code of product on sales site
•
Using seller management code to a Smartship SKU
You must choose one of these two methods to register your information.
This seller management code is entered into the product in the case of a single product, but is entered into each option in the case of an optional product.
E.g.)1: Tmon option management – “Product Management Code”

E.g.)2: “Seller product number” in Interpark’s product management
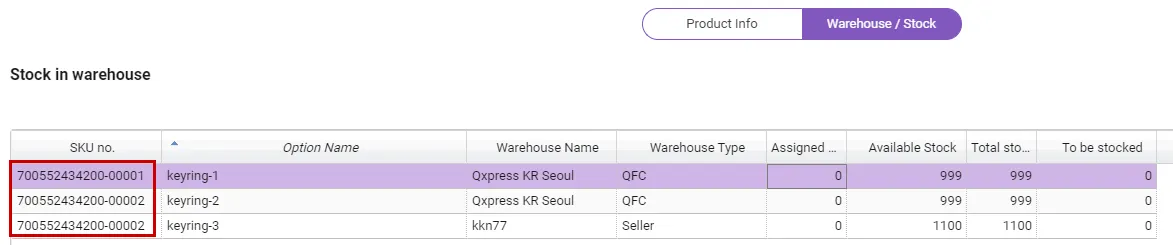
Enter the SKU Number in the Seller Defined Code of the Sales Site’s Product
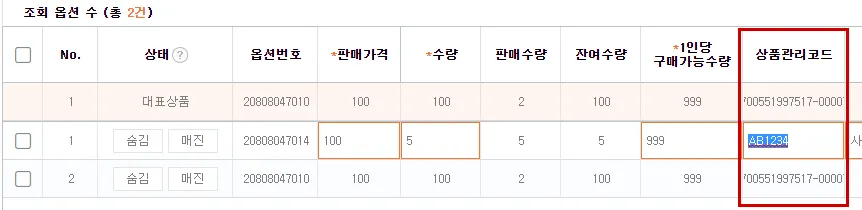
If you do not define and use a separate seller defined code for the product you are selling, you can just use the SKU number as the defined code. The SKU number can be checked directly in the SKU number column in the inquiry grid of the SKU management page.
Even in the case of a single product, a SKU number is created for actual stock management, so you can use this information as is. Usually, the SKU number of a single product is ‘-00001’ followed by the product number (12 digits starting with 7 or 9).
Register this SKU number as the management code for each product/option on the product management page of the sales site.
How to Register a Seller Management Code to a Smartship SKU
If you use a separate management code, a unique management code is usually registered in the product information on the sales site. This means that there is no space left for the SKU number on the product on your sales site. In this case, just register the seller defined code in the Smartship SKU.
On Smartship, in the case of a single product, there is an item called “Seller Defined Code” in the representative product information. In case of a multi-option product, the field is present in each option information tab. Register your seller management code here.
When registering in bulk using Excel file upload, you can register by entering the seller management code for each SKU in the “Seller’s SKU Code” column.
[Single product]
For a single product, you can edit product information by selecting the product row and representative option row.
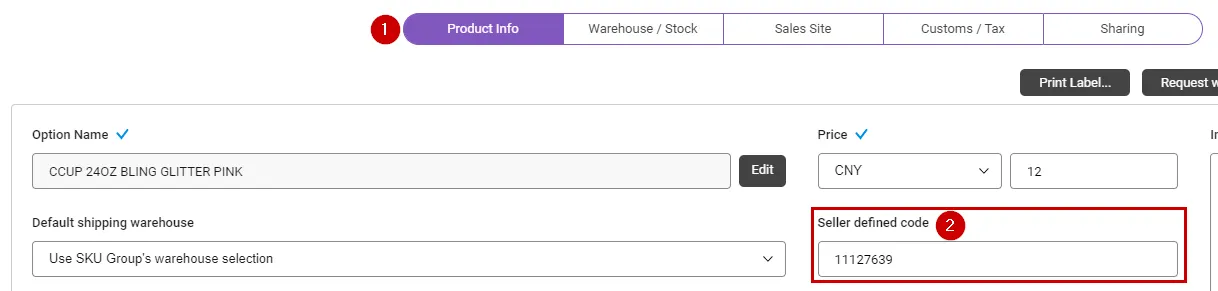
1.
Click the “Product Info” tab.
2.
Enter the seller management code in the “Seller defined code” field.
[Option product]
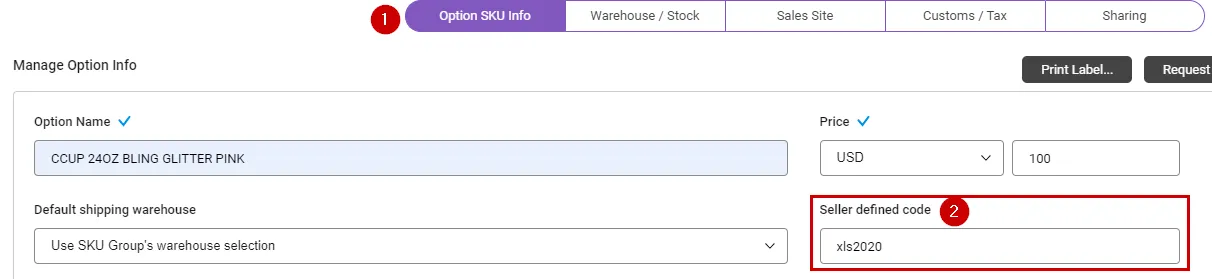
1.
Select each option and click the “Option SKU Info” tab.
2.
Enter the seller management code in the “Seller defined code” field.
4-2. Apply for SKU warehousing
Once you have completed SKU registration, you must store the product in the TX warehouse.
Please refer to the guide below for how to apply for stock.
Path : Inventory > Re-Stocking
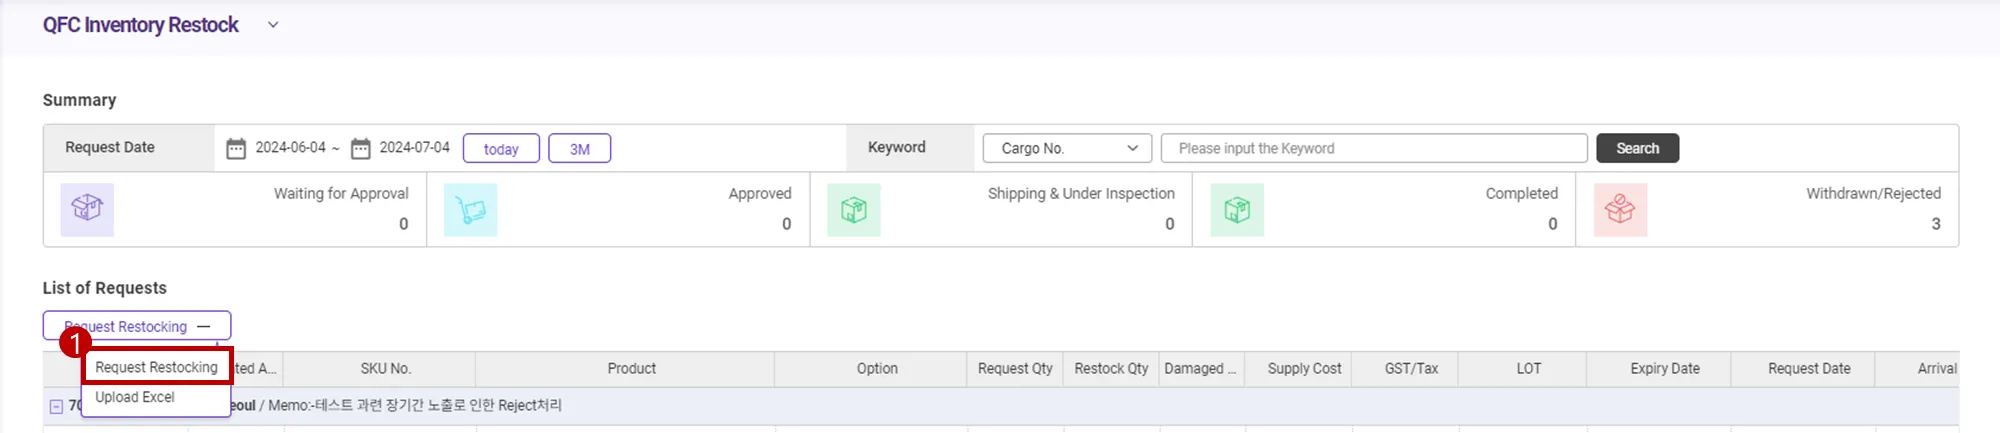
1.
Click the [Request Restocking] button in the Product and Inventory > Re-Stocking menu.
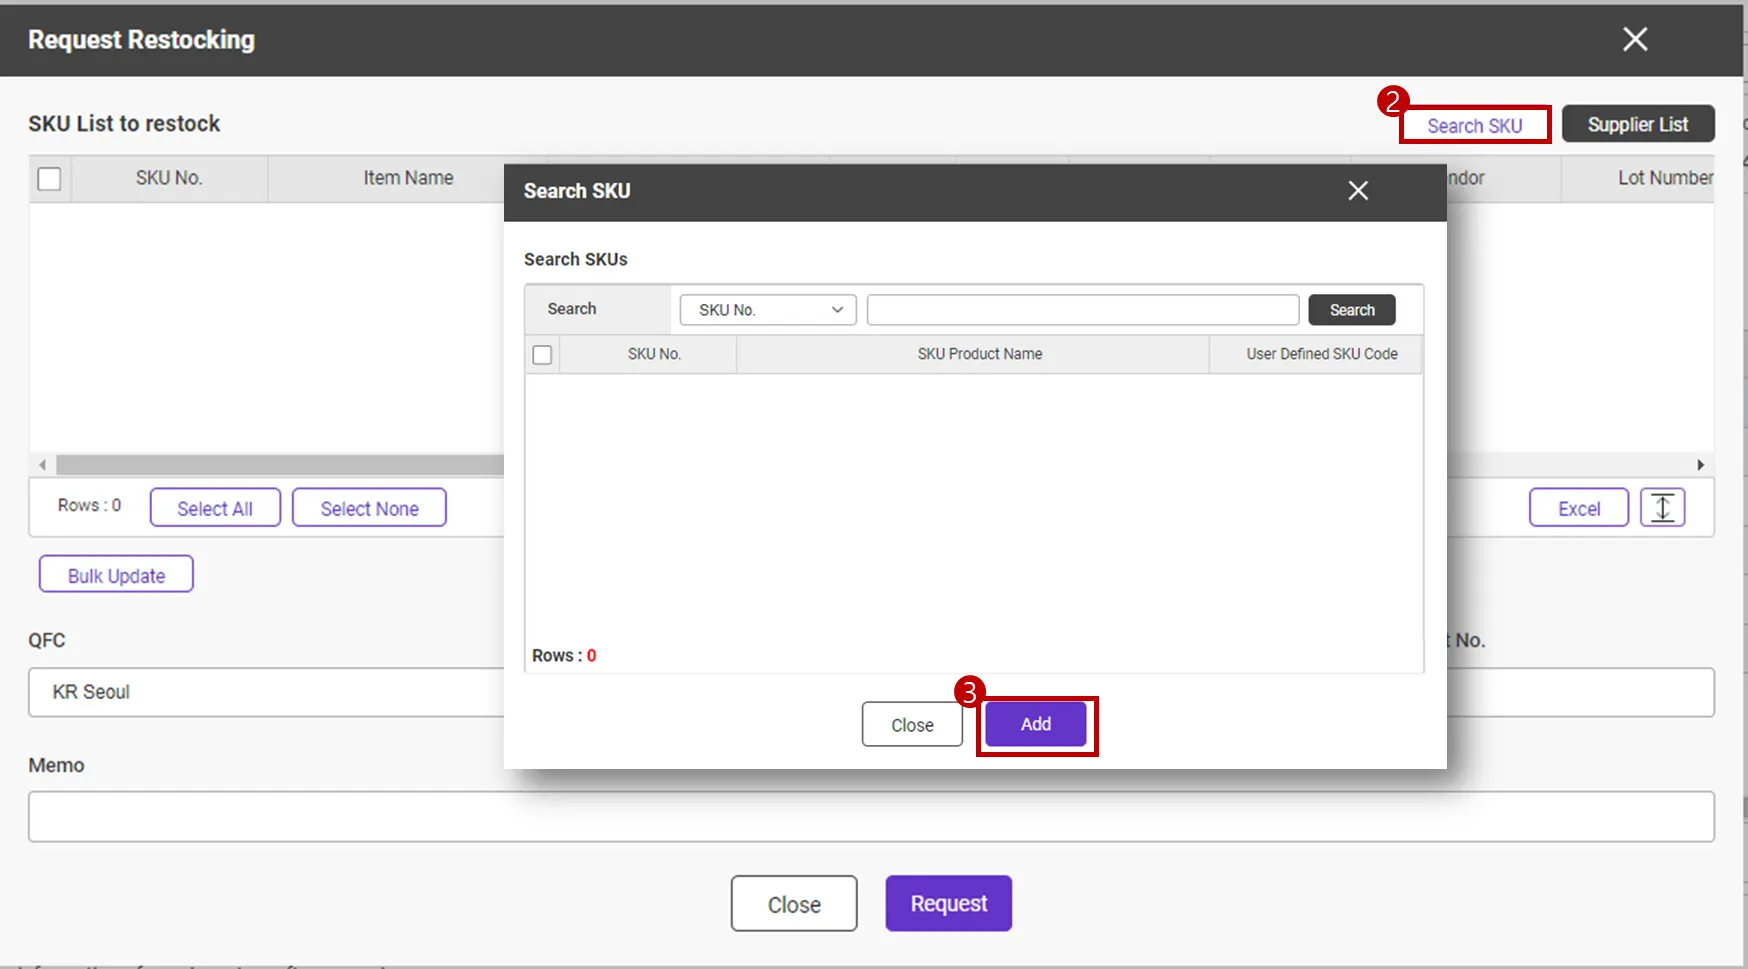
2.
Click Search SKU to search for the SKU you want to send to the warehouse.
3.
Click the [Add] button to add items to be stocked.
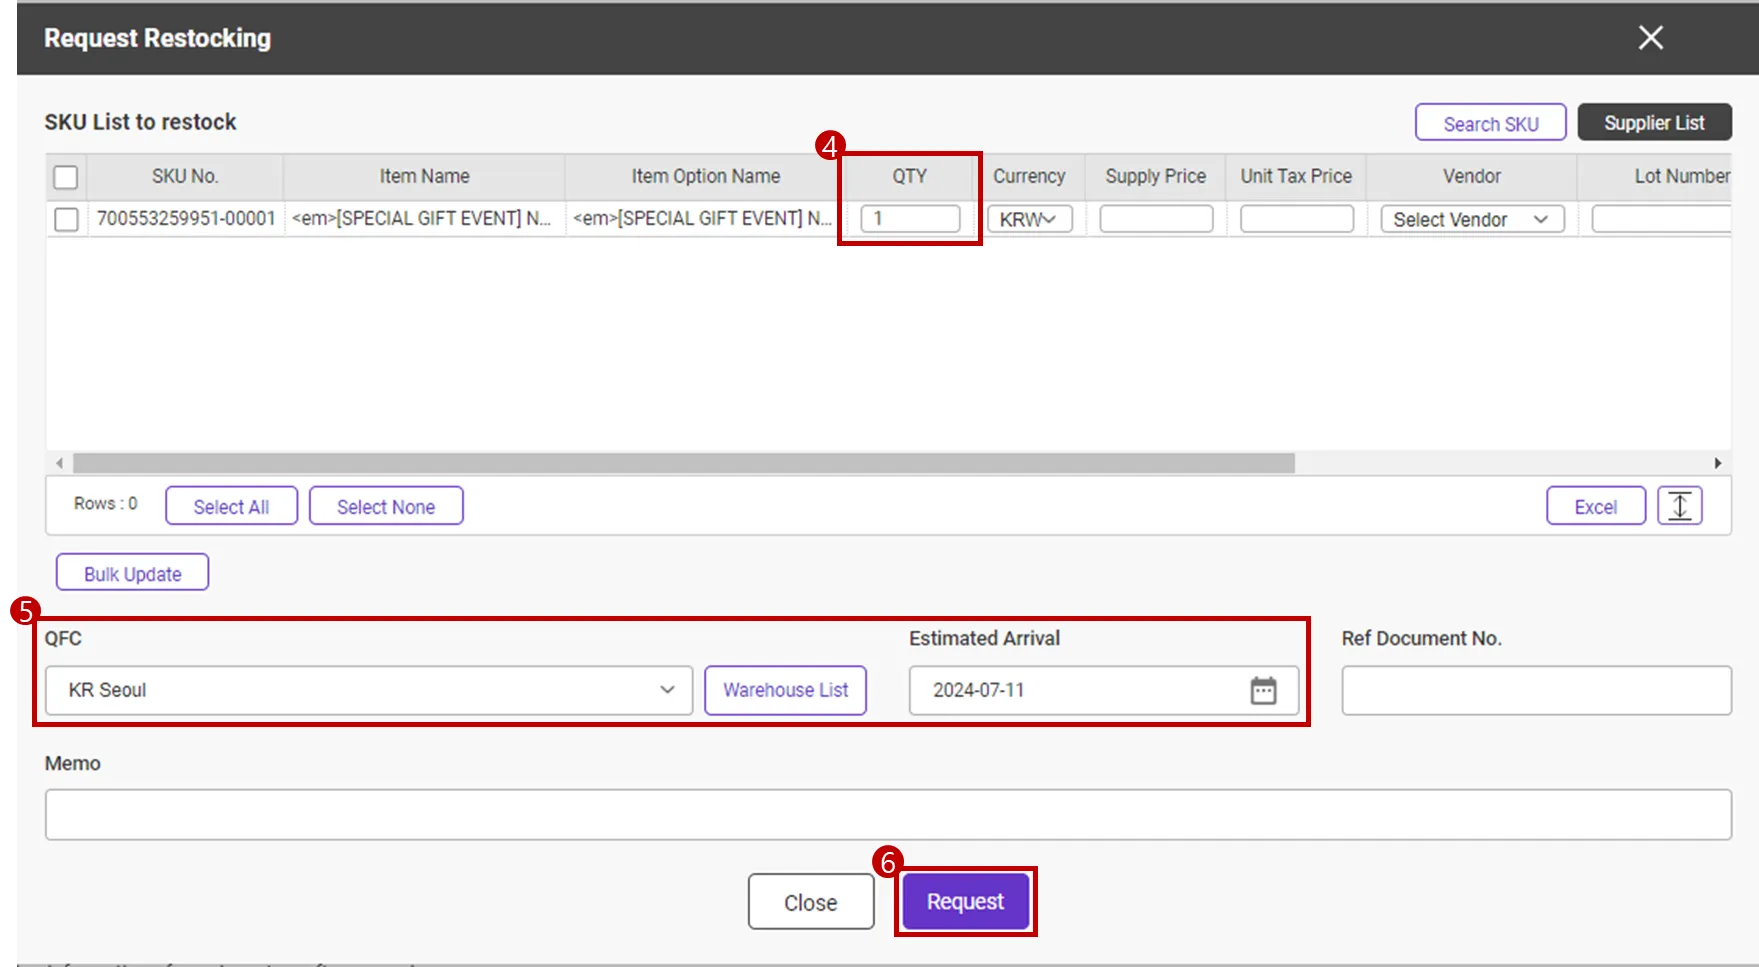
4.
Please enter the shipment quantity. Please provide additional information as needed.
•
Delivery quantity: Quantity to be included in TXFX (individual product quantity, not number of boxes)
•
Currency
•
Supply price
•
Tax price
•
Vendor: Supplier
•
Production/manufacturing unit number (Lot No): Product production date
•
Product expiration date: Products with a fixed expiration date, such as cosmetics, etc.
•
SKU Memo
5.
Select the warehouse to use, select the expected warehouse arrival date, and click the [Request] button.
Process after application for warehousing

•
Wating for Approval : The TXFX warehousing application is complete. If you apply for a new application, it will be reflected in the “Requested” status.
•
Approved : If the warehouse manager confirms the warehousing application details and approves it, the value is changed to “Approved” status. At this time, please prepare to ship the cargo to TXFX.
•
Shipping & Under Inspection : You have sent a shipment to the warehouse that has been changed to “Approved” status. After sending to the warehouse by Cargo No., write down the shipping company and invoice number and click the [Ship Cargo] button.
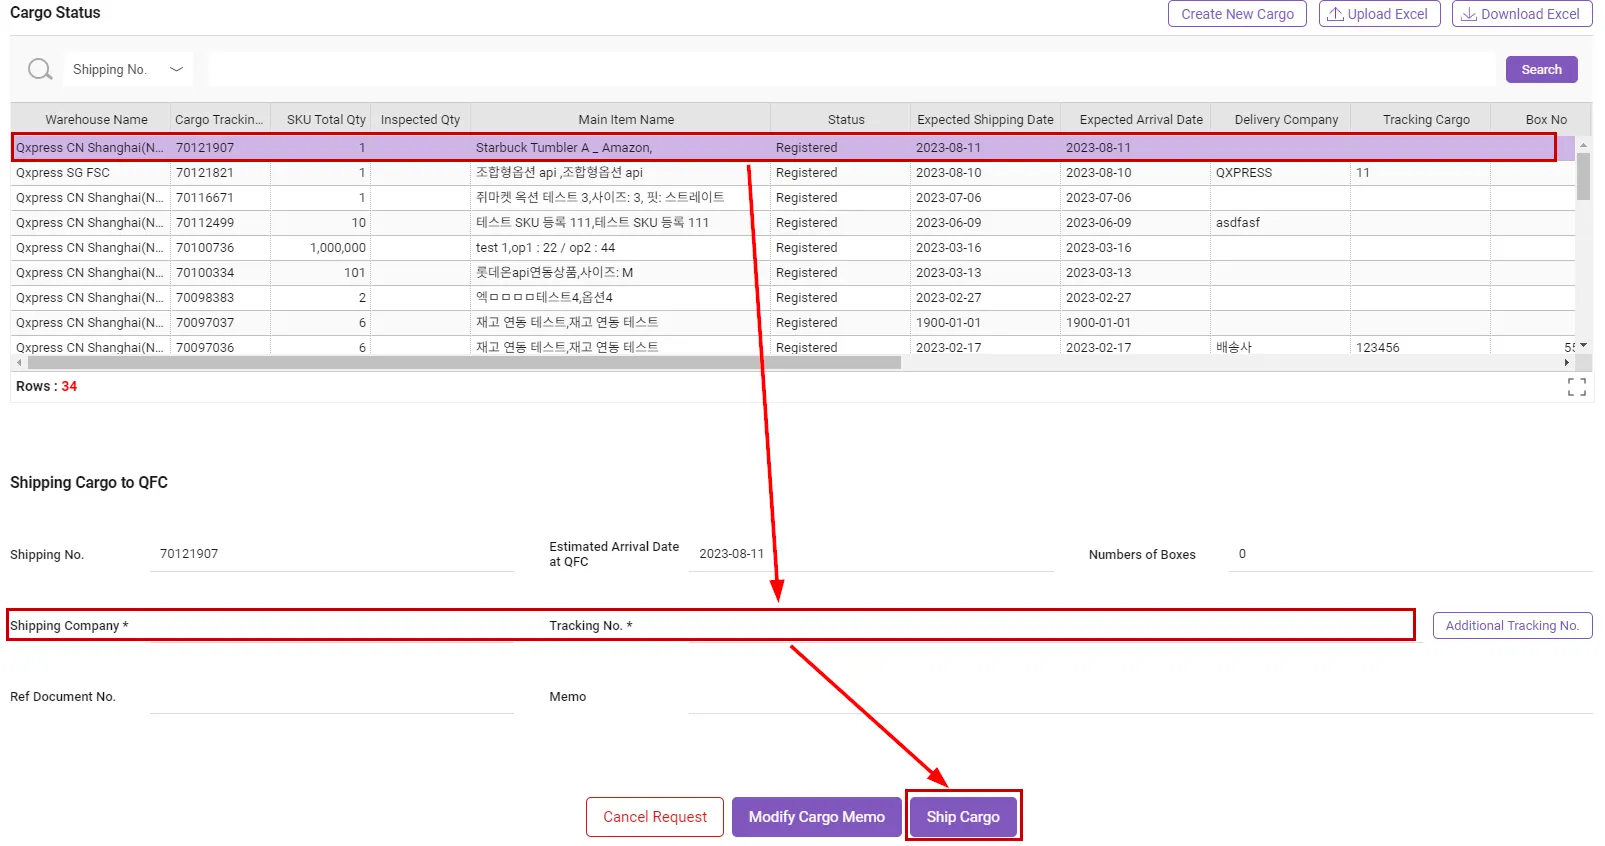
•
Completed : The cargo you sent to the warehouse has arrived and has been inspected to ensure that the cargo application details and the content of the arrived cargo are correct. Once receipt is completed, it will be reflected in the SKU quantity in the warehouse.
•
Withdrawn/ Rejected : Receipt in warehouse is rejected.


4-3. How to register API integration order
After registering the SKU product and completing the warehousing to the TX warehouse, you can now use fulfillment shipping.
If you have been issued a sales site API KEY and linked it to Smartship, you can automatically register orders from the sales site where sales occurred using API integration order registration.
Please check the settings before registering an API integration order.
Common Option Details
API order integration steps
After completing API KEY registration, please register your order by referring to the guide below.
If you set the “Auto Order Collection”, “Auto Order Confirmation”, and “Auto Fulfillment Center Assignment” functions to automatic on the sales site linkage settings page, everything from order registration to shipment will be done automatically. The guide below explains the sales site linkage page functions. This method of order registration and processing only applies to sellers who set it to “Manual.”
Path : Sycn Orders > Import Orders via API

1.
Please set the date on which the order occurred in the sales site.
2.
Select the sales site where you would like to register your order.
3.
Click the checkbox.
4.
Click the [Import Orders] button to register your sales site order.
Path : Orders > Order Management
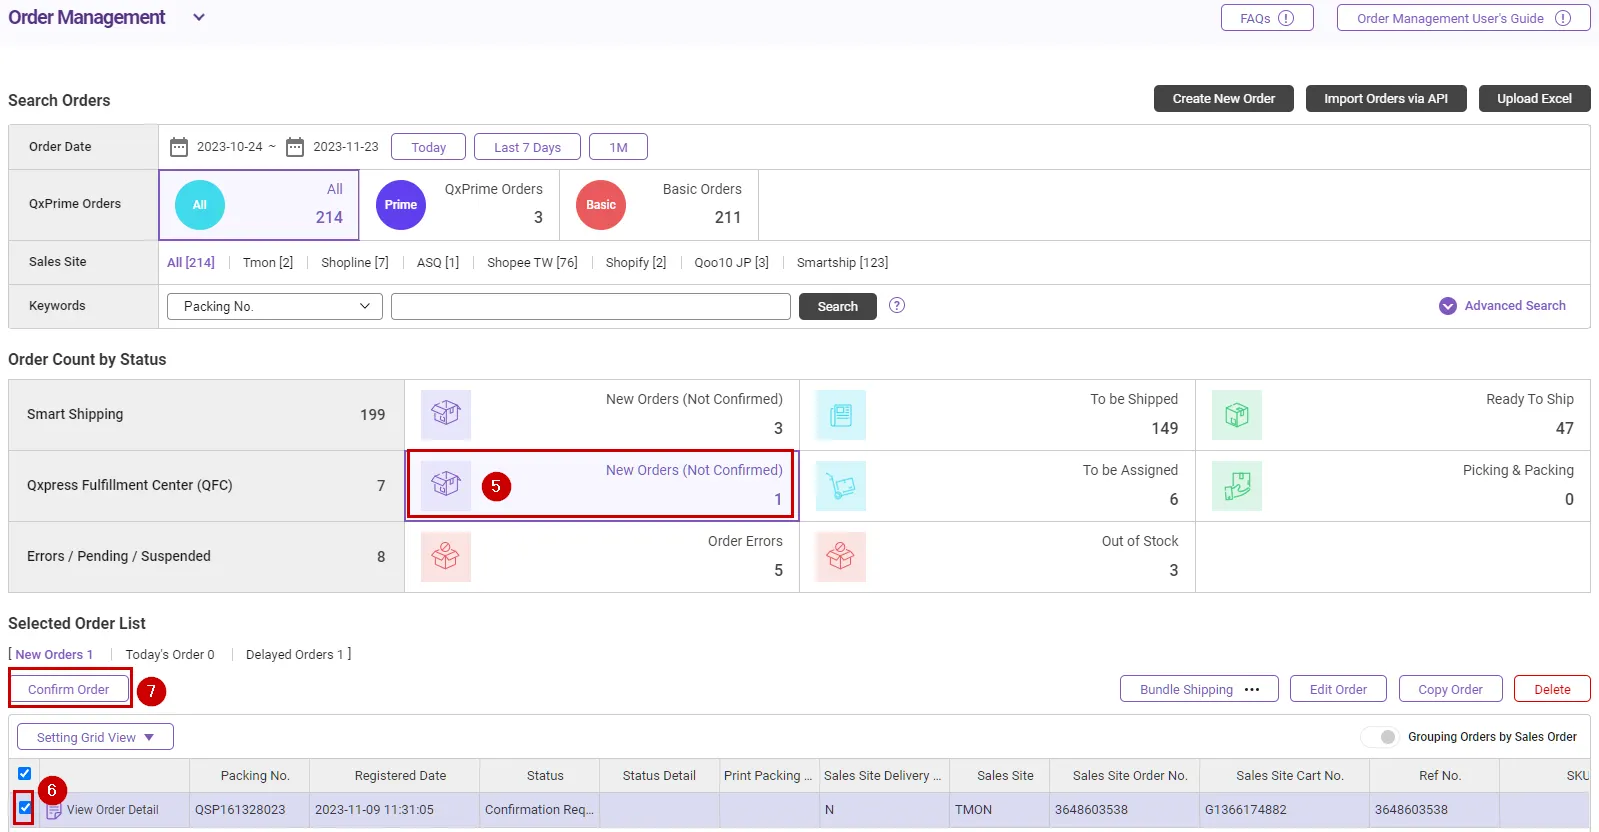
5.
Click New Orders (Not Confirmed).
6.
Select the orders.
7.
When you press the [Confirm Order] button, the status changes to shipping label printing.
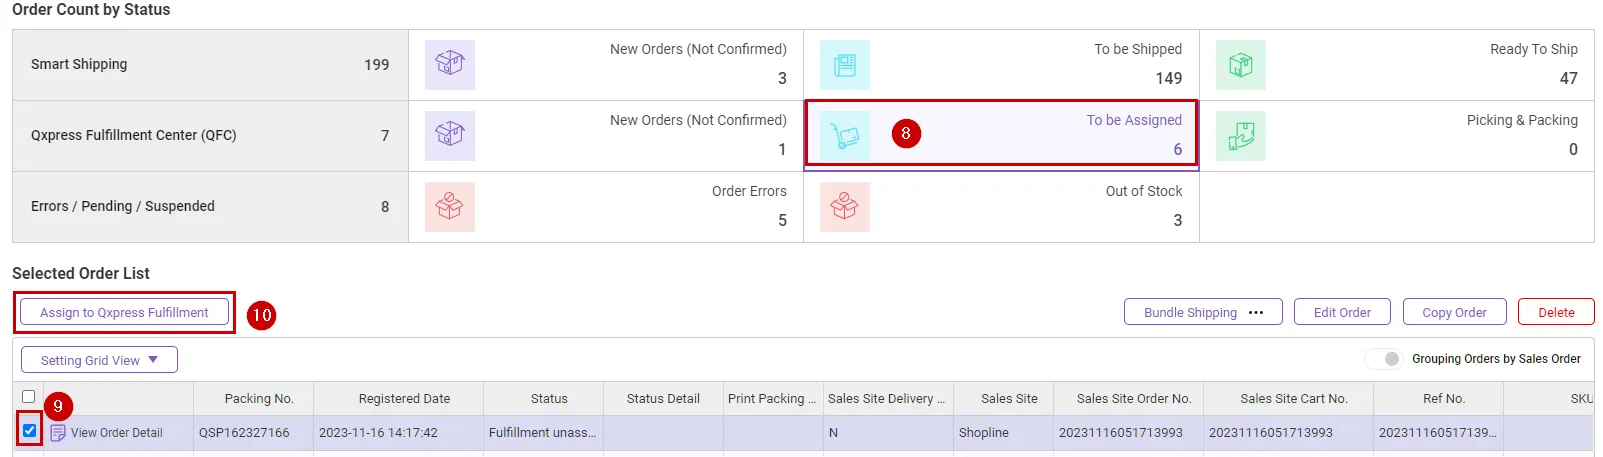
8.
Click To be Assigned.
9.
Select the orders that you want to ship.
10.
When you press the [Assign to Tracx Logis Fulfillment] button, the status changes to “Picking & Packing” and the subsequent work is automatically carried out in Tracx Logis.
4-4. How to register a manual order (Create order)
When registering a single order, please use Create New Order.
Manual order registration steps
Individual registration in Smart Ship (single item & Excel bulk registration) > Confirm Order> Assign to Tracx Logis Fulfillment > Delivered
Path : Orders > Order Management
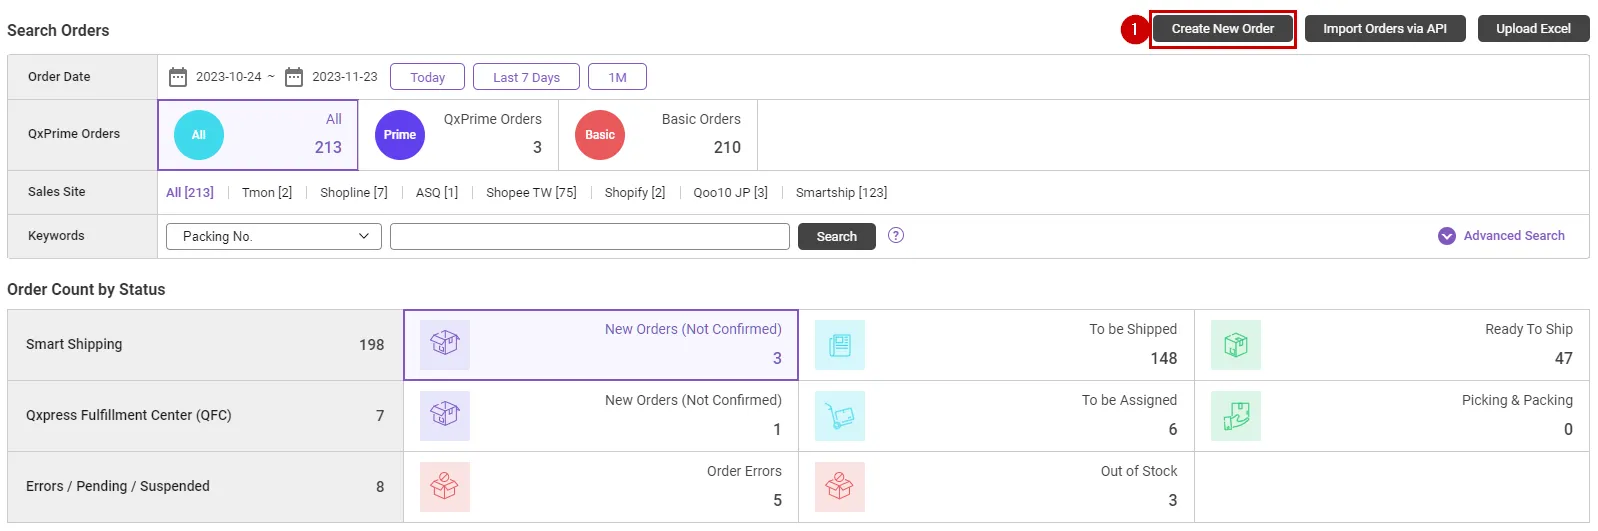
1.
Click the [Create New Order] button.
2.
Please enter basic information. (Required fields marked with a red *)
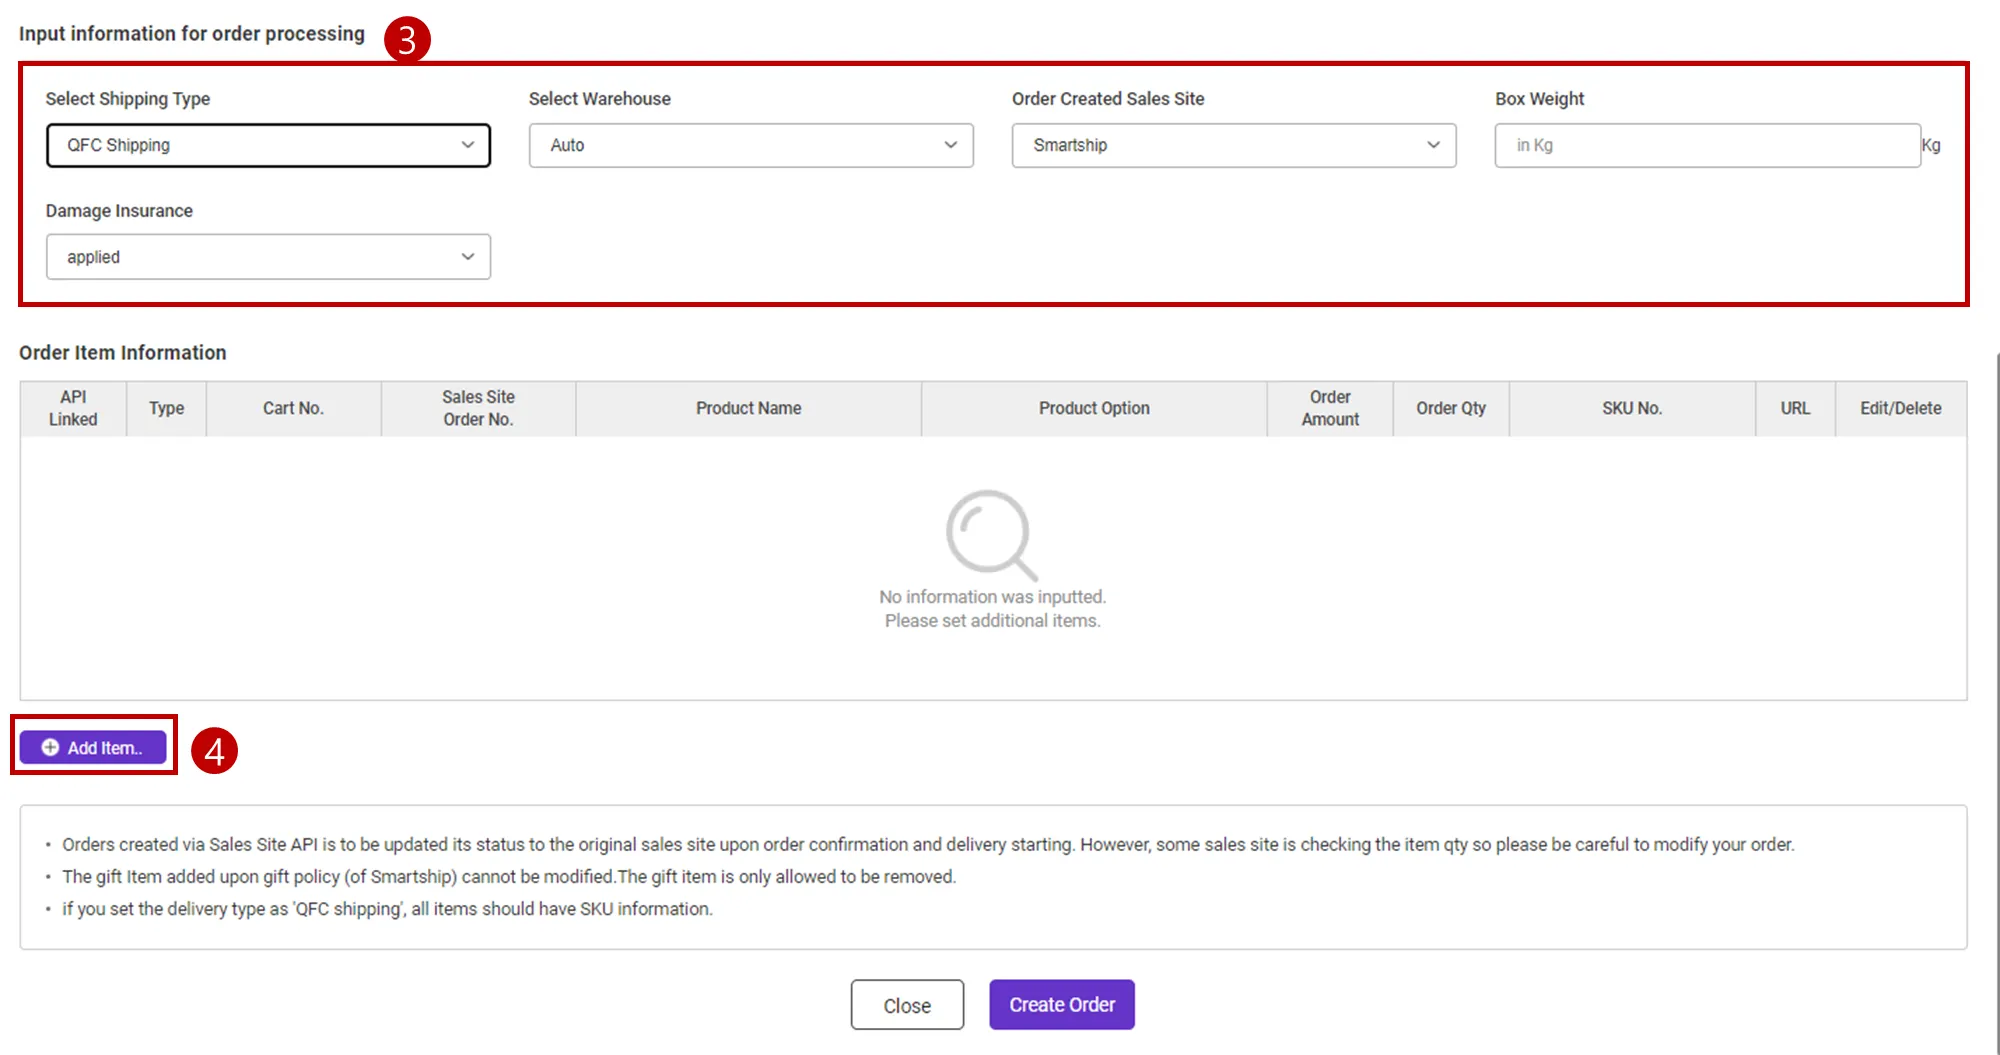
3.
Change the service type to “TXFX Shipping” and enter the warehouse, order created sales site, and box weight information.
4.
Click the [+Add Item] button.
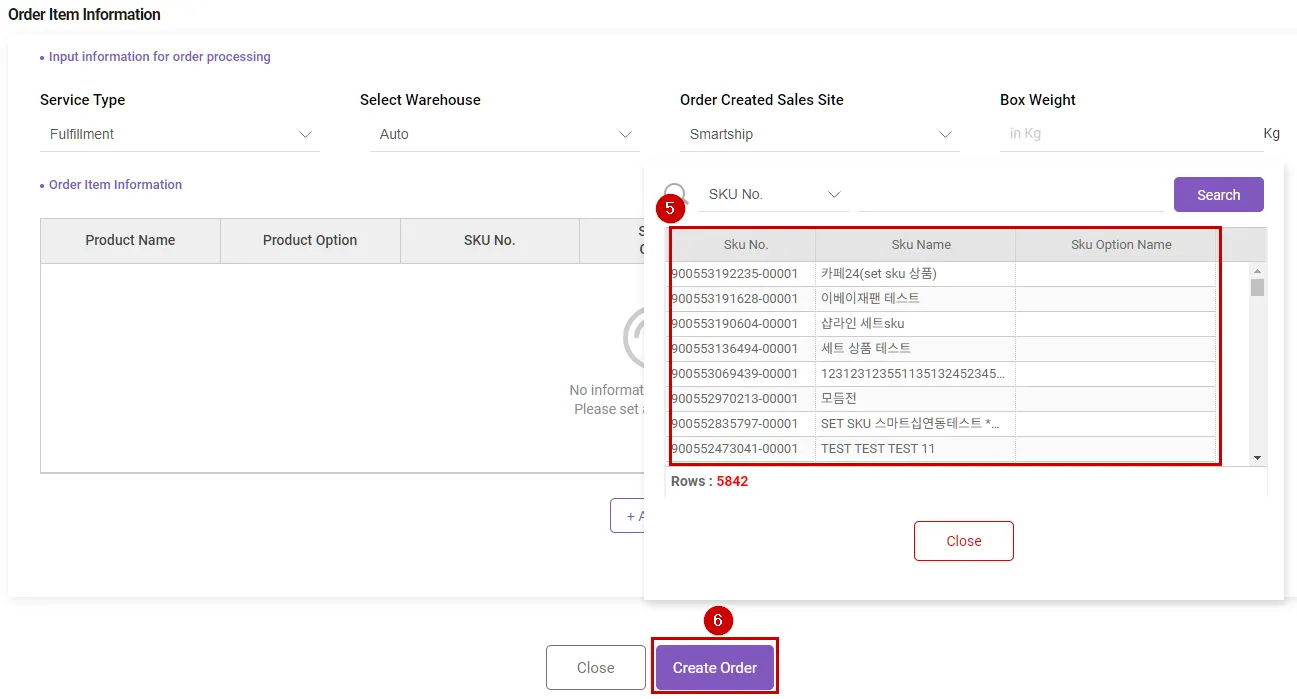
5.
Please select the sold SKU product.
6.
Click the [Create Order] button to register your order.
4-5. How to register manual order (Excel registration)
Please use Excel for bulk order registration.
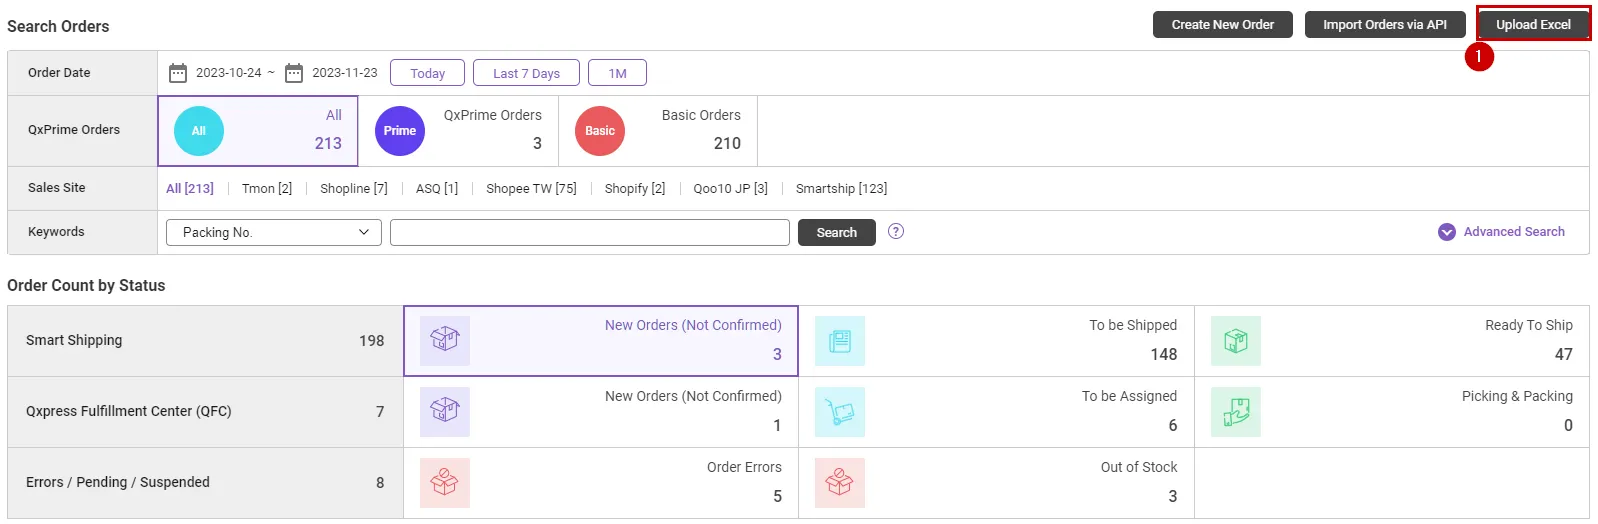
1.
Click the [Upload Excel] button.

2.
In the pop-up window that follows, select the type of Excel form you want to use.
•
Standard Excel Form : You may proceed with bulk upload using the Tracx Logis Smartship Basic template.
•
Major shopping site excel form : You may proceed with bulk upload using the excel template from the E-commerce Platform without any modification.
•
Use my excel form : You may proceed with bulk upload easily using your own customized excel template.
3.
Please select the form and download Excel.

4.
Click the [Select File] button to register Excel.
5.
Click the [Register Orders] button to register your order. The order confirmation process is as follows.
5. Abort Shipping/Resume request
What is abort shipping/resume request?
If delivery needs to be abort for a specific reason, or if delivery of an order whose delivery has been aborted needs to be resumed, delivery can be abort/resume by following the instructions above.
Order status available to request abort shipping
You can request to abort shipping for orders in the ‘Out for delivery’ status, but please note that if delivery is actually handed over to a courier company and delivery has begun, delivery is actually in progress even if delivery has been stopped in the system.
(Please note that for local delivery orders, delivery cannot be stopped after warehousing.)
•
Smart Shipping : Orders in the status of ‘‘Redy To Ship’

•
Tracx Logis Fulfillment Center (TXFX) : Orders in the status of ‘Picking & Packing’

5-1. How to abort shipping
Path : Order > Order Management
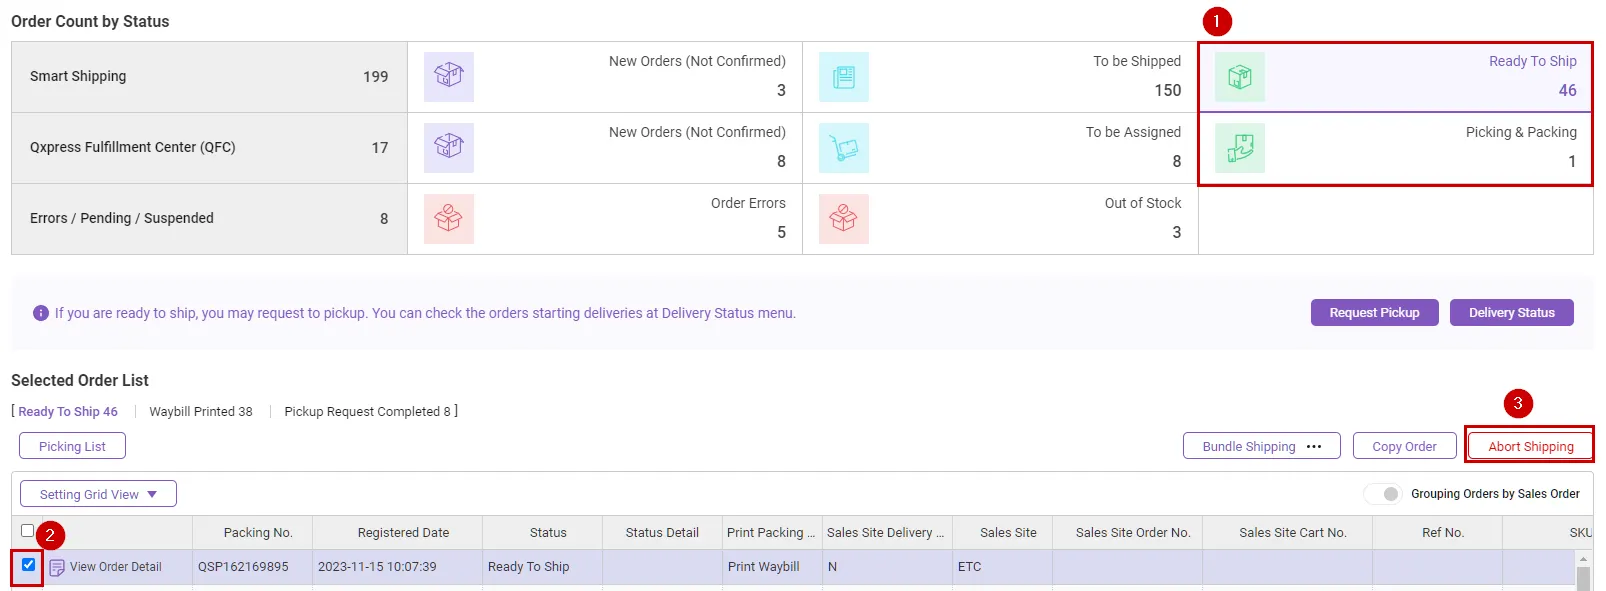
1.
Click the ‘Ready To Ship’ or ‘Picking & Packing’
2.
Please select the orders.
3.
By click the [Abort Shipping] button, you can request to abort shipping for the selected order.
5-2. How to request resume delivery
Path : Tracking > NDR Management
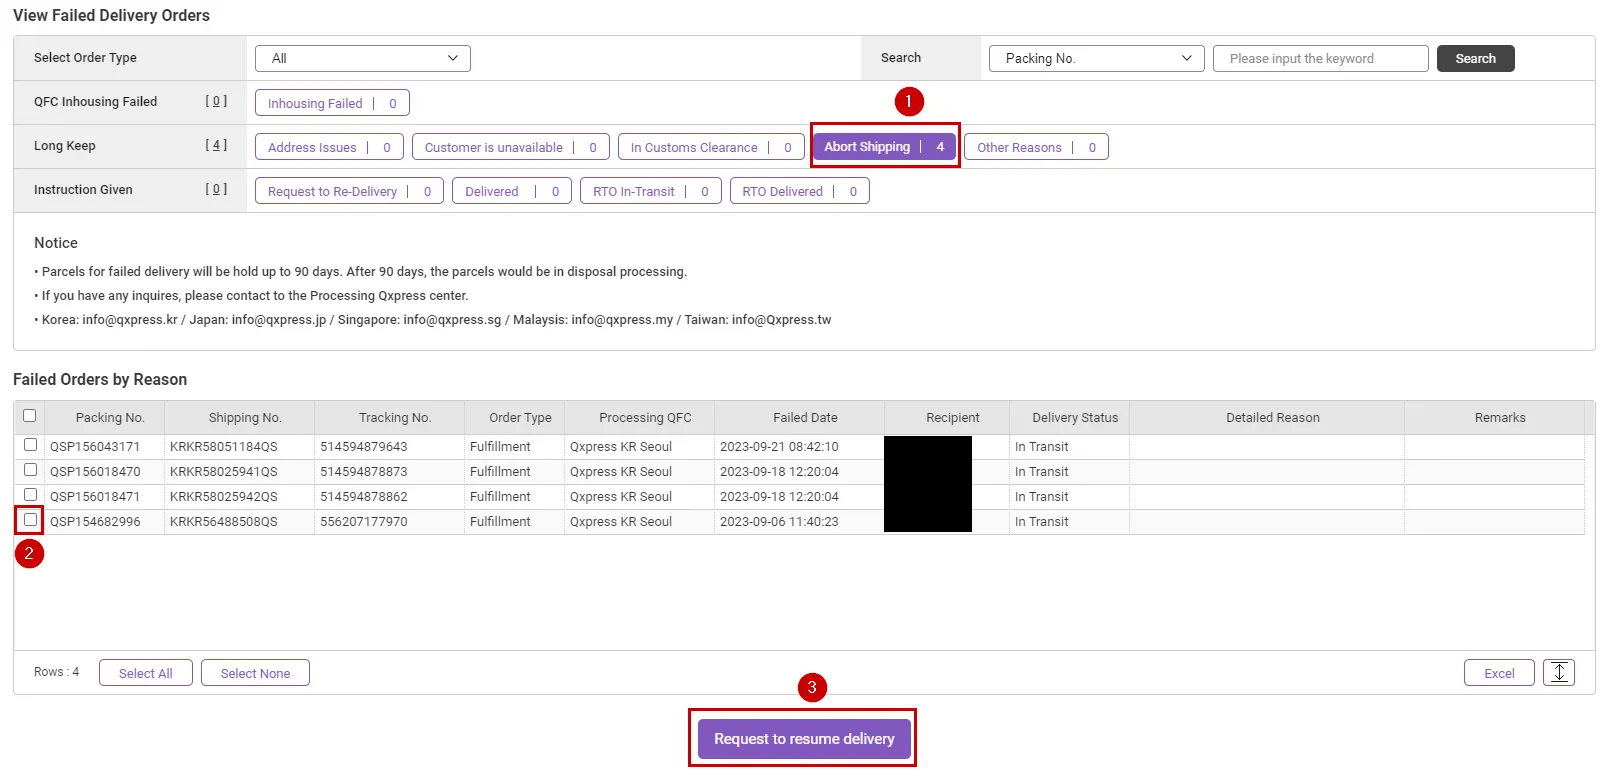
1.
Please click [Abort Shipping].
2.
Please select the order for which you would like to resume delivery.
3.
Clicking the [Request to resume delivery] button will cancel the abort shipping