.png&blockId=78c9ff9a-717f-4cfb-9b99-87bbb83a5b89)

The smartship process has been revamped so that anyone can easily use it by following the guide from order registration to shipping.
The process has been changed to Order registration > Print shipping label > Request pick up, and the arrangement order of each page has been changed to make the process from order registration to shipment processing easier.
Accordingly, those who wish to use Smartship 2.0 before its official opening can use the trial version. We would like to inform you about the revamped page in Smartship 2.0
Shipping processing according to order type
The order processing process in Smartship varies depending on the order type. There are two main methods, smart shipping method and QX fulfillment center method.
1.
What is smart shipping? : This method involves sending cargo to QX DPC, then printing an shipping label from QX DPC and sending it out. Sellers only need to confirm registered/collected orders, create/print an shipping label, and process pick up requests on Smartship.
2.
What is QX fulfillment center? : After inventory is received at the QX Fulfillment Center, the entire process from product picking to invoicing and shipping is handled at the QX fulfillment center. The seller must confirm the registered/collected orders and assign to QX fulfillment.
Smart Shipping : Register/Confirm Order > Create/print shipping label > Pickup request
QX Fulfillment Center (QFC) : Register/Confirm Order > Assigning to Qxpress Fulfillment
++ For orders registered via API, order confirmation and fulfillment shipment instructions can be performed automatically depending on settings.
Setting up API with Sales Site
1. Smart Shipping Guide
1-1. Register and confirm orders (Order Management UI)

Path : Order > Order Management
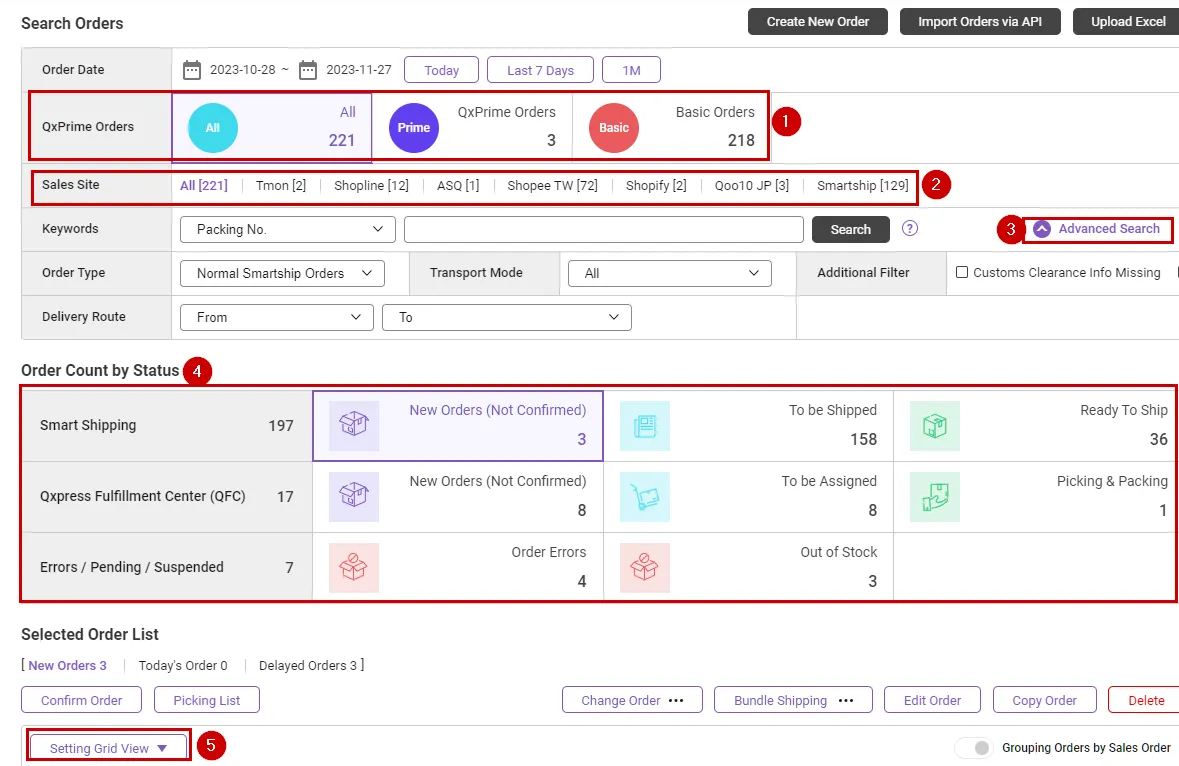

Changes
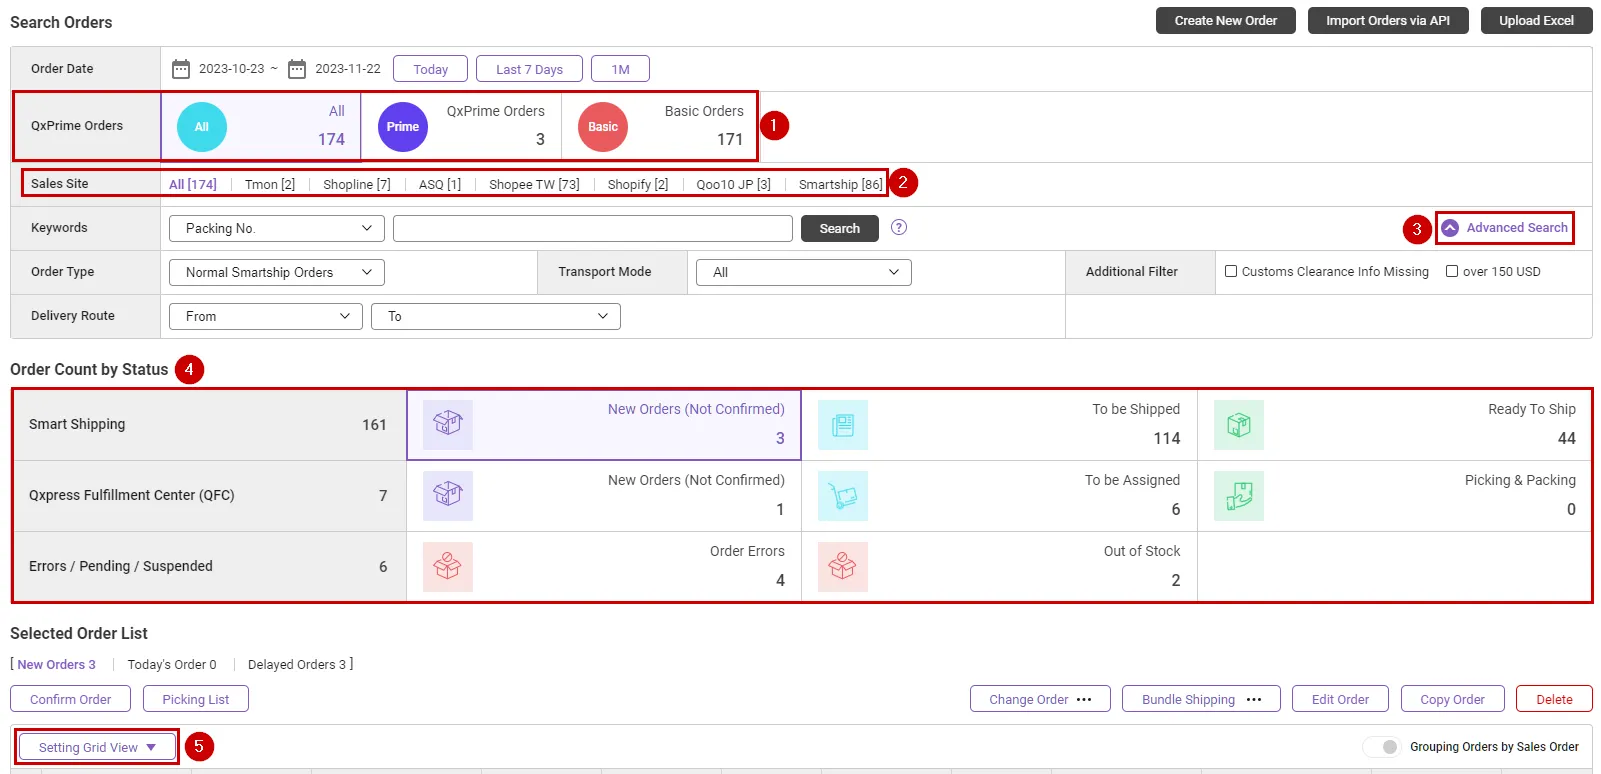
1.
QxPrime Orders : You can separately search for items subject to QxPrime orders.
2.
Sales Site : It is a tally of the number of orders for each site registered during the set period.
3.
Advanced Search : You can obtain more detailed search results by using additional filters such as order type, transportation method, and delivery zone.
4.
Order Count by Status : You can check the progress of your order by classifying it by status.
•
New Orders (Not Confirmed) : This is a new order that has been sold, and has not yet been confirmed for ordering. Please process orders quickly to prevent buyer cancellation.
◦
New Orders (Not Confirmed) : This is a new order that has been sold, and has not yet been confirmed for ordering. Please process orders quickly to prevent buyer cancellation.
◦
In case of new order status, it is classified into detailed status as below.

◦
Today’s Orders: This is an unprocessed order registered on the day of order inquiry.
◦
Delayed Orders: This is an unprocessed order that is more than one day old based on the order inquiry date. Please process quickly to avoid cancellation.
•
To be Shipped : Order confirmation and order processing have been completed, and this is the step to prepare for shipping. Barcode labels and shipping label can be printed for orders for which order confirmation has been completed.
◦
Ready To Ship : he barcode label or shipping label has been printed and is ready to be shipped. You can request pickup for these orders.
◦
In case of new order status, it is classified into detailed status as below.

◦
Waybill Printed : The shipping label has been printed, but you have not requested pickup. If you would like to conveniently send products to the QX warehouse, please request pickup.
◦
Pickup Request Completed : Shipping label printing and pickup request have been completed. If you have requested pickup, our partner company will visit the requested address for collection, so please prepare the product according to the guidelines.
•
Errors / Pending : Indicates that the order cannot be processed or shipping has been stopped due to a specific reason.
5.
Grid option settings
•
Setting Grid View : On the new order management page, you can customize the search data displayed in the grid to suit your convenience. Depending on the grid type you choose, you can hide or add data that is unnecessary for your order processing.
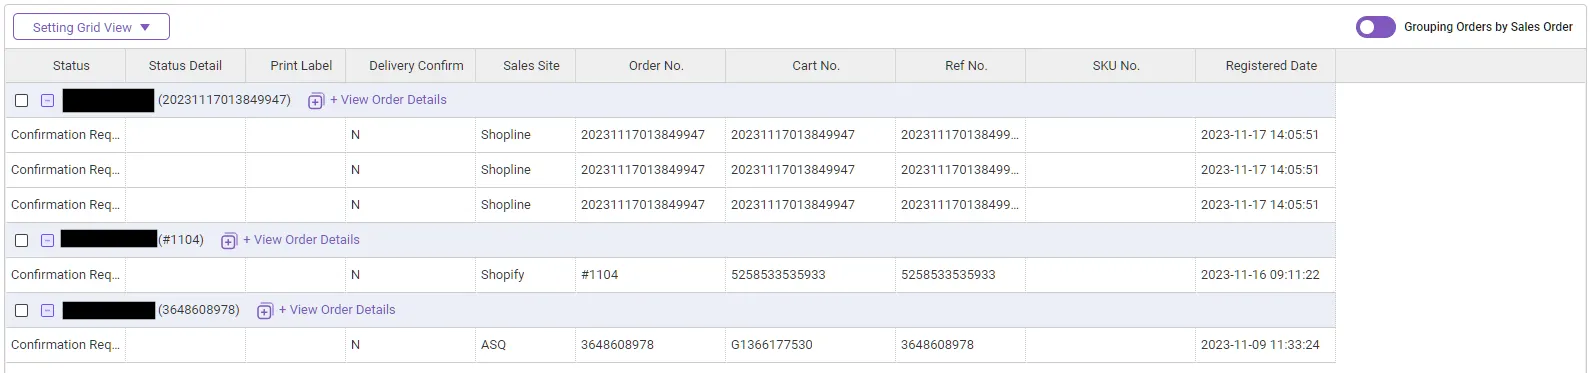
•
Grouping Orders by Sales Order : A new grid view function has been added that shows the order number and product information from the sales site included in one QSP packing number, separated by row. You can check your order details more quickly and easily by viewing product details in one grid without having to click View Order Details.
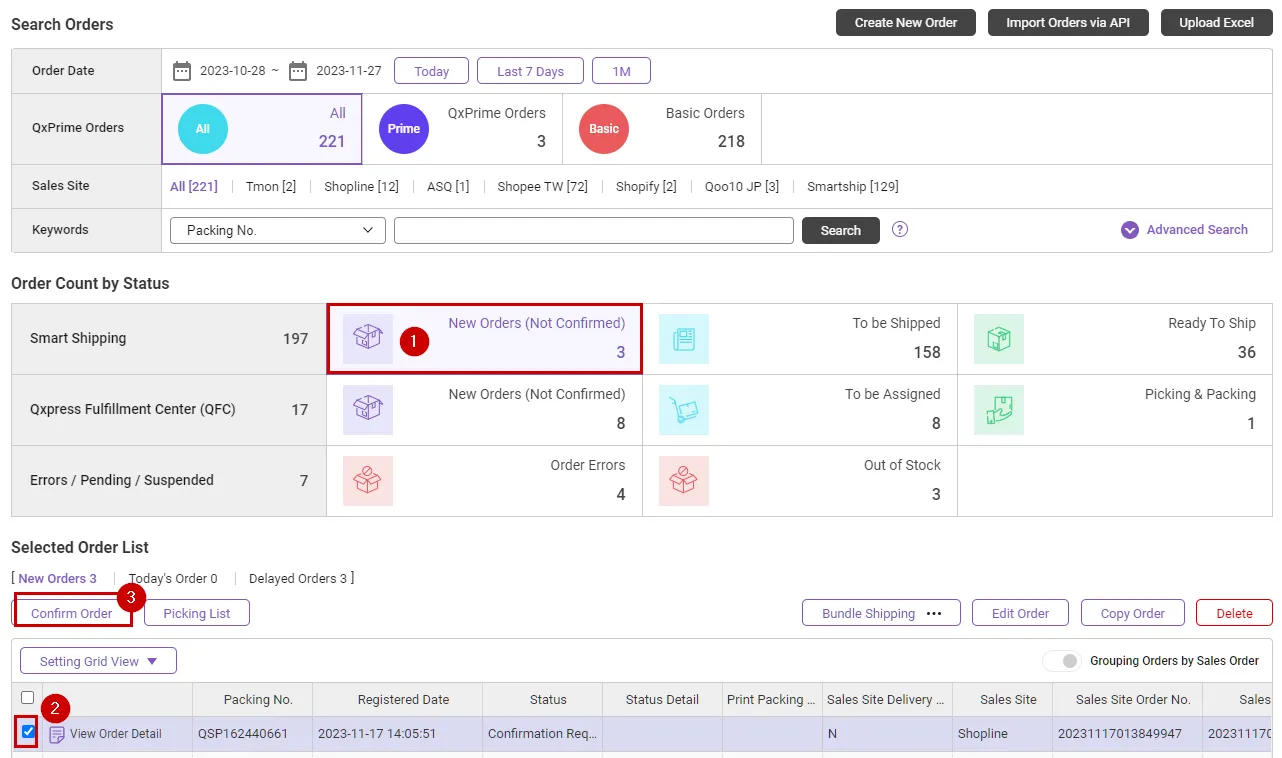
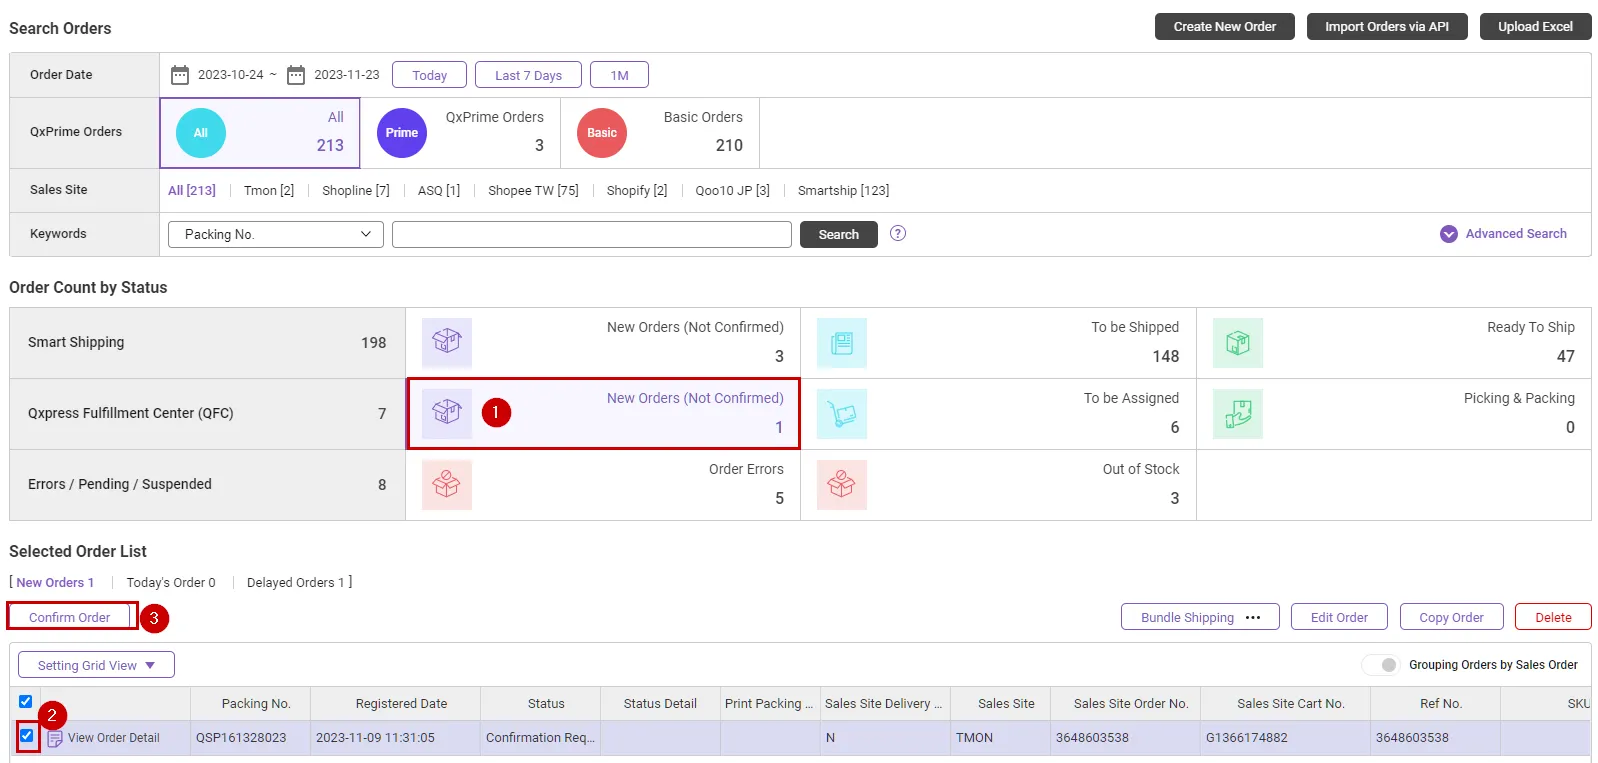
How to process smart shipping orders (order confirmation)
1.
Please click on New Orders (Not Confirmed).
2.
Please select your order.
3.
When you press the [Confirm Order] button, the status changes to shipping label printing. After confirming your order, please check the shipping label creation and printing guide.
Please check the guide below for details.


1-2. Create and print shipping label (Shipping Label UI)
Path : Waybill > Print Waybill

Changes
•
The method has been changed to require shipping company assignment and shipping label creation to be processed first.
Orders with pre-assigned carrier do not require carrier assignment, and can be printed after creating an shipping label.
•
If a shipping company is pre-assigned to the packing number, it will be displayed for each shipping company assigned to the order.
•
You can reprint the shipping label.
•
The “Directly register Shipping Label” function has been added, allowing sellers to directly register the shipping company and invoice number they use. The information you entered will be reflected in the shopping mall order shipping information and processed.
•
Shipping service type has been added.
- Basic
- Premium
1. How to create and print shipping label
There are two ways to create and print shipping label depending on whether the shipping company is assigned or unassigned.
•
How to print an shipping label for orders that are not assigned to a shipping company
•
How to print an shipping label for an order with a pre-shipped carrier assigned
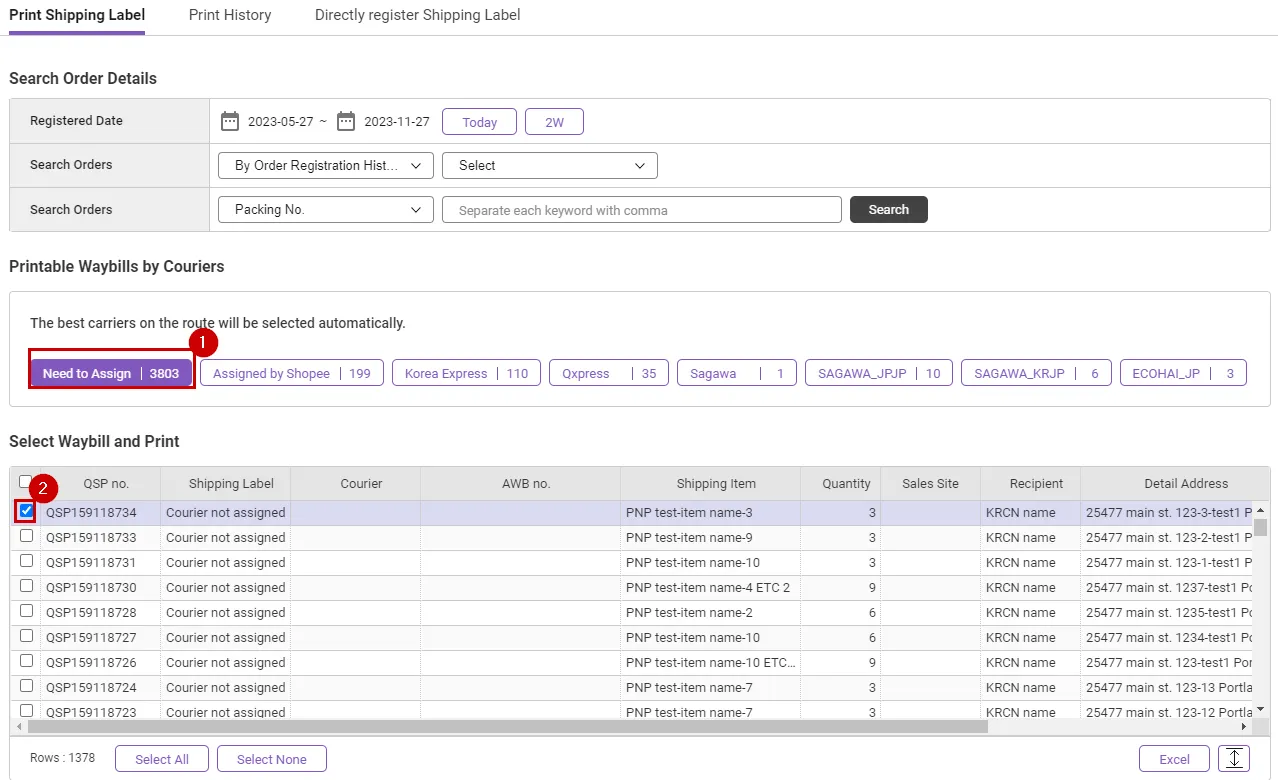
2. How to print an shipping label for orders that are not assigned to a shipping company
1.
If you click the [Need to Assing] tab, you can check orders for which a carrier has not been assigned.
2.
Please select the order that requires carrier assignment.
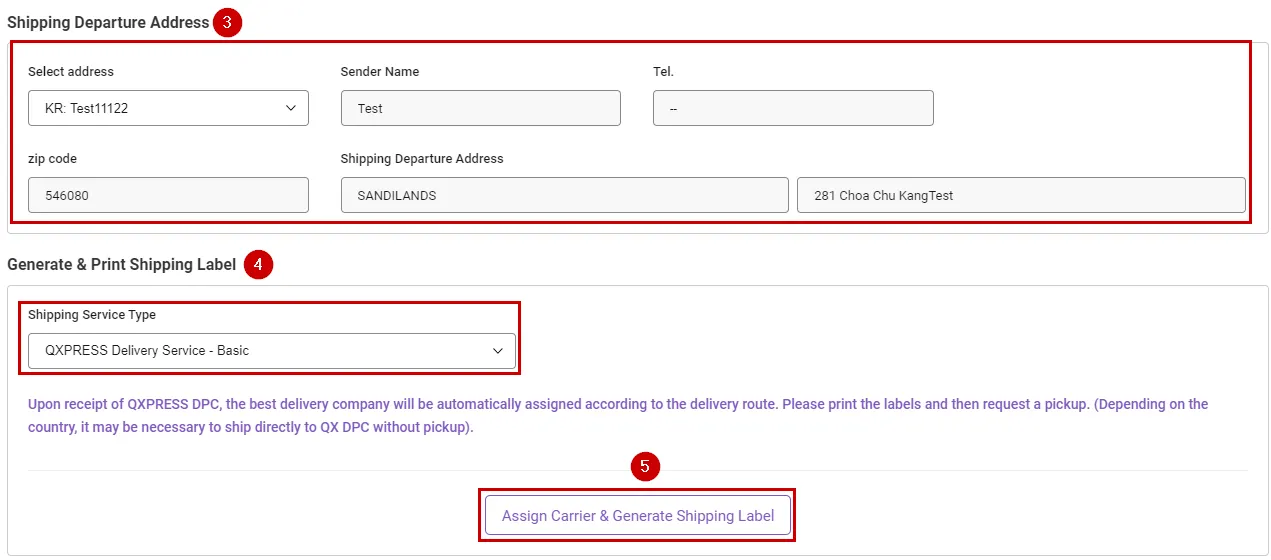
3.
Please enter shipping address information.
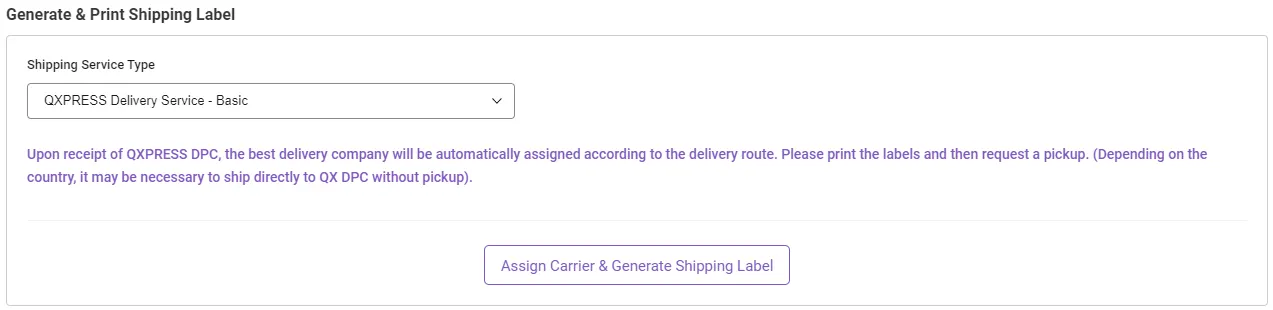
4.
Please select a shipping service type. (If you are not a linked seller, it will be fixed to Basic service.)
5.
When you press the [Assign Carrier & Generate Shipping Label] button, a shipping company is assigned.
(QXPRESS is assigned as the default shipping company, and the existing QSP number is assigned as the shipping label number.)
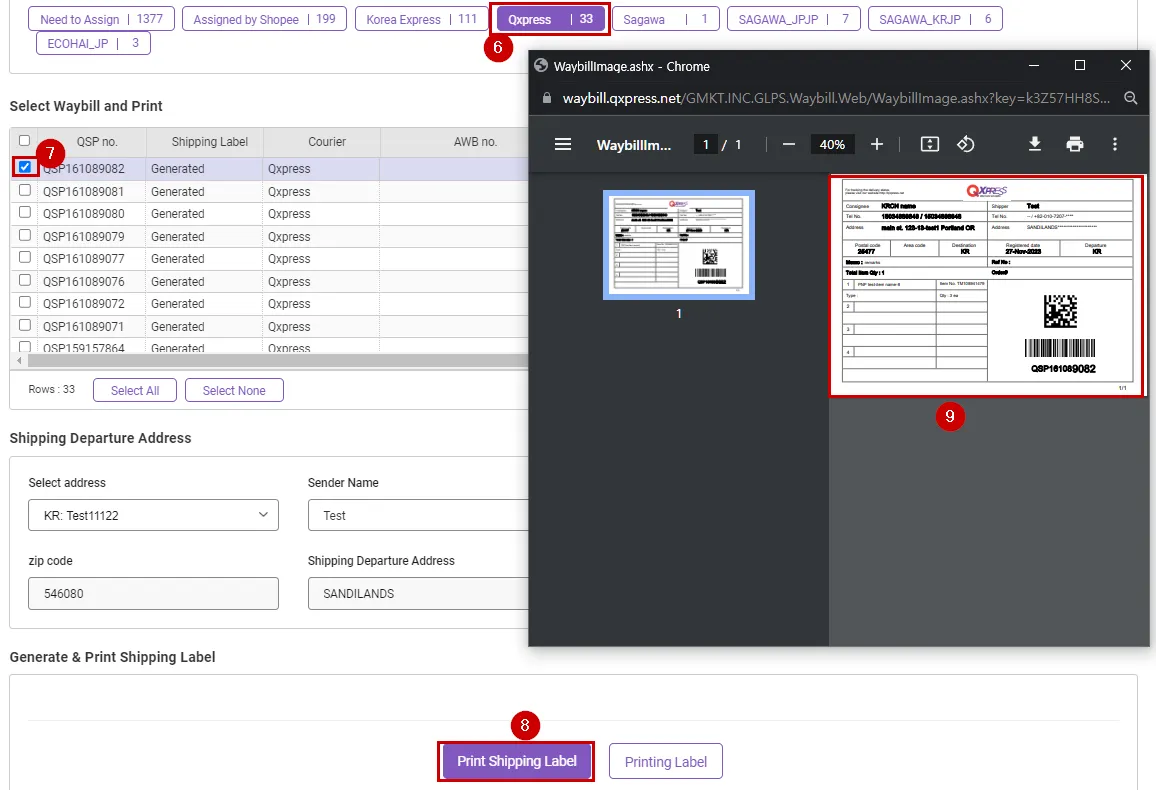
6.
Please press the [Qxpress] button.
7.
Please select the order for which you want to print an shipping label.
8.
Please press the [Print Shipping Label] button.
9.
After printing the shipping label, attach it to the packaging box.
3. How to print an shipping label for an order with a pre-shipped carrier assigned
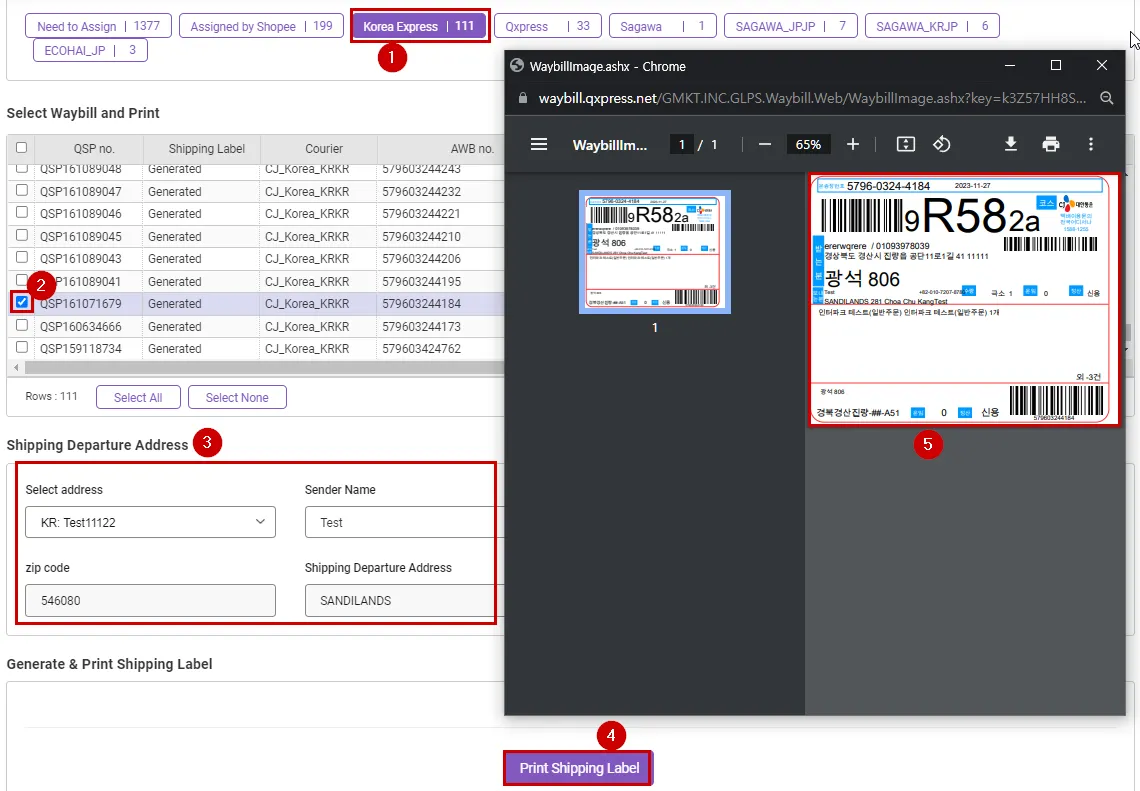
1.
If a pre-shipping carrier is set up, it will be displayed at the top.
(Press the [Korea Express] button when printing invoices for orders assigned to CJ.)
2.
Please select the order for which you want to print an shipping label.
3.
Please enter shipping address information.
4.
Click the [Print Shipping Label] button.
The [Print Shipping Label] button appears after printing the invoice.
5.
After printing the shipping label, attach it to the packaging box.


1-3. Pickup Request (Request Pickup UI)
Path : Pickup > Request Pickup
Changes
•
You can request pickup based on the shipping company assigned when creating the shipping label.
•
Orders subject to pickup are classified according to the departure country, and couriers available for pickup are displayed.
•
The pickup request is completed as soon as the pickup is created.
•
The pickup application created when the pickup application fails can only be re-applied or cancelled, and information cannot be modified.
(Pickup request date can be changed)
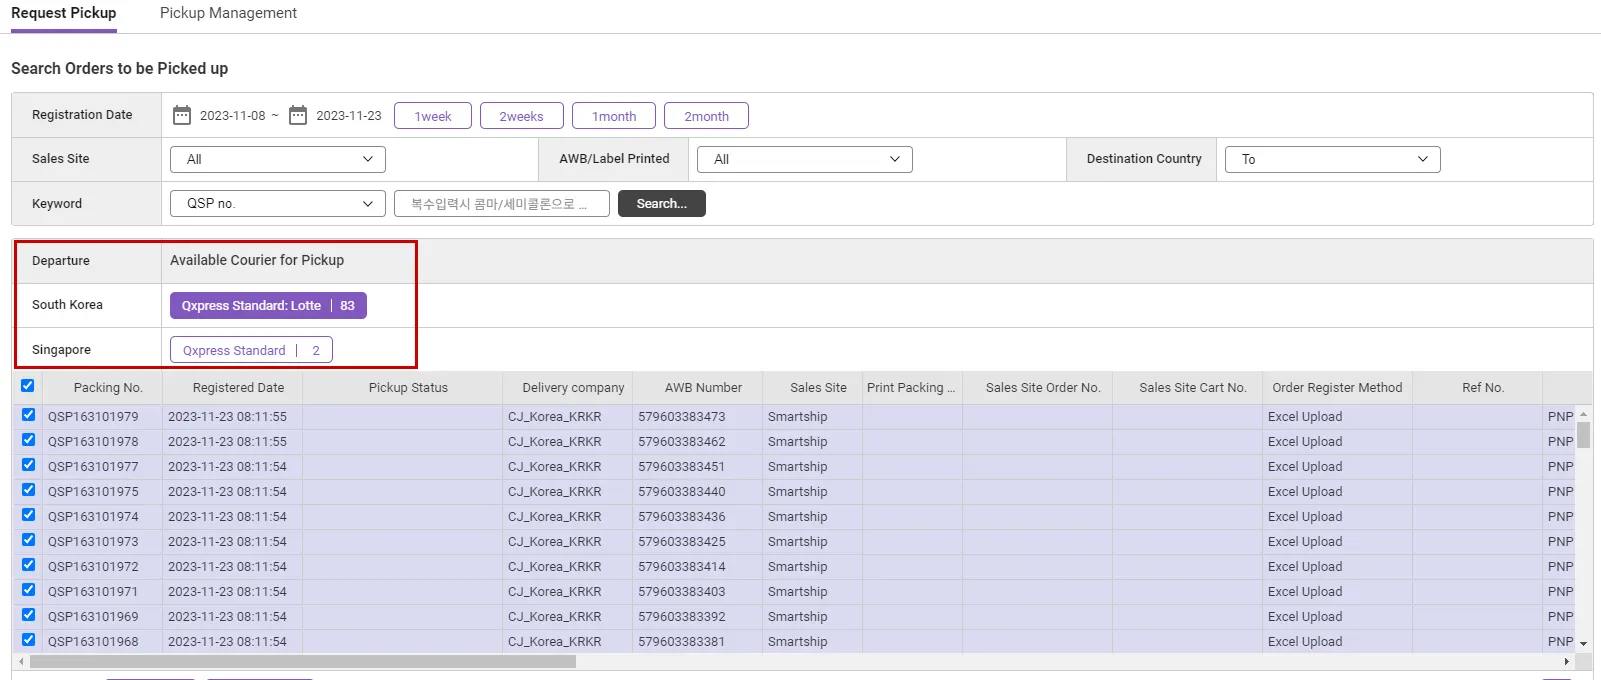
How to request pickup
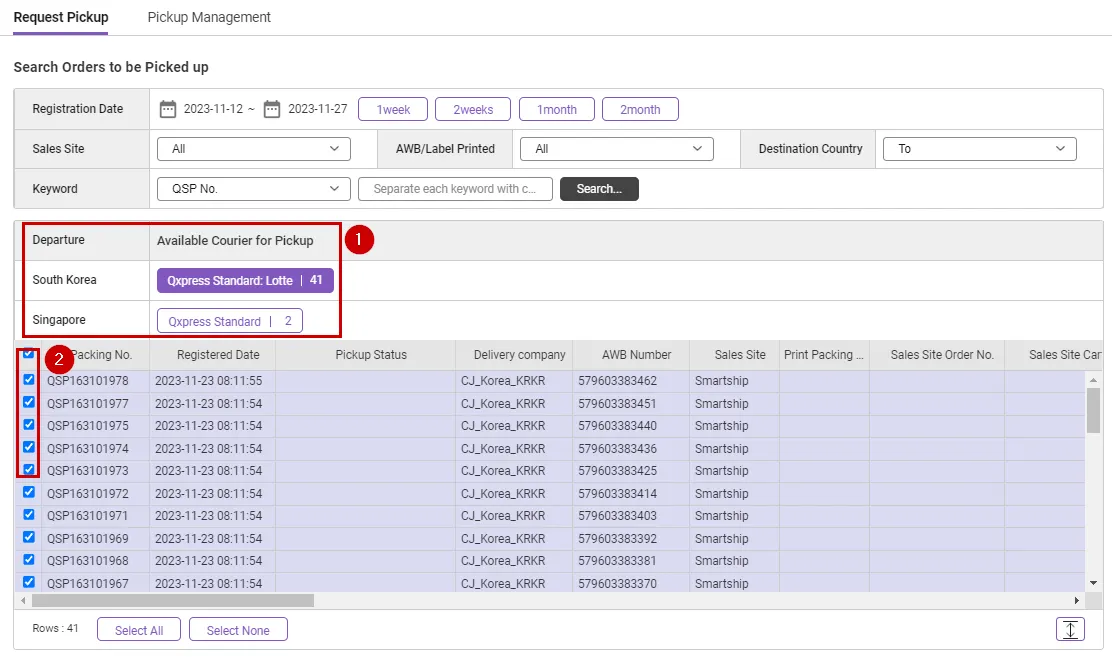
1.
Select the departure country and applicable courier company.
2.
Select the order you would like to request for pickup.
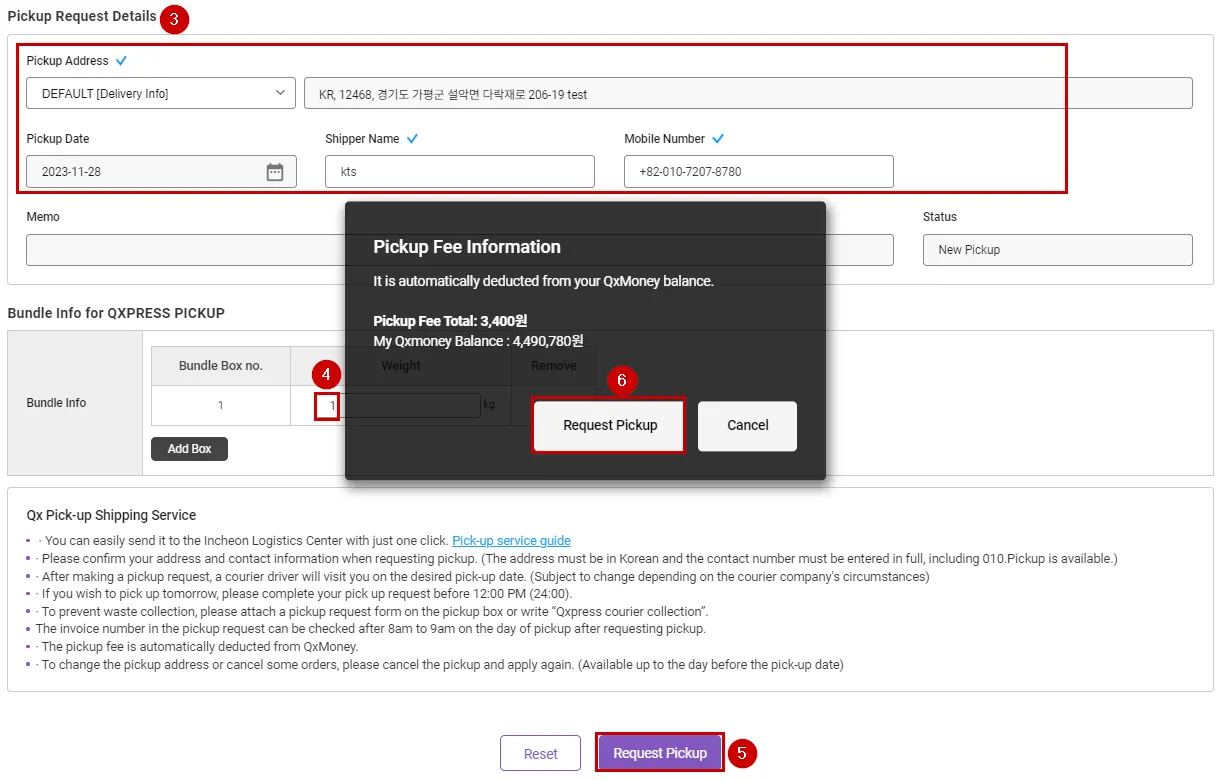
3.
Please enter pickup address information.
4.
Please enter the weight of the packaging box.
5.
Click the [Request Pickup] button.
6.
After checking the pickup cost, click the [Request Pickup] button to complete the pickup request.
Please check the guide below for details.


2. QX Fulfillment Center Shipping Guide
2-1. Register and confirm orders / Assign to Qxpress Fulfillment (Order Management UI)
Path : Order > Order Management
Changes
1.
QxPrime Orders : You can separately search for items subject to QxPrime orders.
2.
Sales Site : It is a tally of the number of orders for each site registered during the set period.
3.
Advanced Search : You can obtain more detailed search results by using additional filters such as order type, transportation method, and delivery zone.
4.
Order Count by Status : You can check the progress of your order by classifying it by status.
•
New Orders (Not Confirmed) : This is a new order that has been sold, and has not yet been confirmed for ordering. Please process orders quickly to prevent buyer cancellation.
◦
In case of new order status, it is classified into detailed status as below.

◦
Today’s Orders: This is an unprocessed order registered on the day of order inquiry.
◦
Delayed Orders: This is an unprocessed order that is more than one day old based on the order inquiry date. Please process quickly to avoid cancellation.
•
To be Assigned : Once order confirmation and order processing have been completed, the step of assigning a QFC to handle shipping is required. Allocation settings follow the seller's default settings, but if there is a center specific to each SKU, specify the corresponding QFC first. Unallocated orders cannot be processed at the QFC, so please process them manually.
•
Picking & Packing : Order confirmation and shipping instruction have been completed. From this point on, there are no additional actions for the seller to handle, and Qxpress is at the stage where it begins to handle the work.
◦
If the status is to be shipped are classified by detailed status as shown below.

•
Allocating warehouse : After requesting shipping instructions, a warehouse is being Allocated. It takes approximately 20 minutes to analyze and specify the seller's default settings and SKU configuration logic.
•
Warehouse Allocation completed : A center has been Allocated to handle shipping. Please wait until the operation starts. You can withdraw the shipment order until the warehouse Allocation is complete, but requesting shipment again after withdrawal also takes about 20 minutes.
•
To be Shipped : This is the stage where packaging work is carried out at the QFC. It may vary depending on the center's work status, but shipping will begin on the same day it moves to picking & packing status.
•
Pre-sales Order : This filter is added when some reservation products are supported. After holding the shipment until the reserved shipment date, the reserved product will be shipped from the QX Fulfillment Center when the designated reservation shipment date arrives.
(Supported shopping mall: Shopby)
5.
Order Detail Grid
•
Grid option settings : On the new order management page, you can customize the search data displayed in the grid to suit your convenience. Depending on the grid type you choose, you can hide or add data that is unnecessary for your order processing.
•
Search based on sales site orders : A new grid view function has been added that shows the order number and product information from the sales site included in one QSP packing number, separated by row. You can check your order details more quickly and easily by viewing product details in one grid without having to click View Order Details.
How to process QX fulfillment center order (Assign to Qxpress Fulfillment)
1.
Please click on New Orders (Not Confirmed).
2.
Please select your order.
3.
When you press the [Confirm Order] button, the status changes to be assigned.
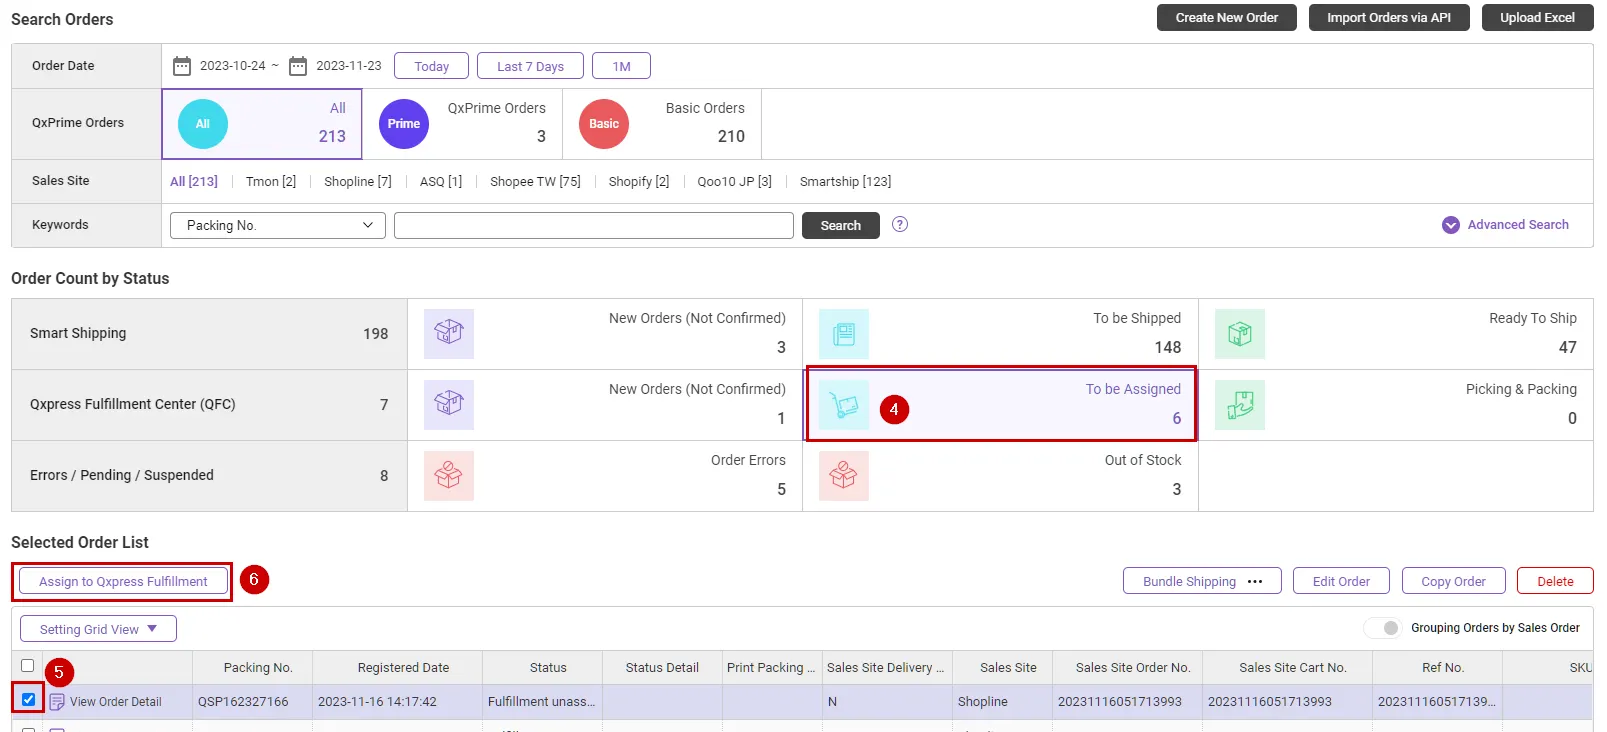
4.
Please click To be Assigned.
5.
Please select the order you want to assign to QFC.
6.
When you click the [Assign to Qxpress Fulfillment] button, the seller's work is completed, and the subsequent work will be handled by Qxpress.
Please check the guide below for details.


3. SKU Management
You can register SKU for sold products on the SKU management page.
QX Fulfillment Center provides shipping service based on SKU number.
You must register your SKU through this page to use the QX Fulfillment Center shipping service.
Path : Inventory > SKU Management
Changes
•
A grid display format option has been added.
This option allows you to list your SKUs in your preferred format.
1.
Product/Option : The main product and options are displayed together.

2. Option only : Only option products of the main product are displayed.(Exclude main products)

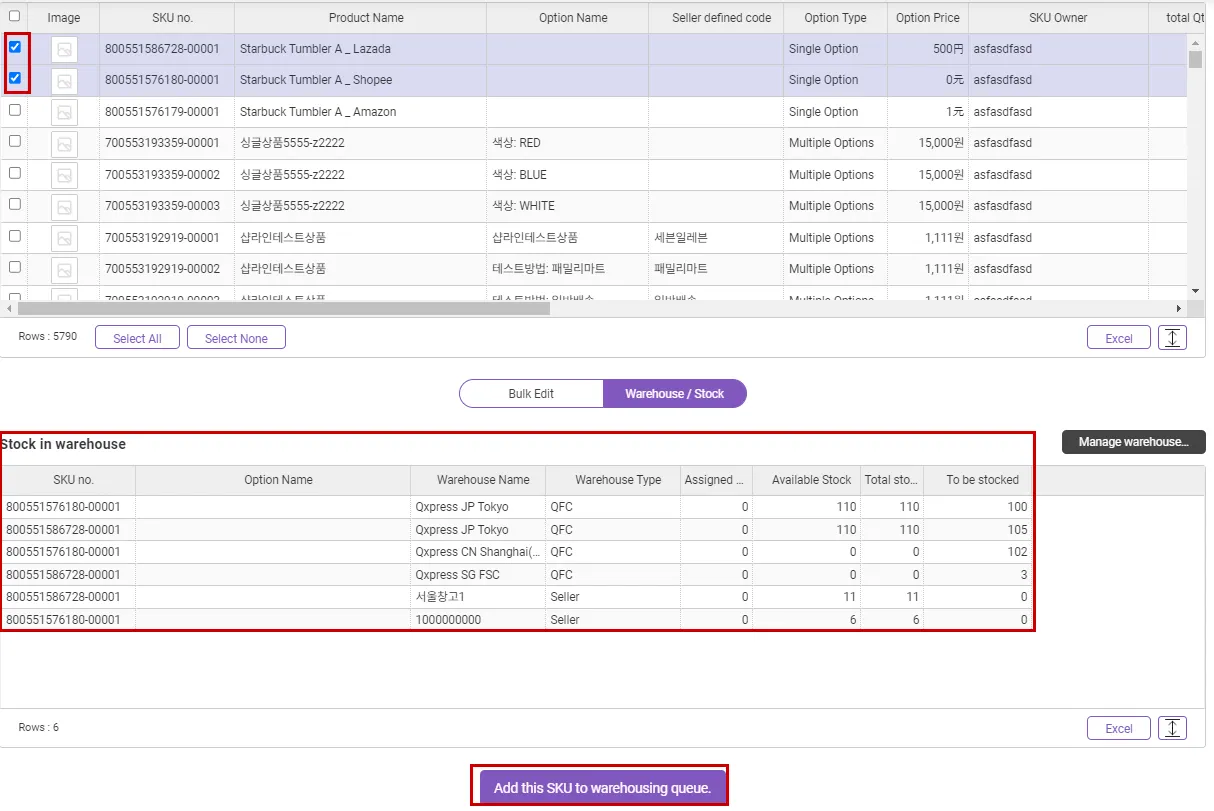
•
Add SKU bulk selection function
By selecting multiple SKUs in batches, you can quickly check the stock of only the selected SKUs and add the selected SKUs to the to be stocked list.
How to register a SKU
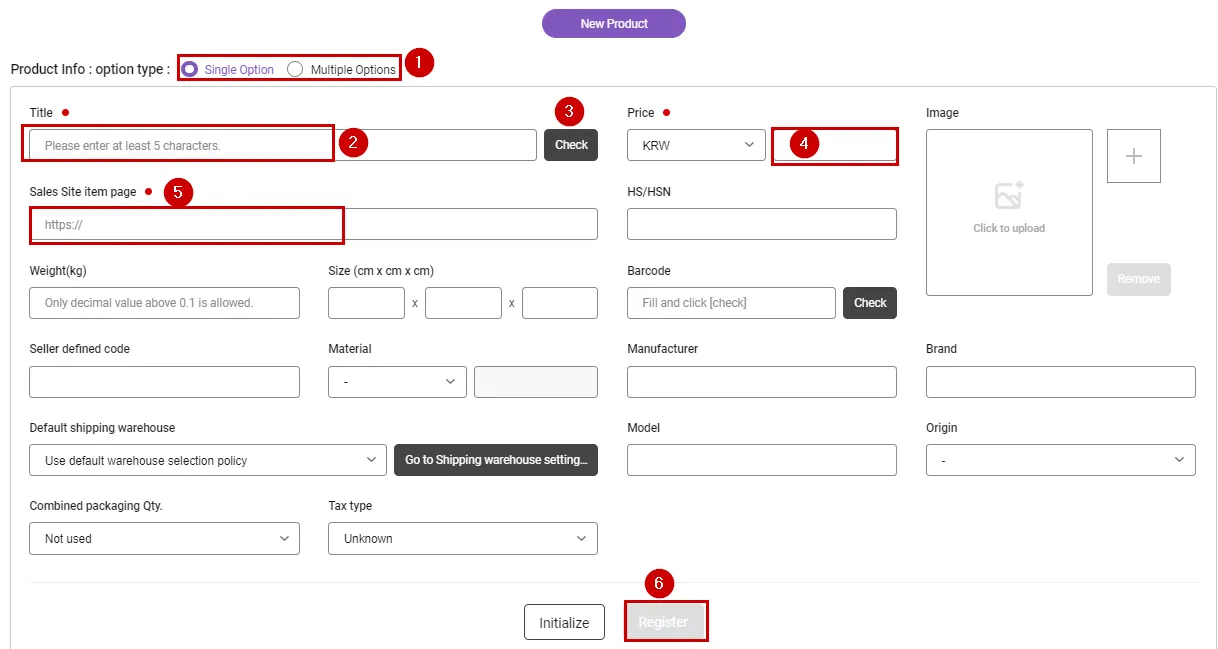
1.
Please select an option type depending on the product.
2.
Please enter at least 3 characters for the product name of the representative product.
3.
Click the [Check] button to check if the product name is a duplicate.
4.
Please enter the product price. (You can only enter numbers greater than 0 for the product price.)
5.
Enter the product page URL of the sales site.
6.
After entering all required information, the [Register] button will be activated. Click the [Register] button to register the product.
If the [Register] button is not activated, please check whether the required fields have been entered correctly.
Please check the guide below for details.

